Hierarchy-Document editor
Version selector
One version hierarchy can be displayed in this editor, and the current version is shown in the dropdown selector at the top of the editor. Click the down-arrow to select a different version.

Minimize or Expand the hierarchy view
The Minimize-Expand button (<<, >>) in the bottom left corner can be used to hide or show the hierarchy viewer. This is useful to maximize the screen space available during document editing.
Hierarchy toolbar
The toolbar is used to access the main functions for working on the hierarchy.

Use the buttons at the left to switch between
Tree view  and
List view
and
List view  .
.
The tool buttons are as follows. Note that most of the buttons are disabled (grayed out) when no document is selected.
| Icon | Function | Description |
|---|---|---|

|
Show only selected | (only in List view) Show only the documents that have been selected. The button color changes to blue when the restriction is active. |

|
Filter | Open the Hierarchy Filter tool. The button color changes to blue when the filtering is active. See Hierarchy filter. |

|
Reload | Refresh the contents of the hierarchy viewer. |

|
Revision Tag | Edit Revision Tags for the selected documents. See Revision Tags. |

|
Calculate | Run a Calculate operation on the selected documents. See Calculate. |

|
Run reports | Run the Reporting function to generate reports. See Reporting. |

|
Cancel edits for all users |
The action of this button is to turn off the Edit mode for all documents that are currently being edited, by any user, for the currently-selected documents in the hierarchy viewer. All document changes that are not published will be lost. To use this function the role 'Dataflow/Documents - Cancel Edit' must be granted to your user account. |

|
Copy selected documents to other Version | Copy documents from the current version to a different version. See 'Copy documents to other Version': Copy documents between versions. |

|
Manage Scenarios | Add or remove scenarios from the selected documents. See Manage Scenarios. |

|
Update Currency Settings | Change the currency settings for variables in the currently-selected documents. See Update Currency Settings. |
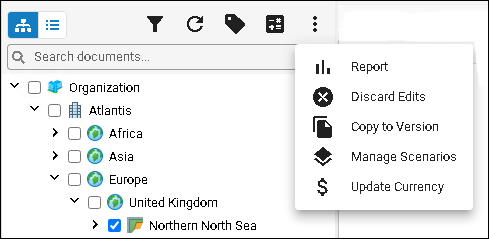
The toolbar has an 'overflow' menu which appears when the width of the viewer is not sufficient to
display all of the tool buttons. Click the Overflow button
 to access the tool buttons that are not being displayed; for example:
Viewing the hierarchy: Tree view
The hierarchy Tree
view shows
its hierarchy levels. To open or close a section of the hierarchy use the
'right'/'down' arrows in front of each document name.
The context menu of each document contains the actions Expand all children and Collapse all children to expand/collapse the view of the hierarchy levels underneath that document.
The actions Select document and children and Deselect document and children can be used to select/deselect documents in bulk.
Viewing the hierarchy: List view
Click the List view button in the toolbar.
This shows a flattened view of all of the documents in the hierarchy.
Use the Show only selected button
in the toolbar to restrict the list to show only
selected documents. The button color changes to blue when the restriction is active.
Searching the hierarchy
You can use the search box (Type to search documents...) below the toolbar to enter a string to match any sequence of letters that is contained in a document name (i.e., it works by substring matching).
In the Tree view, a restricted view of the hierarchy appears with matching documents are shown with yellow highlights, and all of the antecedant nodes for the matching document(s).
In the List view, a flat list of the matching documents is shown.
Click the X button at the right-hand end of the search box to restore the view to all documents.
Filtering the hierarchy
The Filter button
in the toolbar opens the
Hierarchy filter tool.

You can filter documents based on one or more Document types; if the document is in Edit mode; and/or by conditions based on the documents' Scalar properties.
Hierarchy filtering is key to the Dataflow Version 20 design principle that data operations are based on a unified interface (compared with the multiple separate tools of Version 16.5) where a set of documents can be selected by searching and filtering, and then a data action is applied to that set of documents; for example to apply Revision Tags, manage scenarios, or recalculate documents. Moreover the filter settings can be saved, managed and shared as presets.
In the Tree view, a restricted view of the hierarchy appears showing the filtered documents, and all of the antecedant hierarchy nodes for those documents.
In the List view, a flat list of the filtered documents is shown.
For details about filtering, see Hierarchy filter.
Document context menu
Each document has a context menu. Hover the mouse over the document name, a 'down caret' icon
![]() appears, and click this to open the menu:
appears, and click this to open the menu:
- New: see Create a Document
- Rename: Change the document name
- Delete: Delete the document
- Cut: Cut the document and all child documents so that you can use Paste to move them to a new location
- Copy: Copy the document and all child documents so that you can use Paste to make copies in a new location
- Paste: Paste document(s) in the current location
- Expand all children (only in Tree view)
- Collapse all children (only in Tree view)
- Open in a new tab: Opens the document in the Single Document viewer in a separate browser tab; the same action is possible using the mouse with 'Control-Click' on the document name
- Revision History: see Document Revision History and Restore
- Select document and children (only in Tree view)
- Deselect document and children (only in Tree view)
- DB Data Load: Opens the Data Loader blade where you can run a data loader job based on the Load from Database tool; see Data Loader from Database
- Data Aggregator: see Data Aggregator
- Data Propagator: see Data Propagator
- Prices: see Document Prices
- Permissions: see Document Permissions
Note: you can't use the 'right click' action to open the context menu since the Manage Data workspace runs in a web browser window and 'right click' will open the context menu of the browser software.
Multiple document editing
Only one instance of the Single Document viewer can run in the Dataflow Documents interface. However you can open multiple browser tabs (or browser windows), each running an instance of Documents, with a different document open for editing.
The document context menu has the action Open in a new tab which the document in the Single Document viewer in a separate browser tab; the same action is possible using the mouse with 'Control-Click' on the document name. (You can use the browser application's own tab management functions to arrange the tabs in single or multiple browser windows.)
Rename a document
Hover the mouse over a document, then select Rename in the context menu.
Type a new name in the dialog box and click the Rename button.
Delete a document
Hover the mouse over a document, then select Delete in the context menu.
In the dialog, click the Delete button. The deletion applies to the selected document and every descendant document that is below it in the hierarchy.
Important: the deletion is not reversible and the document data will be permanently deleted.
Hierarchy document management: Cut, Copy and Paste documents
You can make a copy of a document in a version hierarchy including all of its child documents, and paste the copy at a new location in the hierarchy. Alternatively, you can 'cut' the document (with all of its child documents) and move them to a new location.
These functions are accessed using the document context menu. Open the content menu for the document which is needed to be copied or moved. Click Copy or Cut.
Now find the destination document for the copy or cut and click Paste. The paste operation needs to be applied on the parent document (that is, one hierarchy level above) at the destination location of the document(s). If the document types are not valid to be pasted at a location then you will see an error message. If a document of the same name already exists at the destination location, a dialog will appear to type a new name.
The paste operation runs as a background process and the time taken will depend on the amount of documents and data being processed. You should wait for the notification message that the process is complete before performing further changes on the source/destination locations in the hierarchy. You can check the progress of the operation in the Notifications viewer.
Your user account must have appropriate permissions to perform a cut at a hierarchy location, and to paste documents(s) at a hierarchy location.
Revision History and Restore
Each time a document is published, it will be stored as a new revision, and the document's earlier states can be accessed as revisions as well.
The Revision History window for the document can be opened and used in two ways:
- In the Hierarchy View: hover the mouse over the document, then select Revision History in the context menu. In this mode you can only view the revision history and the list of changes for each revision.
- In the Single Document view-edit window: select a document in the hierarchy so that it opens for viewing in the editor at the right.
Click the View Revision History button
 in the toolbar.
In this mode you can view the revision
history, and load the content of a selected revision into the document editor's data fields (the data is read-only because data
in revisions cannot be changed). You can also
Restore a document revision, i.e., the current ('Latest') content of the document
will be replaced by the content in a stored revision.
in the toolbar.
In this mode you can view the revision
history, and load the content of a selected revision into the document editor's data fields (the data is read-only because data
in revisions cannot be changed). You can also
Restore a document revision, i.e., the current ('Latest') content of the document
will be replaced by the content in a stored revision.
The Revision History window lists the document's revisions, the date of each revision, and the user responsible for the editing. The Comment value will have been entered by the user in the Change Record when the document was Published. If the revision has been tagged, the revision tags will be listed in the Tags column.
If you click the left-arrow at the left-hand side to expand the revision information, there is a table listing changes to document variables in details.
The Revision History filter at the right-hand side can be used to filter revisions by a date range, and/or by changes to specified variables.
For more information see Document Revision History and Restore.
Cancel Edits for All Users
This function is performed with the button
Cancel edits for all users
in the hierarchy toolbar.
Note: This function requires the role 'Dataflow/Documents - Cancel Edit' to be granted to your user account.
The action of the button is to turn off the Edit mode for all documents that are currently being edited, by any user. All document changes that are not published will be lost. A confirmation dialog is used to make sure that the action is intended.
The action applies only to documents that are selected in the hierarchy. You could select only specific documents that you know are being edited, or select a sub-section of the hierarchy using Select document and children.