Regime Designer
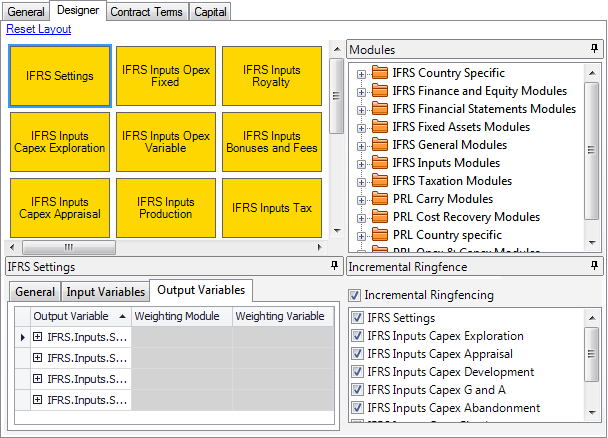
The Regime Designer is a tool for visual presentation of Regime modules and the calculation process. The components of the Regime Designer are described below.

The Regime Designer contains the canvas, the Modules pane, the Module Settings pane and the Incremental Ringfence pane.
The Modules pane contains the list of all available Regime modules arranged in categories. PRL in module names denotes modules provided from the Aucerna Regime Library (formerly, Palantir Regime Library). Click the "+" or "-" signs to expand or collapse a category. Modules are represented by colored rectangles. Module colors are arbitrary, however we recommend using them consistently. For example, the Aucerna modules use green for oil revenue modules and red for gas revenue modules. To see how modules interact with one another, use the Dependency Viewer tool (see Dependency Viewer).
Note: Since modules are programmed in a development environment, it is not possible to add or delete modules or variables in the Regime Designer; you can only drag-and-drop them on and off the canvas.
The canvas contains modules which perform various calculations. To add a module to a Regime, select it from the list in the Modules pane and drag it onto the Designer canvas. You can move modules around by dragging and dropping them. Each module has a number of input and output variables. Since modules are programmed externally, it is not possible to add or delete variables in the Regime Designer. You can specify the data sources for variables in the Module Settings pane.
The Incremental Ringfence pane is used to show and hide modules from the ringfence editor (see Setting up a ringfence) so that only relevant modules are presented to users. To hide modules, uncheck boxes next to their names.
The Module Settings pane displays the name of the currently selected module and contains three tabs: General, Input Variables and Output Variables.
The General tab includes two fields specifying the product associated with the selected module. The Applies to product field contains the name of the product type. The Stream # field contains the number of the product stream since one product type can have multiple streams.
The Input Variables tab shows where the module data are coming from. The Weighting Variable is the variable used to perform weighted-average calculations when projects are ringfenced.
Click on a cell to activate the drop-down list with available options.
| Column | Description |
|---|---|
| Input Variable | This column displays all input variables contained in the selected module. |
| Source | The source of the input variable value. This list includes four options: User Entered, Contract Term, Linked and None. If you select None, the variable will not be used by the Regime. If you select Linked, more fields will be displayed where you can select from which module and variable this value will be taken. |
| Weighting Module | Module which contains the variable chosen as the weighting variable. This field contains the list of all modules on the canvas and the <Default> option. If you select the <Default> option, the weighting variable settings will be taken from the Choose Weighting Variable fields on the General tab in the Regime. |
| Weighting Variable | Variable chosen as the weighting variable. This field contains the list of all output variables of the module selected in the Module field. |
If a variable is linked to another variable, the "+" sign next to it will be active. Click on it to view variable link settings. It is possible to combine variable values with the help of the Join operators.
| Column | Description |
|---|---|

|
Hides all other variables. To display all variables again, click on the X button in the top left corner of the table row. |
| ( | Select the level of opening brackets. |
| Source Module | The list of all available modules. |
| Source Variable | Contains the list of all output variables in the module selected in the Source Module field. |
| Operation | Select an operation involving a constant. |
| Constant | Enter the value. |
| ) | Select the level of closing brackets. |
| Join | Select an operation from the list to combine values of several variables. |
The Output Variables tab shows where data from the module are going to. It is organized exactly like the Input Variables tab, only in this case the settings define output variables which can be used as input variables elsewhere; for example, in other modules.
| Column | Description |
|---|---|
| Output Variable | This column displays the list of all output variables contained in the selected module. |
| Weighting Module | Module which contains the variable chosen as the weighting variable. This field contains the list of all modules on the canvas and the <Default> option. If you select the <Default> option, the weighting variable settings will be taken from the Choose Weighting Variable fields on the General tab in the Regime. |
| Weighting Variable | Variable chosen as the weighting variable. This field contains the list of all output variables of the module selected in the Module field. |
If a variable is linked to another variable, the "+" sign next to it will be active. Click on it to view variable link settings.
| Column | Description |
|---|---|

|
Hides all other variables. |
| Destination Module | Module into which the output variable data are fed. |
| Destination Variable | Variable into which the output variable data are fed. |