Data loading automation
PAGE CONTENTS
The API /PlanningSpaceDataflow/api/v1/dataimport allows for automation of batch imports from database,
CASH cx, Economics, or Financials data sources. The manual batch import process is explained in the
PlanningSpace 16.5
User Manual
(Data import
and export).
Jobs are always asynchronous, that is, the job is submitted to the IPS Server for processing, and a 'job ID' is generated. You will need to manually or automatically use API requests to monitor the status of each job (using the job ID), and handle any failed jobs.
The operations available via the API are: Initiate a loader job; Monitor job status; Retrieve job logs.
The loader jobs, for each type of data source, can use a 'SimpleImport' method (based on batch settings saved in Dataflow) or an 'AdvancedImport' method (which requires the the full specification of the loader job with mapping template, settings, revision comment, etc).
Authentication setup
All PlanningSpace Web API requests must be authenticated. For the loader API, the use of an API Key is recommended, as described below, and for more details see Authentication by API key.
Alternatively, it is possible to use OAuth-based authentication (where an authentication request returns a bearer token, which is then included in subsequent API requests) - for details see Authentication by OAuth.
Steps for using an API Key:
- Create a dedicated PlanningSpace user account for running loader jobs, and give this account the minimum required permissions for the task. (See PlanningSpace 16.5 User Manual: Users)
- Login to the tenant web interface ('https://ips.mycompany.com/tenantname') as the required user, and navigate to the web page 'https://ips.mycompany.com/tenantname/PlanningSpace/#/generateApiKey'; click Create key and then copy the API Key that is generated. (Note: the API key is not recoverable after this point, even for the tenant Administrator.)
- Use the API Key in every API request (see examples below) using HTTP Basic authentication where 'Username' is set to 'FeedKey' and 'Password' is set to the API Key.
Initiate a loader job 'SimpleImport'
In this case, the import must be already configured and stored as "batch import settings" in Dataflow.
For loading data from a database, use this POST request with no request body:
POST /PlanningSpaceDataflow/api/v1/dataimport/db/SimpleImport?batchTemplate=STRING&targetVersion=STRING&targetHierarchyPath=STRING
(Note: you do not put delimiter quote characters around the parameter values. The values do need to be URL-escaped, as shown in the code samples below.)
For version 16.5 Update 6 and later: In Load from Database batch settings, you can use the check box Load All Items to automatically select all items in the data file hierarchy. When this setting is used, any manual selections will be ignored.
The required parameters are:
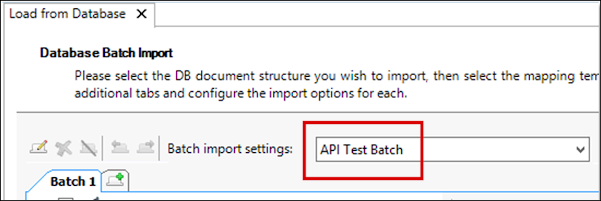
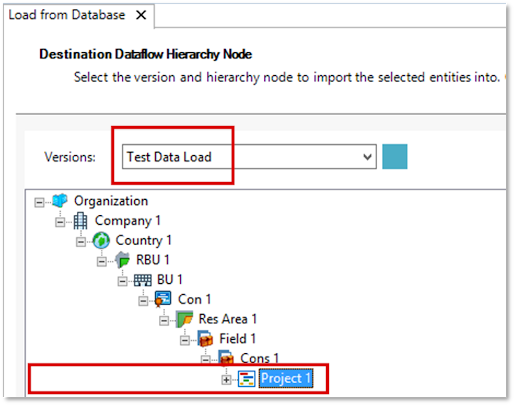
batchTemplate: the name of the saved "batch import settings" to be used; this can be read from the Dataflow UI as shown in the screenshot below:targetVersion: the destination Dataflow version (see the Dataflow screenshot below)targetHierarchyPath: the full path of the destination hierarchy node (see the Dataflow screenshot below)


The database loader can have additional parameters as 'Query Parameters': If any of the mapping templates to be used in the batch process contain query parameters defined in the Query Parameters tab (see screenshot below), these must be added to the API query string. For example:

POST /PlanningSpaceDataflow/api/v1/dataimport/db/SimpleImport?batchTemplate=STRING&targetVersion=STRING&targetHierarchyPath=STRING&WellName=STRING
The API response will be one of the following:
- Success (HTTP 200): the response body contains a UUID (alphanumeric) which is the 'jobId' of the loader job that is initiated.
- Failure (HTTP error): HTTP error code, error status, message.
Get Job Status
Once initiated via the API, the status of the job can be queried using the API request:
GET /PlanningSpaceDataflow/api/v1/dataimport/jobs/Status/{jobId}
where {jobId} is the UUID that was returned by the job initiation request.
The API Response will be one of the following:
- Success (HTTP 200): the response body contains a status string which is one of the following: Created, Scheduled, Running, Completed, CompletedWithWarnings, CompletedWithErrors, Error, Canceled
- Failure (HTTP error): HTTP error code, error status, message.
If the jobId in the request does not match any ID in the server you will get an HTTP 404 error.
(Note: Batch jobs can also be monitored, and cancelled, via the Job Queue interface in the PlanningSpace application. API-based control is available using the IPS Manager API, but access to this requires IPS Administrator permissions.)
Get Job Logs
After completion of a job, the job’s logs can be retrieved via the API request:
GET /PlanningSpaceDataflow/api/v1/dataimport/jobs/Logs/{jobId}
where {jobId} is the UUID that was returned by the job initiation request.
API Response:
- Success (HTTP 200): the response body contains a JSON array of log entries:
[
  {
    "logLevel": "Trace|Info|Warning|Error",
    "message": "string",
    "timestamp": "2019-05-22T13:23:05.792Z",
    "logger": "string",
    "detail": "string"
  }
]
If the jobId in the request does not match any ID in the server you will get an HTTP 404 error.
Code Sample (PowerShell): SimpleImport
The following commands will run in a standard Windows PowerShell without any extra setup. First, create two variables to hold the authorization string (you need to substitute your actual string for 'APIKEY'), and the PlanningSpace tenant address (again, you need to substitute your own server address and tenant name):
$base64AuthInfo = [Convert]::ToBase64String([Text.Encoding]::UTF8.GetBytes(("{0}:{1}" -f 'FeedKey', 'APIKEY')))
$tenantUrl = 'https://ipsserver.mycompany.com/TENANTNAME'
Every API request must contain an 'Authorization' header, as shown below.
The data loader POST request can be implemented as a PowerShell Invoke-RestMethod command like this:
Invoke-RestMethod -Method POST -Headers @{'Authorization' = "Basic $base64AuthInfo"} -Uri ($tenantUrl + '/PlanningSpaceDataflow/api/v1/dataimport/economics/SimpleImport?batchTemplate=API%20Test%20Batch&targetVersion=Test%20Data%20Load&targetHierarchyPath=Organization%5CCompany%201%5CCountry%201%5CRBU%201%5CBU%201%5CCon%201%5CRes%20Area%201%5CField%201%5CCons%201%5CProject%201')And a successful response will contain a job identifier (jobId) similar to this:
77dffe62-b80e-4d99-806b-d39a9aafec02
Use the jobId to check the status of the batch job:
Invoke-RestMethod -Headers @{'Authorization' = "Basic $base64AuthInfo"} -Uri ($tenantUrl + '/PlanningSpaceDataflow/api/v1/dataimport/jobs/status/77dffe62-b80e-4d99-806b-d39a9aafec02')And a completed job will have a logs file:
Invoke-RestMethod -Headers @{'Authorization' = "Basic $base64AuthInfo"} -Uri ($tenantUrl + '/PlanningSpaceDataflow/api/v1/dataimport/jobs/Logs/77dffe62-b80e-4d99-806b-d39a9aafec02') | ConvertTo-JSONThe API response will be in JSON format, beginning and ending something like the following example:
{
			    "value":  [
			                  {
			                      "logLevel":  "Info",
			                      "message":  "Setting up job 77dffe62-b80e-4d99-806b-d39a9aafec02",
			                      "timestamp":  "2019-08-14T15:20:00.1797354+01:00",
			                      "logger":  "Setup"
			  },
			//-----------------------------SNIP----------------------------------------------
			                  {
			                      "logLevel":  "Info",
			                      "message":  "Total Documents processed: 3\r\nExecuted @ LON-IPS15\r\nMetric: CreateDocumentTask - avg 00:00:00.0006202 (3) - Last avg:  00:00:00.0003581\r\nMetric: InitializeDocumentTask - avg 00:00:02.2171837 (3) - Last avg:  00:00:01.6015710\r\n",
			                      "timestamp":  "2019-08-14T15:20:22.6406289+01:00",
			                      "logger":  "Job"
			                  }
			              ],
			    "Count":  342
			}
Cancelling a job
Batch jobs that are queued or running can be cancelled with an API request that is a POST request without a body:
POST /PlanningSpaceDataflow/api/v1/dataimport/jobs/Cancel/{jobId}
In PowerShell this can implemented as:
Invoke-RestMethod -Method POST -Headers @{'Authorization' = "Basic $base64AuthInfo"} -Uri ($tenantUrl + '/PlanningSpaceDataflow/api/v1/dataimport/jobs/Cancel/3bb774ec-c8f2-4617-be95-fe429a08af56') Note that the API response will be blank whenever the jobId is valid, and whether a cancellation has happened or not. You can use the 'Status' API request to confirm that the job has the status 'Canceled'.