
Adding custom fields, configuring permissions, building custom tabs, etc.
Overview
In Aucerna Execute, a document is a collection of related fields. AFEs and RTDs are documents. The lists of values used by the application like accounts, partners, users, disciplines, etc. are all documents. A custom list field is also considered a document. Documents have many configuration options and all documents have the same options available. Configuration options include:
- changing display names
- adding fields
- configuring options at the document’s field level like editability, whether the field can be copied, its units of measurement, and filters on list fields
- rules around document creation, visibility, editing, search cards, footer tables in email notifications, document headers and display identifiers
Document Configuration
To configure a document, browse to the document name under Tools > Configuration. In order to edit the document configuration, you must have the Edit Document Config administrator privilege (Tools > Configuration > User Roles). On the left side of the Document Configuration page, there is a list of tabs for each of the configuration options. The tabs that begin with the word "custom", as well as the Archive Rule tab, all make use of Aucerna Execute’s graphical rule building tool (see Custom Business Rules).
Adding Fields
You can add fields to a document to track different types of data that may be required for the document approval, reporting needs or building workflow rules around. Adding a field to a document not only includes adding fields to AFEs or RTDs, but also includes examples like:
- Adding a field to the “Users” document to track a phone number so it could be pulled into a partner letter or form.
- Adding a field to the “Partners” document to track an inactivation date.
- Adding a field to the “AFE Type” document to track the types that relate to a well, so you can build a validation rule to enforce the entry of a primary well before route or release.
- Adding a field to the “Accounts” document to track whether the account is related to tangible or intangible costs.
An administrator must have the Add Custom Fields to Database and Edit Document Config administrator privileges (Tools > Configuration > User Roles) in order to create new fields for any document. After the addition of a new field, you will not be able to see the field until the Aucerna Execute service is restarted. This can be done if you have the Restart Aucerna Execute Service admin privilege, or you can ask an IT contact to restart the service for you. You need to ensure that users are logged out of the system (Tools > Manage Sessions) prior to restarting the service (Tools > Restart Aucerna Execute Service) as the restart will terminate their sessions if they are logged in and working.
Creating a New Field
To create a field, browse to the document name found under Tools > Configuration. For example, adding a field to an RTD would be done under Tools > Configuration > RTDs whereas adding a field to the “Users” list would be done under Tools > Configuration > Users. Click configure rules & fields beside the document name. Click the Create New Field button at the top of the Document Configuration page and then pick the field type. The field type you select will change the information required to create the field.
Below is a description of the field types.
| Field Type | Description |
|---|---|
| Text | Allows alpha, numeric and non-alphanumeric characters up to a maximum of 2000 characters. |
| Large Text | This is used for fields that would exceed the 2000 character limit of a regular text field. Fields for letters for AFEs and RTDs would make use of large text fields. These fields are less efficient to store in the database and have limited reporting options. They should only be used if you absolutely need to store very large blocks of text. |
| Yes/No | Appears as a Yes/No button. |
| Integer | A whole positive or negative number that would never have a decimal place (ex: Budget Year). |
| Decimal | A number that may have a decimal place (ex: drill depth, estimated number of days). |
| Currency | A value that represents money. Enables proper currency formatting and reporting. |
| List | Lists allow a list of values to be entered and the user is required to pick a single entry from that list. |
| UWI | Allows users to enter UWIs that follow one of these formats: DLS, NTS, FPS, GEO or API |
| Date | Prompts users to pick a date from a calendar. |
| Attachment | A field where you can pick from the list of attached files so that a custom rule (ex: validation rule, completion rule, email notification, etc.) can be built to check for the presence of an attachment. |
| Table | For data that should be represented in a table format (ex: Geological Prognosis on an RTx) |
For most field types, the information to enter to create the field is the same. The exceptions to this are text and list fields.

Click image to expand or minimize.
- Record – Select the record you are adding a field to. This will vary depending on the document you are creating the field for. If the field is a stand-alone field or a new table, then you would select the “Custom” option. If the field is being added to an existing table or sub view, select the table or sub view name. For example, if you are adding a field to the table in the Partners tab of an AFE or RTD, you would select the “Partners/Custom” record.
- Name– The display name of the field or table.
- Field ID– This will auto-populate as you type the field name up to 20 characters. The field ID must be unique. The field ID will be used as the underlying database field name. You can edit the Field ID if required.
- Active – Choose whether the field should be active or not. The default for this field is Yes.
- Custom Tab – If you select Custom for the Record, an additional Custom Tab field may appear where you can select the tab you want the field added to.
- Length – For text fields only, you can specify the length/character count to a maximum of 2000 characters.
For more information regarding creating tables, please see Adding Fields/Columns to Tables.
Creating a Calculated Field
Aucerna Execute supports adding Document-level Calculated Fields whose value is computed based on a formula, rather than entered by the user.
To create a field of this type, select the field type of “Calculated” when adding a new field.
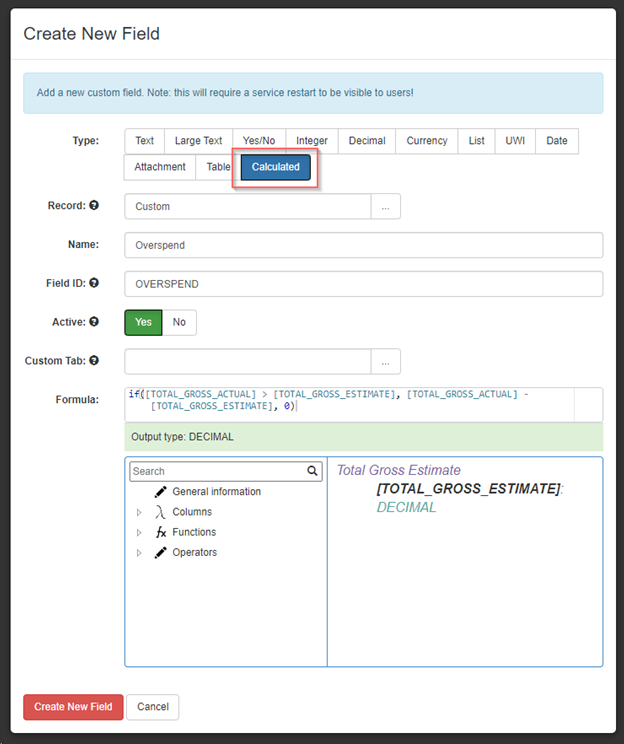
The primary difference between creating a regular field and a calculated field is that you must provide a formula when adding a new calculated field.
Formulas are defined similarly to Excel formulas, and the toolbox under the formula box makes it easy to find available columns and functions with which to build your formula. For more detail on building formulas, see Building Formulas.
The above example adds a calculated field called “Overspend” that returns the amount that the Actuals exceed the Estimate (if they do).
Just like any other new field, you must restart the Aucerna Execute service before this new field becomes available.
After the field has been created, and the service restarted, the formula defined for a Calculated Field can be edited on the “Formula” tab of the Field Configuration screen for that field. Any changes to a formula will take effect immediately and will not require the service be restarted provided that your changes to not alter the Output Type of the formula.
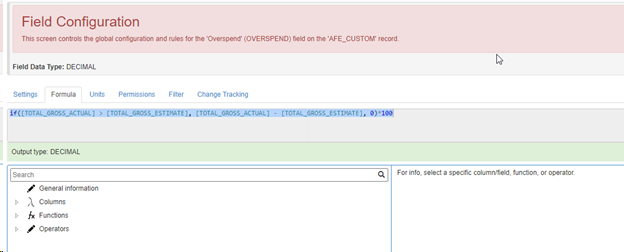
If you make changes that would cause the Output Type of the formula to change (such as converting a result from Text to a Number), you will see the following message and must restart the Aucerna Execute Service in order to see those changes.

List Fields
A list field is a document. When you create a list field, you must specify if you are creating a new document type. A new document type means this list of values does not already exist and therefore it is a new document. If you select Yes for Create New Doc Type, you must provide a name for the new document type. Below is an example where a new list field is created to track Area.
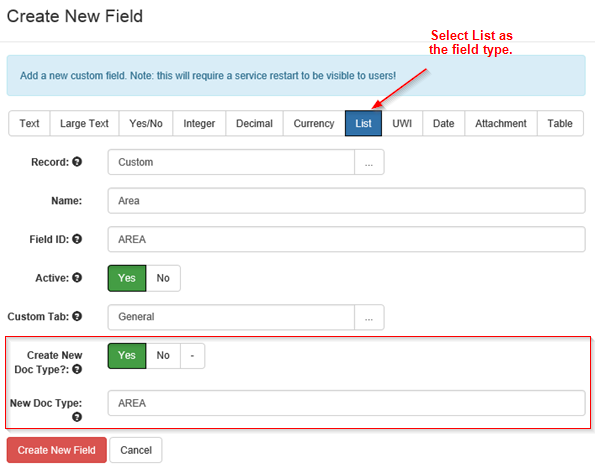
Click image to expand or minimize.
When creating a list field, you can use the same set of values as an existing list field. Select No for Create New Doc Type and then select the document name from the list of Existing Doc Types. Below is an example where a list field is created to track the Target Formation and the list of values is the same as an existing list called Formation.
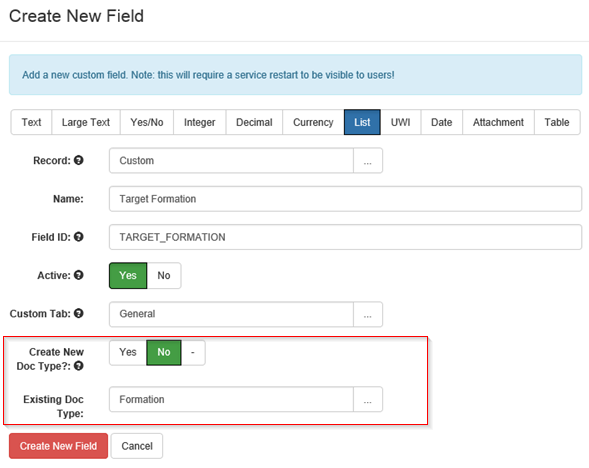
Click image to expand or minimize.
Adding Custom Fields to a List Field
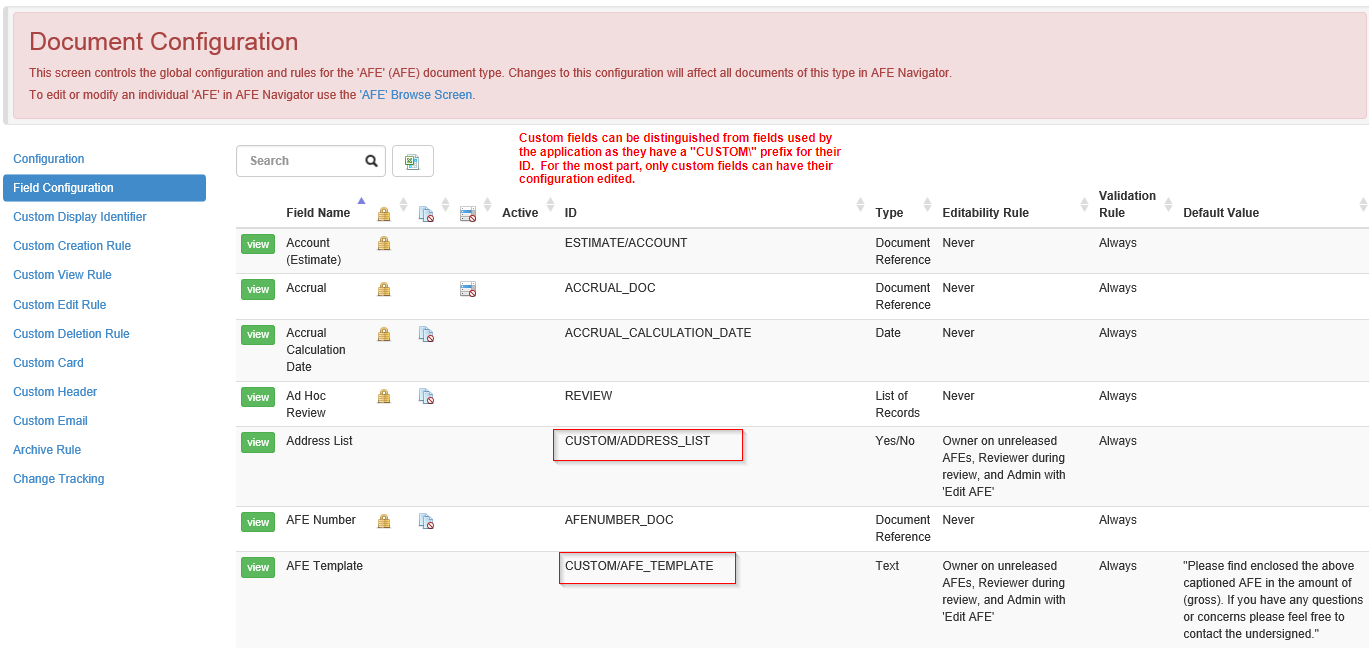
Since a list field is a document, it can have its own set of additional fields. An example of this is a list of areas that has related fields to track the area’s province or state, country and an area code that represents the area in another system (e.g., financial system, land system, etc.)
Click image to expand or minimize.
There are many reasons you may want to track related information on a list of values:
- When picking a value for the field, the additional information may help users select the correct value.
- The additional fields can be pulled into forms and letters.
- You can build validation rules against these additional fields.
- You can build workflow rules (ex: system review, approval, custom create rights) against these additional fields.
- You can pull this additional information into an email notification or use it to build a notification rule.
- The additional fields can be used to create a custom filter on the list.
- The additional fields can be pulled into the document header or used for a custom card.
- This information is required for integration with another system.
To add fields to a list field, you would first create the list field for the appropriate document type (ex: AFEs, RTDs, etc.). Then, after you restart the service, search for the new field name under Tools > Configuration > and click configure rules & fields. In the list’s Document Configuration page, click Create New Field.
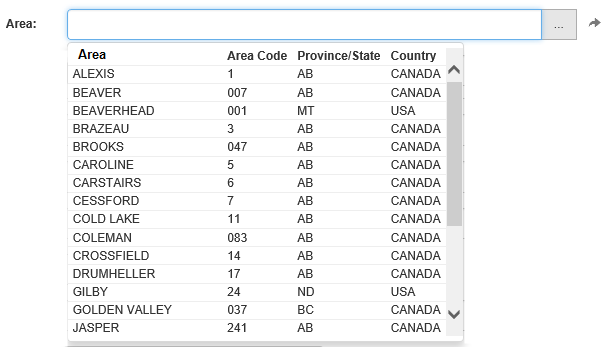
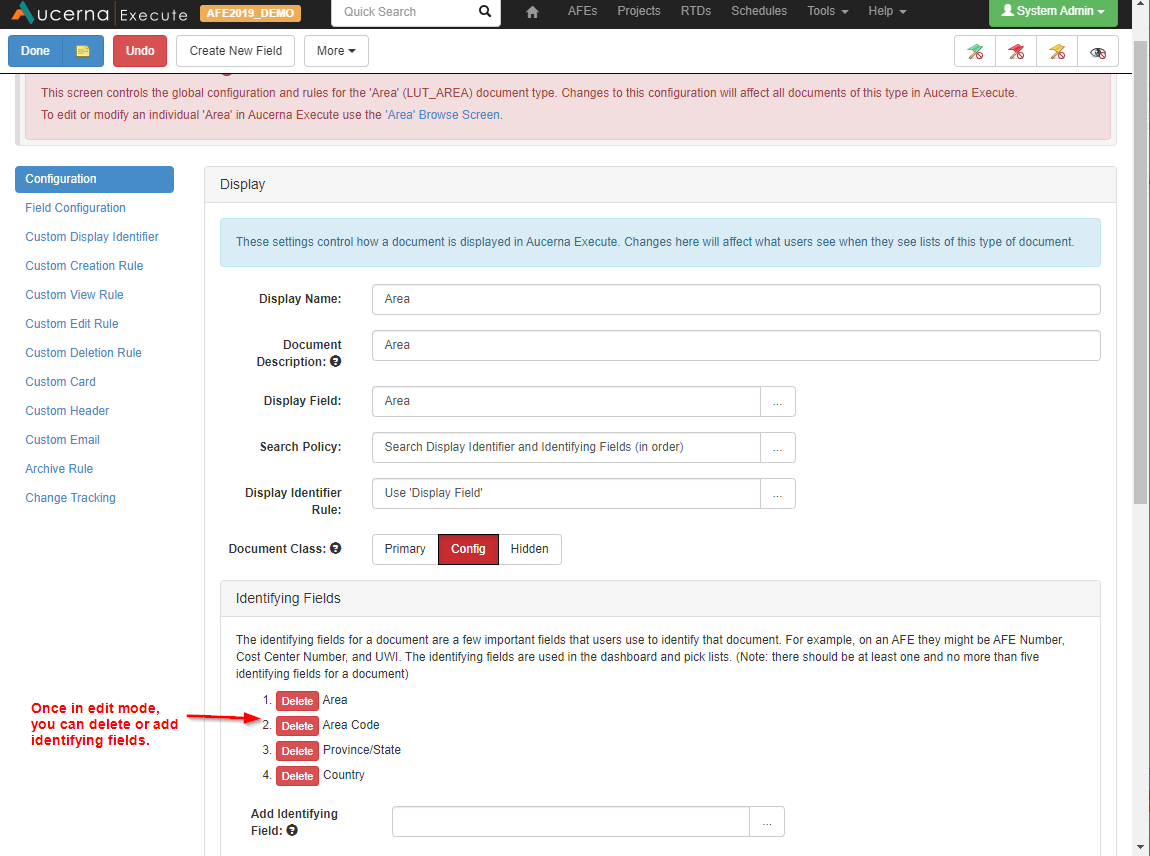
If you want users to see the values for any of the fields you created when they are selecting the initial list value, you must add those fields to the Identifying Fields for the list document. In the Area example above, users could see the Area Code, Province/State and Country when selecting the Area value. This is because these fields were added as Identifying Fields for the Area document in the Document Configuration page (ex: Tools > Configuration > Areas > configure rules & fields). To update the Identifying Fields, click Edit, remove or add fields, and click Done to save.
Click image to expand or minimize.
Adding List Values
Once you have created a list field, you have to add the values for the list. To add values to a list, you must have the Manage Custom Field List Values administrator privilege (Tools > Configuration > User Roles).
To add a list value, search for the name of the list under Tools > Configuration and click the view items button. You can either add list values one at a time or import them from a spreadsheet.
- If adding one at a time, click the Create New [field name] button, enter the value(s) and click Done to save.
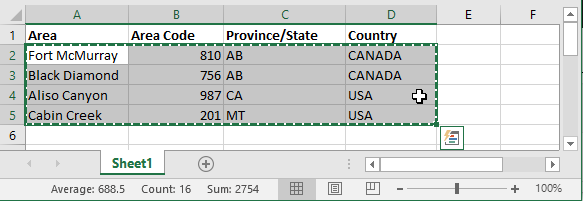
- If you have multiple values to add and you have the data in a spreadsheet, you can import them. First, copy the information from the spreadsheet.
Click image to expand or minimize.
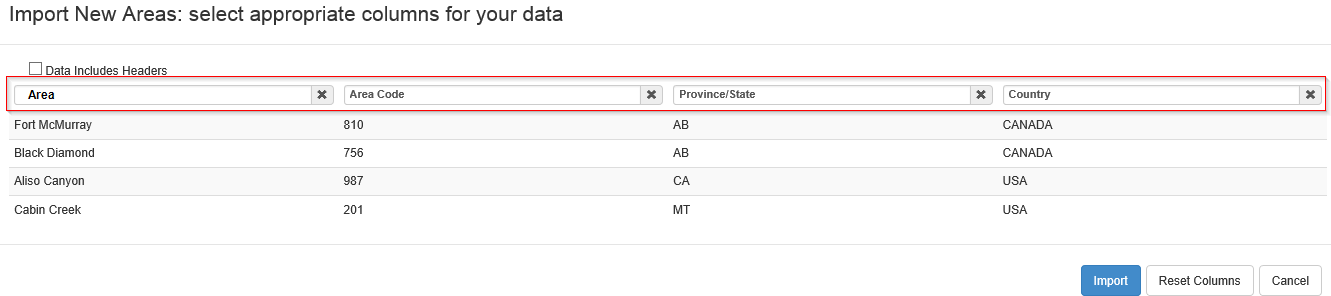
Then, click the Import Multiple [field name] button and click Ctrl + v to paste the copied data in the import window. Label the column headers so Aucerna Execute knows the information to import for each field. Click Import to import the values.
Click image to expand or minimize.
Adding Fields/Columns to Tables
After you create the record for the table (see Creating a New Field) and restart the service, you can add the fields or columns to include in the table.
To add fields to a table, browse to the document type under Tools > Configuration and click configure rules & fields. Click the Create New Field button and select the field type. The only difference between adding a field to a table versus adding a stand-alone custom field is the Record you select. The name you provided when creating the Table field has now been added to the Record list as Custom/Table Name. Therefore, when creating a field to be added to a table, you must select the Custom/Table Name option as the Record.
At this time there is no way to configure an order of columns within a table; they are sorted from left to right in ascending alphabetical order. Each user can configure the order of the table columns by clicking the gear button at the top of the table. This should only have to be changed once.
Configuration
On the Document Configuration page, the options in the Configuration tab control how a document is displayed and what users see when they looks at lists for that document.
- Display Name – the displayed name for the document.
- Display Identifier Rule – defines how to take a document and build a summary that is used when documents of that type are shown in list fields and log files, and can be used in emails, document headers and cards.
- Identifying fields – These are the fields that identify the document. The identifying fields are meant to be the unique values that could be used for searching for each document type. For primary documents, the Quick Search uses the identifying fields.
- Browse fields – This is where you set the default fields that show on the document’s browse page, unless the user has their own default fields, or unless you are viewing a browse report that has its columns specified.
- Permissions – You can control the permissions around who can create, view, edit or delete a document. For each of these, you can select a custom rule that is created in the appropriate tab on the Document Configuration page. Usually, these do not need to be changed.
Field Configuration
For each field in a document, there are several configuration options available like adding default values, updating the display name, help text, units of measurement, edit rules/permissions, copy rules, and rules to filter list values. To configure a field, browse to the document name that includes the field, under Tools > Configuration and click configure rules & fields. In the Document Configuration page, select the Field Configuration tab to see a list of all fields for that document. Fields that are used by the application can likely not have their configuration options edited whereas custom/added fields can be configured.
Click image to expand or minimize.
To view the field configuration options, search for the field and click the view button.
Click image to expand or minimize.
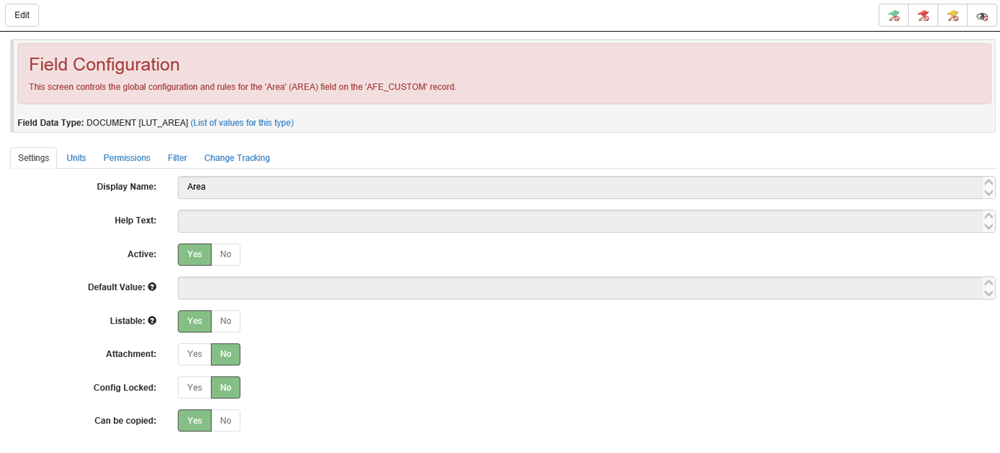
Settings
Below are the field configuration options available in the Settings tab:
- Display Name – Controls the field name that appears when viewing the document.
- Short Name – Overrides the field's full name in browse views.
- Help Text – When help text is added to a field, a question mark icon appears beside the field name when viewing the document.
Help text can be formatted using markdown/markup language to include tables, links to webpages, bulleted lists, bolded text, etc.
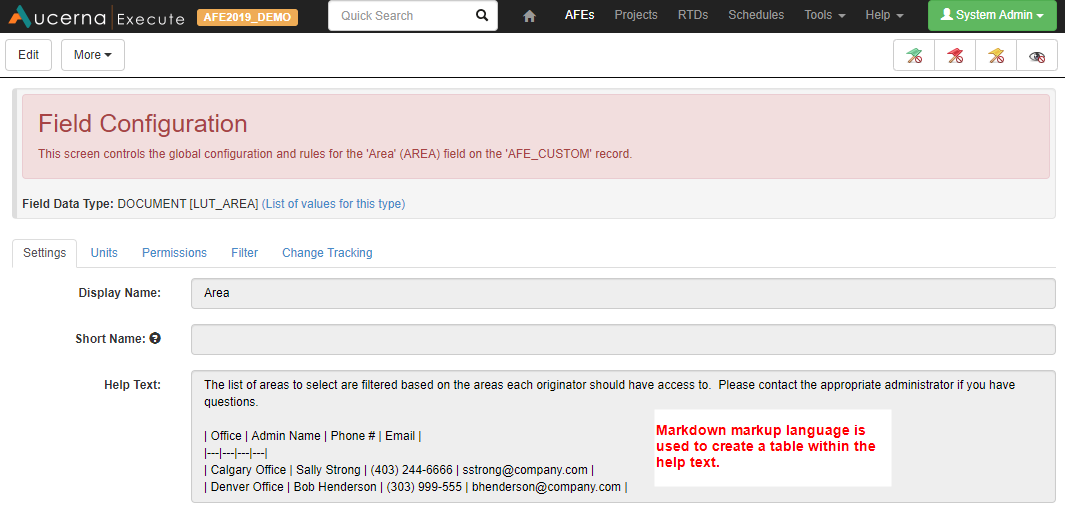
Click image to expand or minimize.
When you click on the question mark, the help text appears.
Click image to expand or minimize.
- Active – To hide a field from a document and reporting options, set the Active field to No. This does not delete any data for this field. At any time, the field can be re-activated by changing the Active field to Yes and all data for the field will be maintained.
- Default Value – When adding a default value for a field, you must consider the field type (e.g., List, Text, Numeric, etc.) as the value entered must have the appropriate syntax.
| Field Type | How to add Default Value |
|---|---|
| Text or Large Text | Add double quotes around the default text (ex: “CC-“). |
| List | Use the GUID for the list value. To find the GUID for a list value, browse to the list name under Tools > Configuration and click view items. Then, click view beside the desired default value. In the URL, you will see a long series of numbers and dashes that looks something like this: 1ae192b0-4977-4818-80a1-41cc8f8b5b65. This is the GUID for the list value. Copy this value and paste it in the Default Value field. Add double quotes around the GUID (ex: “1ae192b0-4977-4818-80a1-41cc8f8b5b65”). |
| Integer, Decimal or Currency | Enter the numeric value (ex: 500); there is no special syntax for the default value of an integer, decimal or currency field. |
| Date | Enter the date formatted YYYY-MM-DD HH:MM and converted to UTC (Coordinated Universal Time). If you want the default value to be the current date and time, enter DateTime.UtcNow |
| Yes/No | Enter true for Yes and false for No. |
- Can be copied – Set whether a field value is copied when the document containing that field is copied.
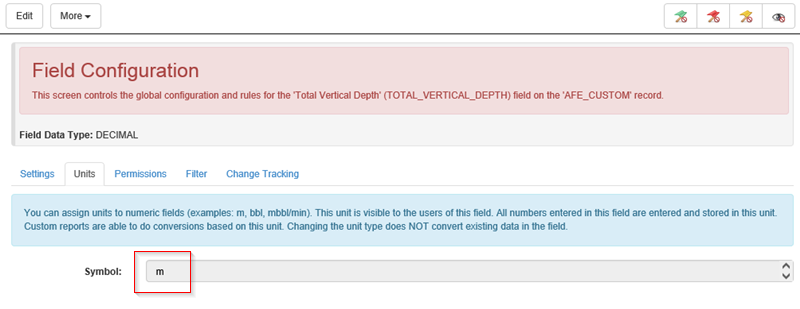
Units
For fields that have a unit of measurement, add the unit in the symbol field. For example, Total Vertical Depth is measured in metres so the unit of measurement is m.
Click image to expand or minimize.
When viewing the field in the document, the unit is added to the end of the field box.

Permissions
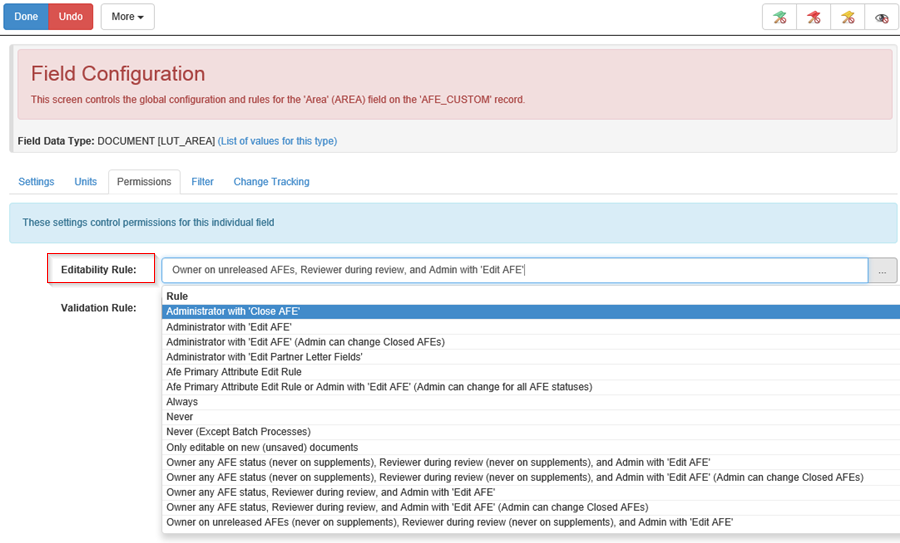
In the Permissions tab, the Editability Rule sets the rules as to who and/or when the field can be edited for that document.
Click image to expand or minimize.
Filter
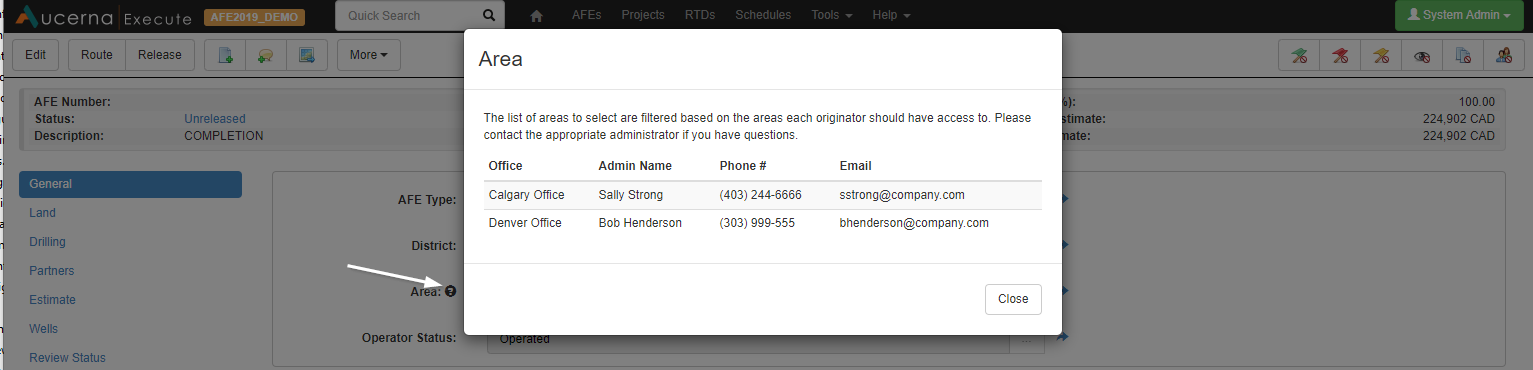
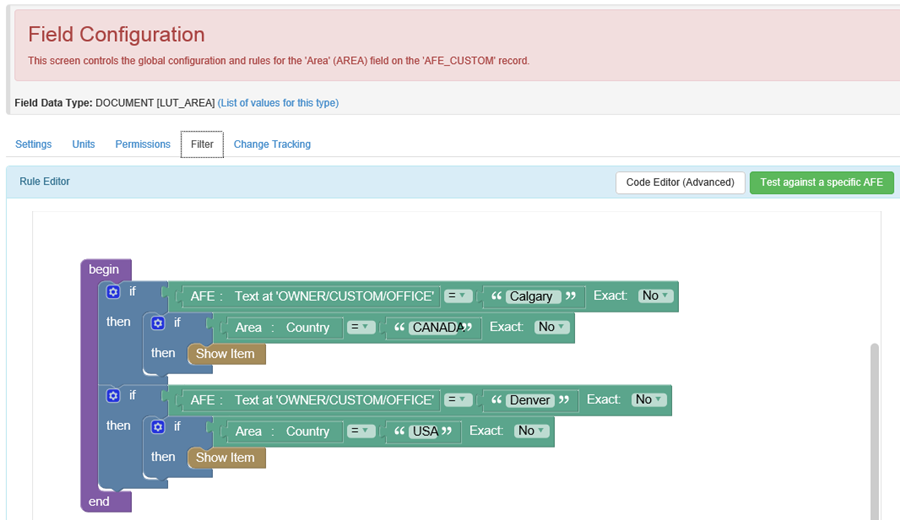
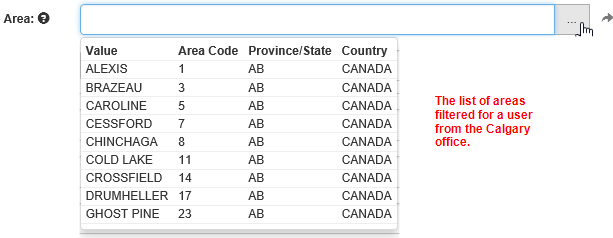
A filter can be used for list fields to limit the values that are shown. For example, if a company has people in multiple offices and the list of areas available for selection on an AFE should be limited based on the user’s home office, this can be accomplished by creating a filter on the Area field. First you would add a field to the Users document to track the office location (e.g., Calgary vs. Denver). Then, you can use the user’s office location to build a rule as to which areas to be shown.
Click image to expand or minimize.
The example above filters the areas list on the AFE document so that users in the Calgary office only see areas where the country is CANADA and users in the Denver office only see areas where the country is USA.
Click image to expand or minimize.
You can also use filters to limit the list of values shown based on other field values within the same document.
Custom Display Identifier
All documents have a display identifier that can be used to reference the document in log files, emails, document headers and cards. On the Document Configuration page in the Configuration tab you can see the display identifier rule (see Configuration). To make use of a custom display identifier for a document, you must select Custom Display Identifier for the Display Identifier Rule field.
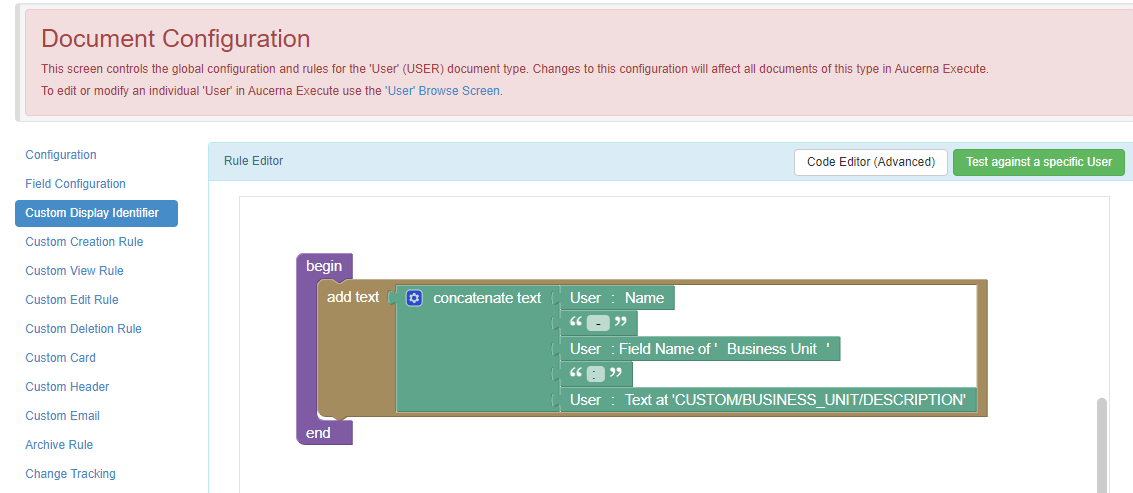
For example, your company may use the user’s display identifier for the owner name in the quick search card. The default identifier rule for the Users document is the user’s name. You may have other fields on the Users document that you would want to see on the card, like the business unit that the user belongs to.

Click image to expand or minimize.
The custom display identifier rule could be updated to display the business unit that the user belongs to after the user’s name.
Click image to expand or minimize.
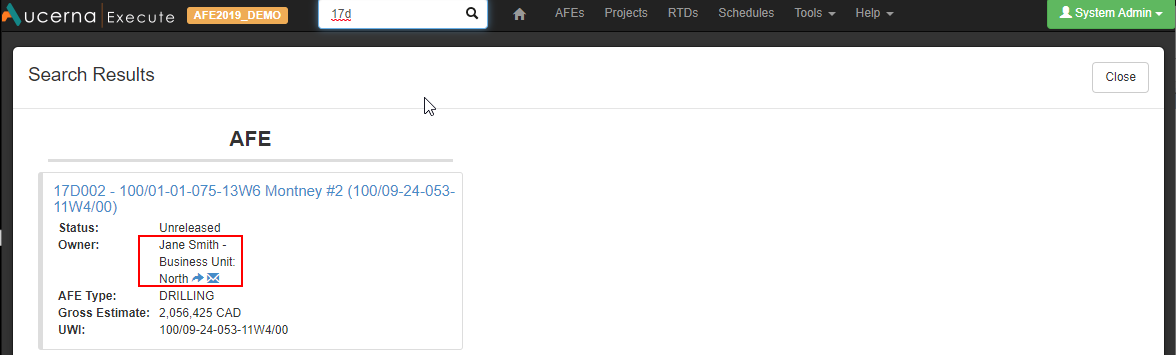
You would now see the owner’s name and business unit displayed in the AFE quick search card.
Click image to expand or minimize.
Custom Creation Rule
To make use of a custom creation rule for a document, on the Document Configuration page in the Configuration tab you must select Custom Creation Rule for the Creation Rule field. For the most part, the creation rule of a document is based on administrator privileges or create rights (for primary documents). There may be certain situations where these privileges are too restrictive, or not restrictive enough and therefore a custom creation rule is required.
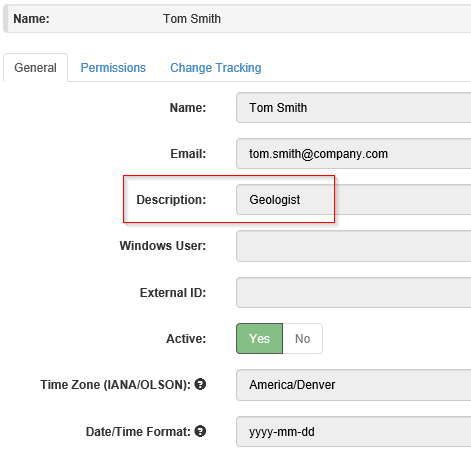
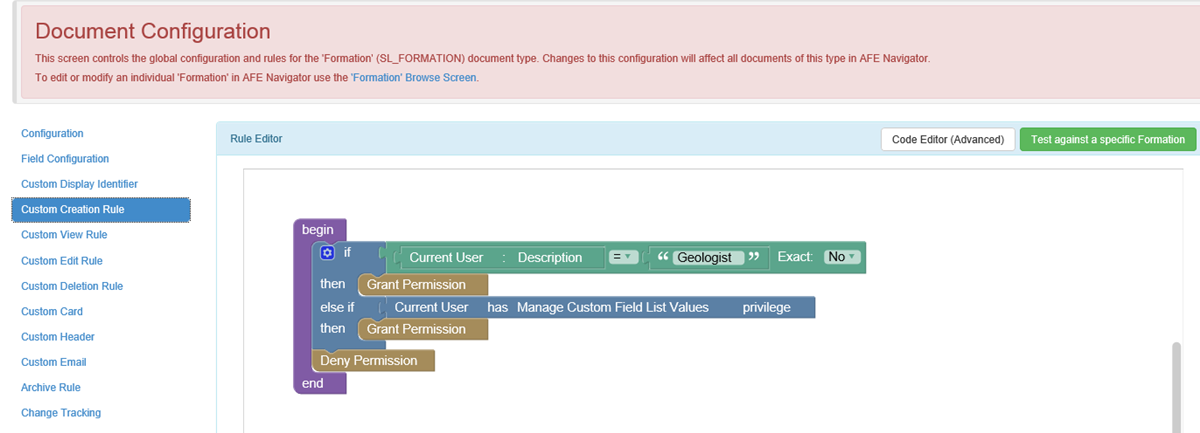
For example, adding list values to custom list fields typically requires the Manage Custom List Values privilege. However, granting a user this permission means they can add or edit the list values for any custom field. There may be situations where you want users with expertise in a certain area to have control over the list values for a given field, for example, allow a group of geologists to create new list options for the Formations list field. In this scenario, you could use the Description on the Users document to flag certain users as Geologist.
Click image to expand or minimize.
Then, you can use the custom creation rule for the Formation document to specify that anyone with either the Manage Custom List Values or a user description of “Geologist” can create new documents of that type.
Click image to expand or minimize.
Custom View Rule
To make use of a custom view rule for a document, on the Document Configuration page in the Configuration tab you must select an option referencing a custom visibility rule for the Visibility Rule field. The default visibility rules for various documents are as follows:
- AFEs are visible to any active user in the system.
- RTDs are visible to users involved in the workflow of that specific document and users with the following administrator privileges (Edit any RTD, View any RTD, and Approve RTD on Behalf).
- List fields are visible to all users.
For primary documents (AFEs, RTDs, etc.) you may want to limit which users can view certain documents based on some attributes of the document. For example, a company that has offices in different countries may want to limit the visibility of documents so that users can only see documents that pertain to work being done in the country of their home office. In order to build this kind of rule, you need a field on the Users document to indicate the user’s office location…
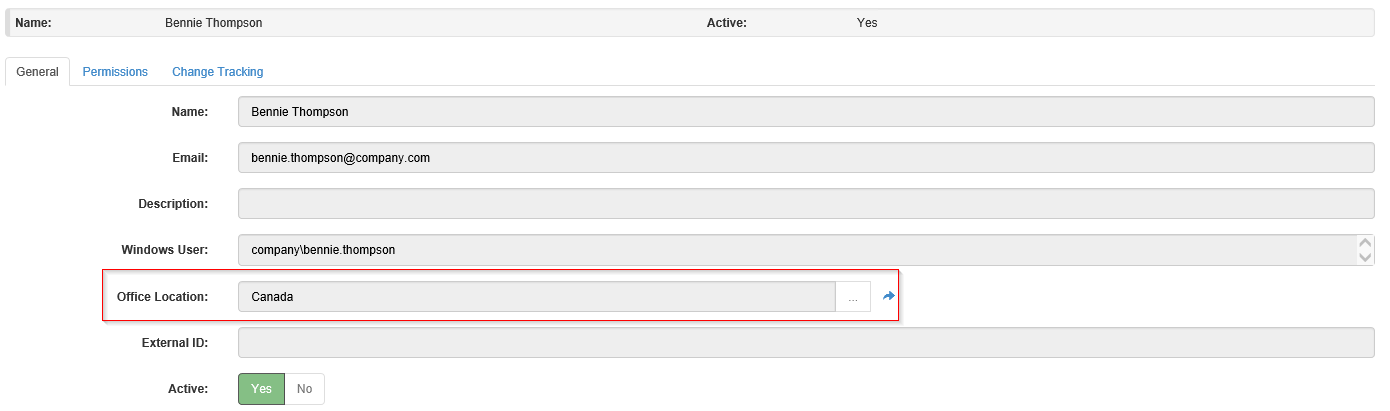
Click image to expand or minimize.
…and a field on the AFE that tracks the country where the work is being done.
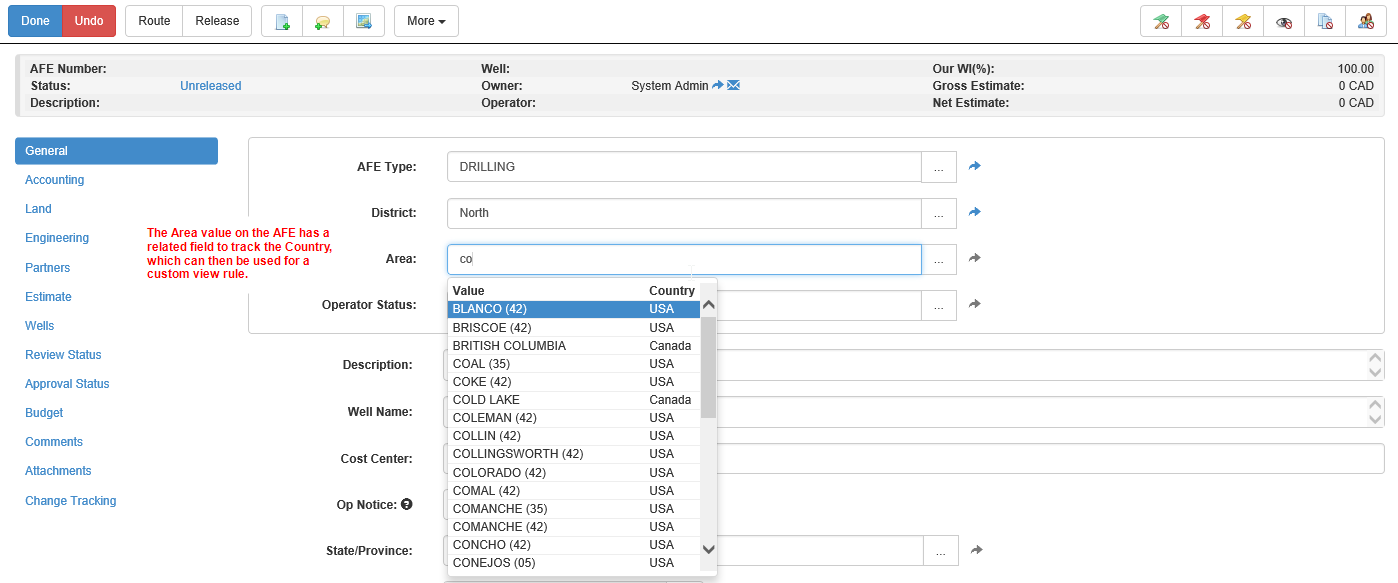
Click image to expand or minimize.
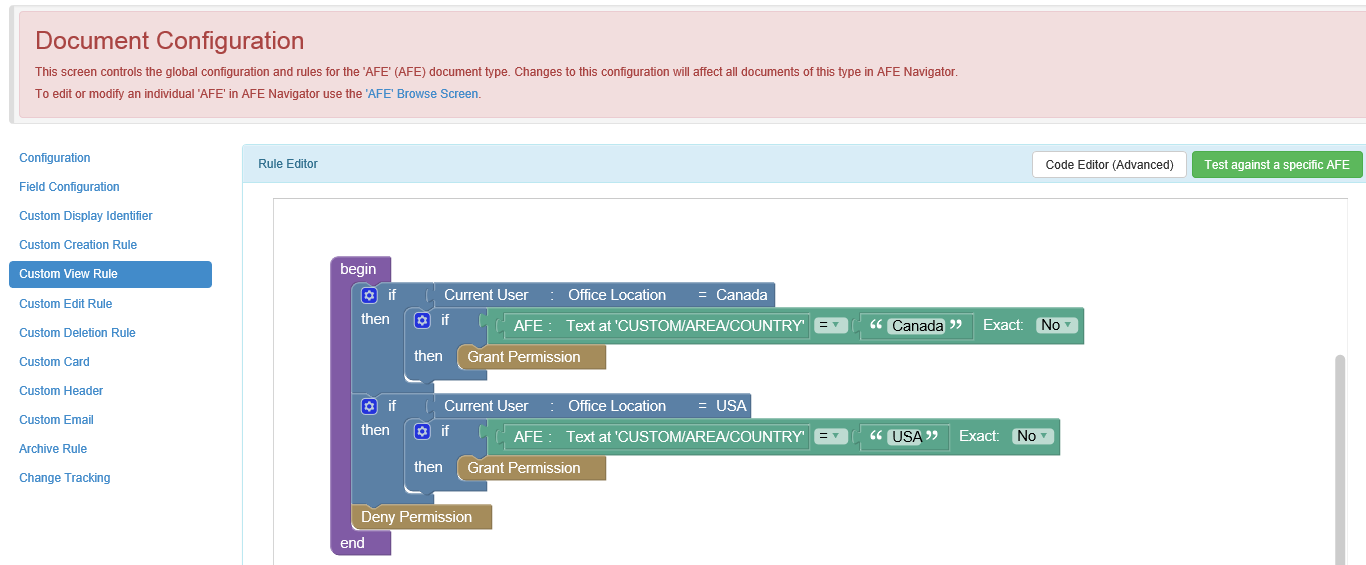
Now you can create a view rule around the office location of the user and the country referenced on the AFE.
Click image to expand or minimize.
Custom Edit Rule
To make use of a custom edit rule for a document, on the Document Configuration page in the Configuration tab you must select an option referencing a custom edit rule for the Editability Rule. If you have rights to edit a document, this means you will see the Edit button at the top of a document. For AFEs and RTDs, there may be additional editability rules at the field level that would prevent a user who can edit the document from making changes to all fields. There are also additional workflow rules that control who and when an AFE or RTD could be edited. For these reasons, creating custom edit rules for primary documents (AFEs, RTDs, etc.) is not recommended.
If you have created a custom creation rule on a document, you would likely also create the same rule for the custom edit rule to allow edits to existing values as well as creation on new values (see Custom Creation Rule).
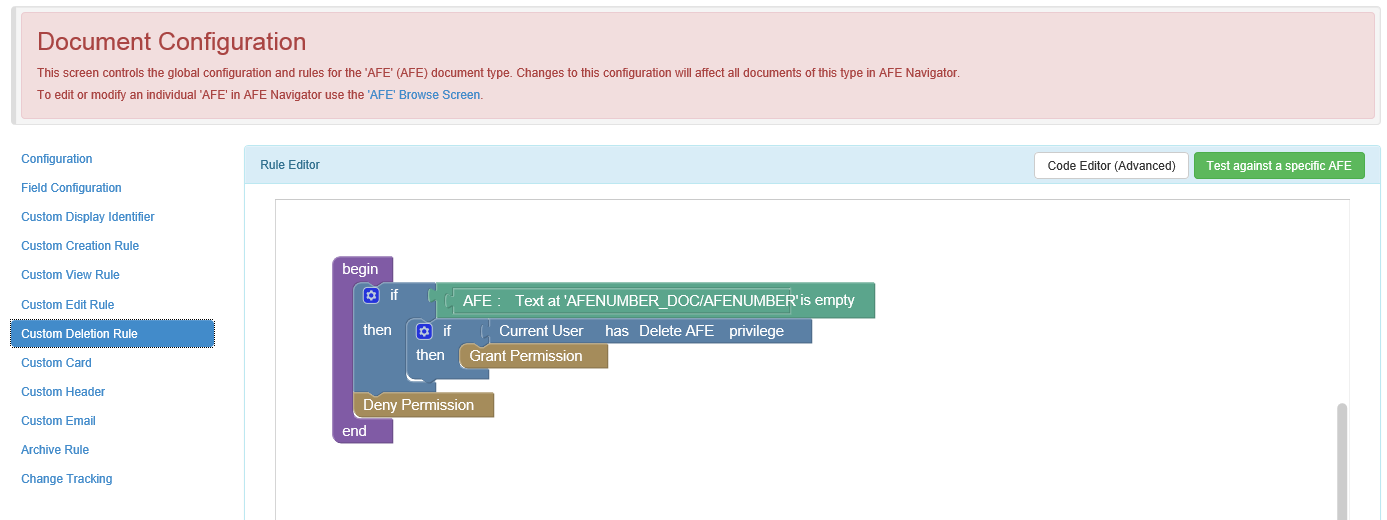
Custom Deletion Rule
To make use of a custom deletion rule for a document, on the Document Configuration page in the Configuration tab you must select an option referencing the custom deletion rule for the Deletion Rule field. By default, the ability to delete a document is restricted by administrator privileges.
- Deleting an AFE or RTD requires the Delete AFE/RTD privilege.
- Deleting a value from a custom list field requires the Manage Custom List Values privilege.
An example of where a custom deletion rule could be useful is for the primary documents (AFEs, RTDs, etc.) as you may want to limit the deletion of these documents based on some attributes of the document. For example, you may want to add a restriction that AFEs can only be deleted by administrators with the Delete AFE privilege and only if the AFE does not have a number.
Click image to expand or minimize.
A reminder that deleting documents may not ever be required as there are other ways to “hide” a document. Primary documents like AFEs and RTDs can be closed rather than deleted. Closing a document pulls its reference from any workflow lists, dashboard widgets or field cost entry pages, however the document can still be searched and possibly re-opened if required. As well, most list field values can be made inactive rather than deleting the value. An inactive list value could not be selected for future documents but would still be shown on any document where it had previously been selected and the value could be re-activated at any time. Deleting a custom list value will still show the list value where it had been selected on any other document but you would not be able to reactivate the value without a database script.
Custom Card
The Quick Search window in the toolbar is where you can search for primary documents based on their identifying fields (see Document Configuration). If results of the search are found, they are displayed in a card format.
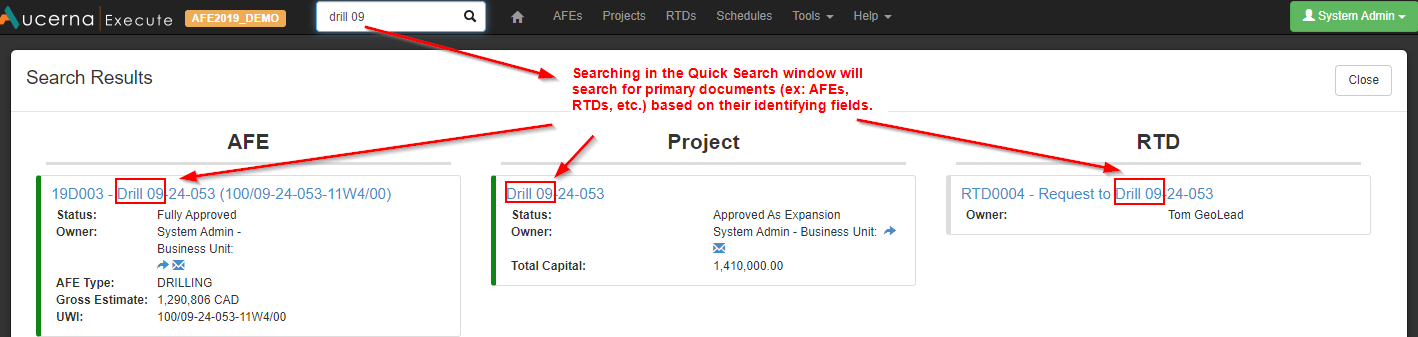
Click image to expand or minimize.
You can customize the cards for your company and even create rules to differentiate the cards based on the user doing the search or some attribute of the document. For example, you could create a rule to show the operating company's AFE number (outside AFE number) for a non-operated AFE.
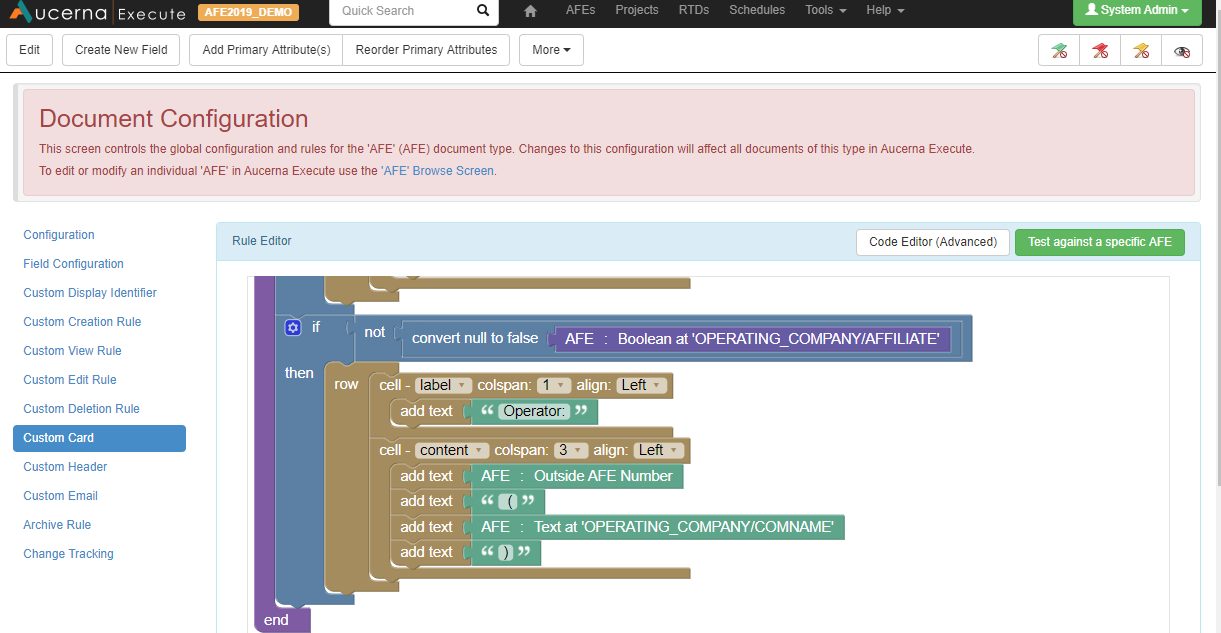
Click image to expand or minimize.
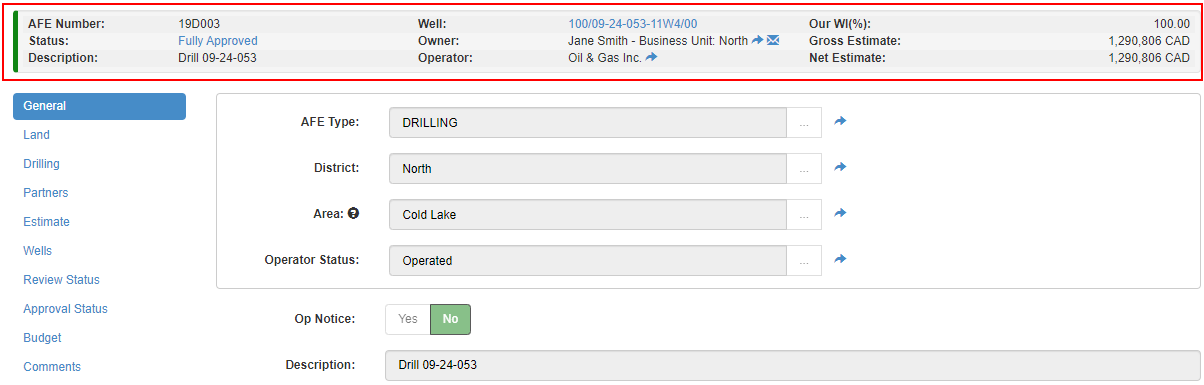
Custom Header
When viewing a document, a header is displayed at the top of the page with information regarding the document being viewed. If you click on tabs in the document, the header stays visible.
Click image to expand or minimize.
You can customize the header for your company’s business needs and create rules around the header display based on some attribute of the document being viewed or the user viewing the document. For example, you could create a rule to show either the cost center or the mineral file number depending on whether the viewing user has a description of Accountant or Land.
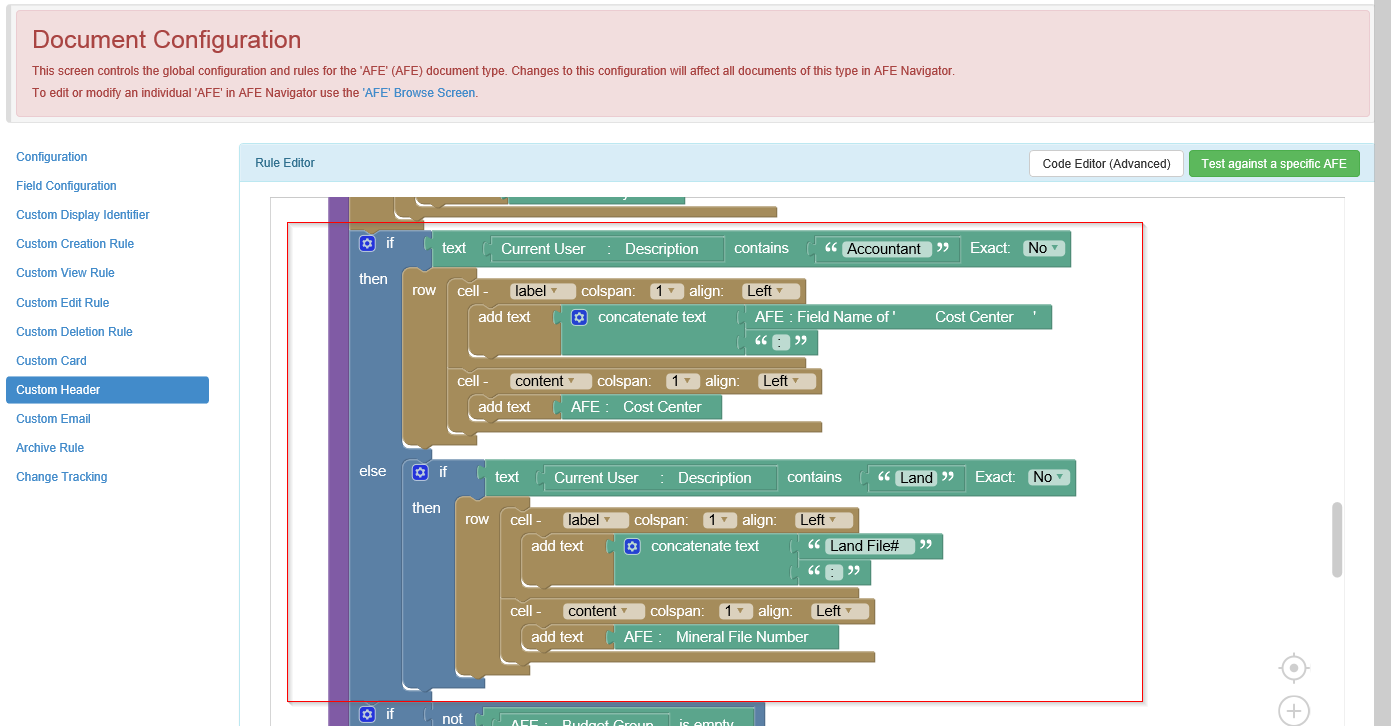
Click image to expand or minimize.
Custom Email
Aucerna Execute allows an administrator to build any number of custom email notifications and email reminders for any document type in Aucerna Execute (AFEs, RTDs, etc.).
Notifications are emails that are sent immediately upon changes to a single document (AFE, RTD, etc.). Notifications are intended to push the workflow forward.
Reminders are scheduled emails that will include information about multiple documents and are intended as a lightweight report.
An administrator must have the Edit Notifications privilege to create email notifications and the Email Reminders privilege to create email reminders (Tools > Configuration > User Roles). In the message body of the email notifications, there is a footer table that shows data from the document. This table is configured in the Custom Email tab of the Document Configuration page. Email reminders and event email notifications do not show this footer table.
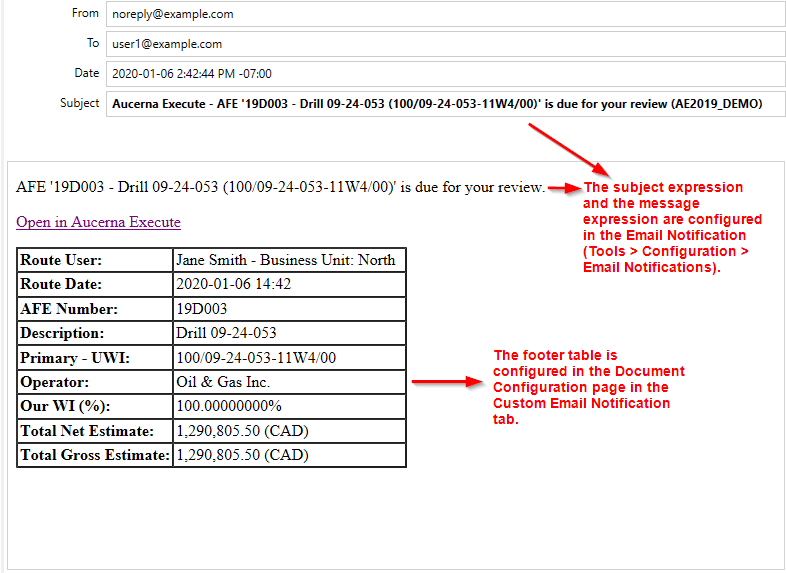
Click image to expand or minimize.
For more information regarding configuring email notifications and reminders, see Email Reminders and Notifications.
Archive Rule
In order to improve performance of reporting and searching on large datasets, documents can be archived and therefore not included by default in reports and searches. For more information, please see (see Archiving Documents).
Custom Tabs
For any document, including custom list fields, you can create a custom tab and configure the display of fields, sub views, separators and text sections for that tab. Configuring custom tabs requires the Document View Configuration and Edit Document Config administrator privileges (Tools > Configuration > User Roles).
By default, the application has custom tabs already created for certain documents:
- An AFE has custom tabs for the General tab, Partners tab and any views that existed on the Custom tab for clients upgrading from a version prior to 8.0.
- An RTD has a custom tab for the General tab, Application tab and a tab for each discipline.
- Lists used by the application like Partners, Users, Accounts, have custom tabs.
Creating a Custom Tab
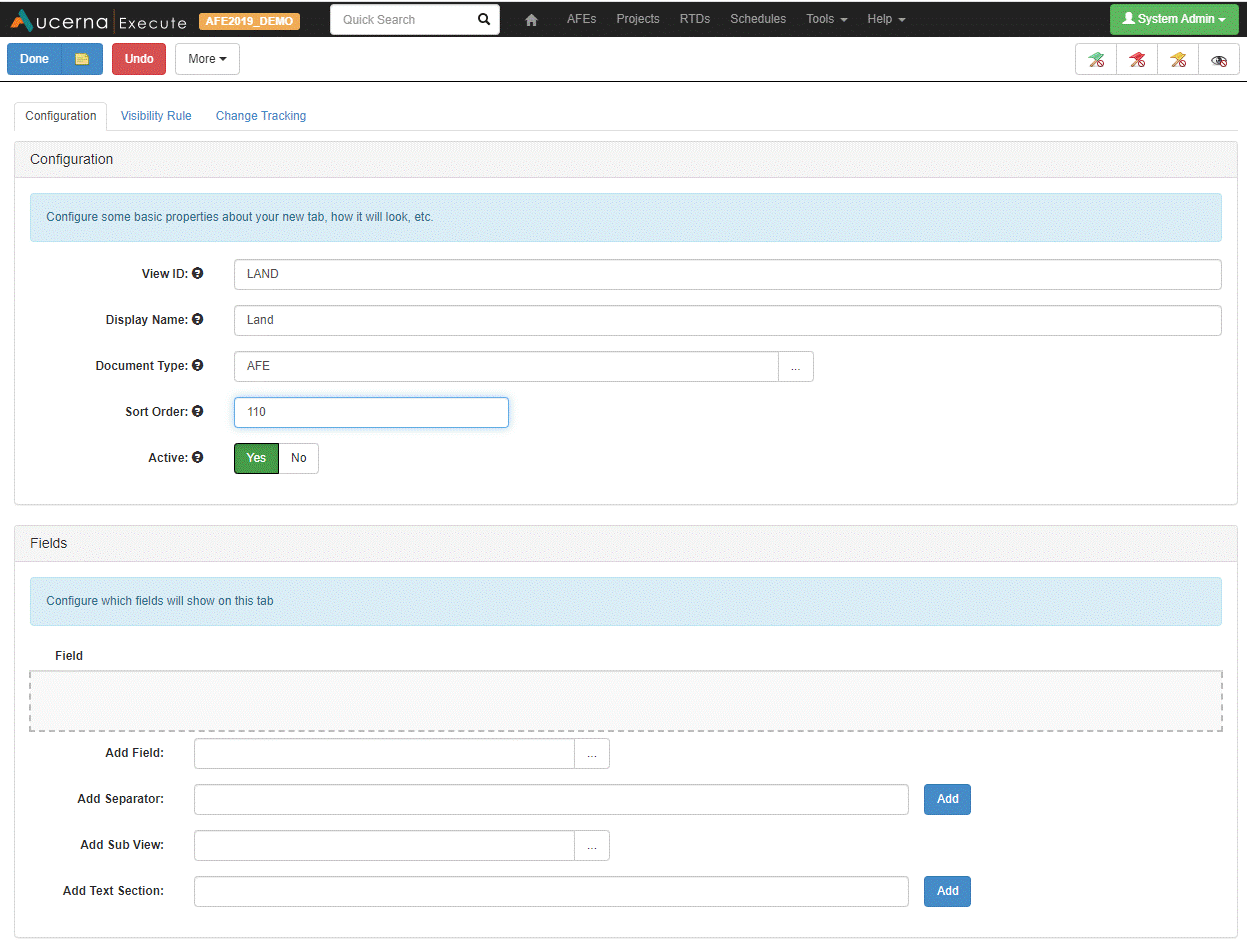
To create a custom tab for a document, select Tools > Configuration > Custom Tabs:
- View ID: An identifier for the tab visible to users in the URL. It is recommended that this be consistent with the Display Name.
- Display Name: The name of the tab as it is shown on the document.
- Document Type: The document you are creating a tab for.
- Sort Order: For custom tabs, select a sort order in the range of 100 to 200.
- Active: You can hide a tab at any time by making it inactive. This does not inactivate the fields on the tab.
Custom Tab Configuration
You can configure a custom tab by adding and removing fields, adding separators, sub views and text sections. You can also set visibility rules to determine whether a tab is visible. Select Tools > Configuration > Custom Tabs and click view items to see a list of custom tabs. Click view beside the tab you want to configure. You must click Edit before you can make changes to a custom tab.
Configuration tab:
- Add a field: Search for the field name in the Add Field list.
- Remove a field: To remove a field, click the trash can button.
- Add a separator: A separator is a title for a group of related fields. Enter the separator’s text in the Add Separator field and click the Add button.
- Add a sub view: A sub view is either one of our default tables (e.g., Partners, Estimates, Wells, etc.) or a custom table. Displaying a sub view on multiple tabs means that the sub view can be edited on any tab, but will only have one set of possible values.
- Add a text section: A text section can be used to add a block of text to the custom tab. You may want to do this to provide some information to users regarding the fields on the custom tab. To add the text section, type the text in the Add Text Section field and click the Add button. You can use Markdown markup language to add formatting to a text section.
You can change the position of fields, separators, sub views or text sections by dragging and dropping them to move them up or down in the list.
Click image to expand or minimize.
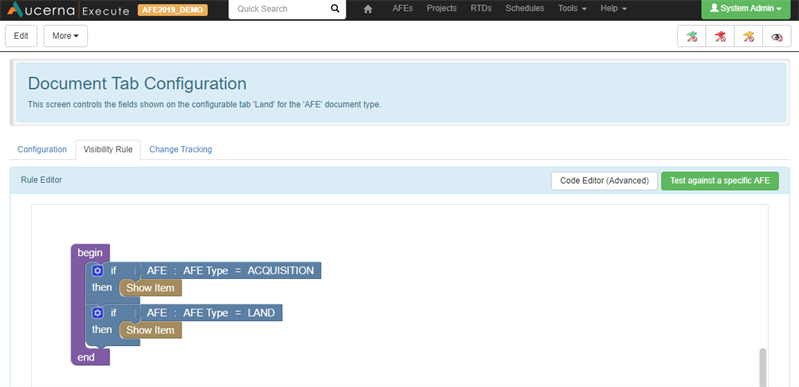
Visibility Rule
You can create a visibility rule to determine whether a tab will be hidden or visible based either on an attribute of the document or the person viewing the document. When deciding to hide a tab, you must consider whether any custom business rules exist making fields mandatory (i.e., you would not want mandatory fields to be on a hidden tab).
Click image to expand or minimize.