
Val Nav Integration Service Example
This document provides detail on the use of the new import API as well as using the existing APIs to run economic running a PowerShell script. Click here to download a sample PowerShell script.
The high-level steps are:
- Set up the integration service
- Connect to the integration service
-
Import data
- Wells and header data
- Production forecast arrays
- Capital costs
- Operating costs (by proxy)
- Retrieve the DB config for economics
- Run economics
- Retrieve database results (since there is no first-class API for this yet)
Set up the Integration Service
To set up the integration service:
- Copy the Val Nav 2022 DB to a local location (e.g. D:\temp\). Click here to download.
- Install, configure, and verify the integration service.
- Configure the service to point to the .vndb from step 1:
- Open C:\Program Files\Quorum Software\Value Navigator Integration Service 2022\Eni.ValueNavigator.IntegrationService.exe.config
- Use the following sample database to configure it (e.g., <value>D:\temp\integration_service_2022.vndb</value>)
Connect to the Service
To connect to the service:
Run the script:
$sysResult =s Invoke-restricted -Uri "http://localhost:8081/api/system" -UseDefaultCredentials
This issues a GET request to the /api/syhstem endpoint and validates the result. If successfully connected, the script proceeds.
Note that the entire script takes advantage of the fact that we're using a .vndb file which only has the default admin user to avoid Active Directory and NTML authentication. This will be required in the real world but this example skips that.
Import Data
This database is empty of wells to begin with. It has a single custom field called Area and a corresponding Area hierarchy defined:
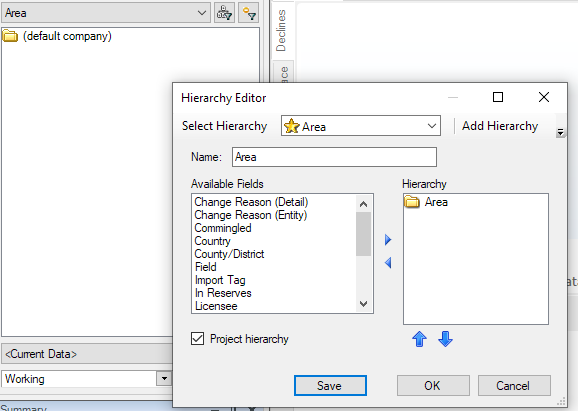
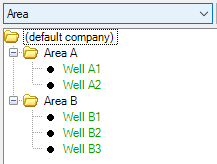
The first step is to bring in wells and headers, including populating the Area hierarchy with two areas, Area A and Area B:
$csvBody = @"
UWI,Product List,Well Type,Area,Country,State/Province
Well A1,Oil,Oil,Area A,United States,Texas
Well A2,Oil,Oil,Area A,United States,Texas
Well B1,Oil,Oil,Area B,United States,Texas
Well B2,Oil,Oil,Area B,United States,Texas
Well B3,Oil,Oil,Area B,United States,Texas
"@
$importParams = @{
Import = $csvBody
DataArea = "Well Info and Custom Fields"
UpdateMode = "Merge"
Header = "1"
}
$importResult = Invoke-restmethod -Uri "http://localhost:8081/api/csvImport" -UseDefaultCredentials -Method "POST" -Body $importParams
And the result: wells.
As large imports can take some time to process, the endpoint returns a job status ID, which you can poll until the import completes. This is done in the script but it's not shown it here.
The script continues with more imports, one data area at a time. Of note is the operating costs import, which does the import by proxy – it does not identify individual wells but just areas. In the CSV payload, see that the UWI is just Area A and Area B, and the additional paramater (Proxy = “Proxy - Area”) in the request body.
$csvBody = @"
UWI,Plan,Reserves Category,Date,WI Fixed Op Cost,WI Variable Op Cost - Oil
Area A,Working,PUD,Jan 2023,3000,5
Area B,Working,PUD,Jan 2024,3500,4.5
"@
$importParams = @{
Import = $csvBody
DataArea = "Operating Costs"
UpdateMode = "ReplaceAll"
Header = "1"
Proxy = "Proxy - Area"
}
At this point, the imports are complete. This is the point where most client integration will end – the database has been updated. But for this example, we’re going to take it further and automate an economic run for these wells.
Configure Economics
The next section of the script deals with obtaining the necessary information to run economics: hierarchy nodes, plans, reserves categories, and scenarios (or jurisdictions). Each of these has endpoints to retrieve the current database config. In this case we’re hard-coding Working - TP for the sole Reserves jurisdiction in the DB.
$jurisdiction = Invoke-restmethod -Uri "http://localhost:8081/api/jurisdiction" -UseDefaultCredentials
$plans = Invoke-restmethod -Uri "http://localhost:8081/api/plans" -UseDefaultCredentials
$working = $plans | Where-Object { $_.DisplayName -EQ 'Working' }
$rescats = Invoke-restmethod -Uri "http://localhost:8081/api/reserveCategory" -UseDefaultCredentials
$tp = $rescats | Where-Object { $_.Name -EQ 'TP' }
Run Economics
The script will headlessly trigger an economics run for the Area A folder node.
We first compose the request payload, and then issue the calculate command to the /api/economic/calculate/hierarchy endpoint:
$areaAResult = Invoke-restmethod -Uri "http://localhost:8081/api/economic/calculate/hierarchy" -UseDefaultCredentials -Method "POST" -Body $econRunConfigString -ContentType 'application/json'
Like the imports, economics can be a long-running job, so we receive back a job ID which we can poll for completion status. When complete, the full economics run is finished, including well-level results, folder-level consolidations, and persistence of results into the database, ready for retrieval.
Retrieve Database Results
One gap in the integration service is that it doesn’t serve back economics results. (Well, technically it does, but in a way that only makes sense if you are Quourm Reserves). Instead, we’re going to reach into the database directly and retrieve some results.
First the script ensures it has access to SQLite (since our sample database is a .vndb file). If running on a system with Val Nav installed, the $runLocal flag tells it to use the installed SQLite DLL. If not, it can download the assembly direct from the SQLite webpage.
Once SQLite is ready, the script opens a connection to the DB and so on. Then in loops through the well nodes provided by the hierarchy API endpoint and retrieves a before-tax cash flow for each (undiscounted and discounted) by querying BTAX_NET_REVENUE and BTAX_NPV3 from the RESULTS_SUMMARY table.
The output:
Well A1 BTCF: 154335.506377472
Well A1 NPV @ 10%: 137384.851758335
Well A2 BTCF: 171965.354389965
Well A2 NPV @ 10%: 153097.936602865
We can look in Val Nav at the results in a simple one-liner report. Because the results were already calculated, Val Nav won’t have any work to do beyond report rendering. We can see the results are a match for those retrieved directly via the script:
