Reserves 5.16 Release Notes
Quorum Reserves 5.16.0 is now available. Notable changes and improvements in this release include:
- New Updater Option controls with support for default values
- An OpenXML based method for Excel Loaders and Exporters
- Security option to overwrite on import
- Installer improvements
- Bug fixes and Veracode fixes
Build Numbers
Reserves Build: PL5160_20231124_5.16.0.159110
CCM Build: CCM_20231025_1.0.0.157517
Centralized Configuration Manager (CCM) Farm Upgrades
There is a CCM farm upgrade available to support the new features in Reserves 5.16.0. After you update the CCM application, run the UpdateCCM.exe to upgrade your CCM farm.
Database Upgrades
There are no modifications to the database necessary to support the new features in Reserves 5.16.0.
Updater Option Controls with support for default values
A new section has been added to the Update Data page to accommodate new types of Option controls that are populated by default with the object’s existing attribute data. Users can then set a new value using the controls and commit the changes by clicking the Update button as with a regular Loader.
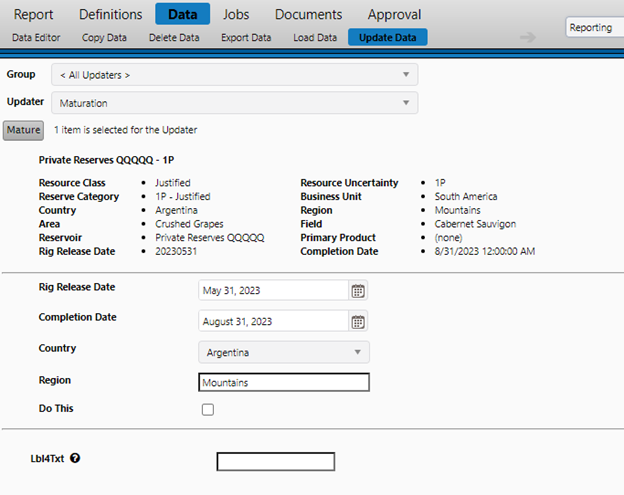
Specifying the Option Controls
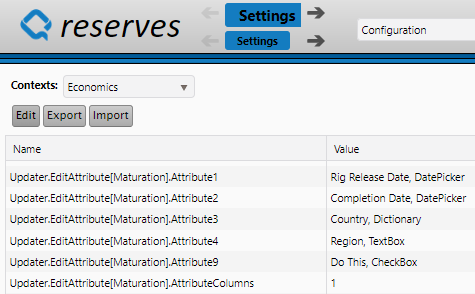
The Option controls are set-up through the Configuration->Settings->Settings page. Option Controls are ordered with a unique number and are linked to an Attribute using either the Metadata Display Name or Metadata Column Name.
The comma separated Value specifies the control type: DatePicker, TextBox, Dictionary, Checkbox.
Name: Updater.EditAttribute[LoaderName].Attribute1
The AttributeColumns setting is used to control the column display on the Update Data page and currently honors either a single column if set to “1”, or else it defaults to an auto spacing logic if set to other than “1”.
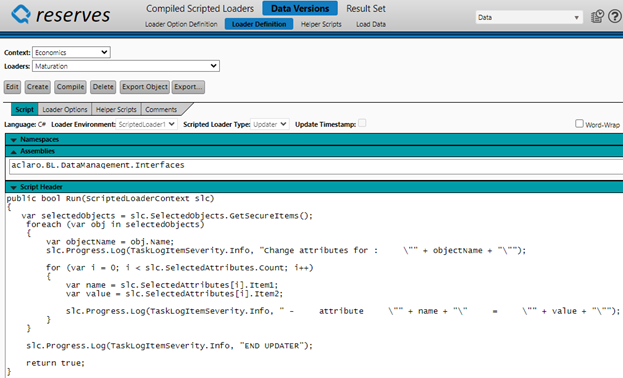
Example Updater C# Code
The Code can reference the name and values like in the below example:
Assembly: aclaro.BL.DataManagement.Interfaces
var name = slc.SelectedAttributes[i].Item1;
var value = slc.SelectedAttributes[i].Item2;
OpenXML method for Excel Loaders and Exporters
New C# methods, based on .Net Framework OpenXML libraries, have been added to support Excel Loaders and Exporters. Legacy Excel Loaders and Exporters were based on methods reliant on the Microsoft Access Database Engine (aka ADE, ACE) which was one of the original ways to interact with Excel files. The old ADE methods have been observed to contribute to hanging behaviors in some environments when running Loader or Exporter jobs. The new methods have been designed to be a drop-in replacement to minimize conversion effort.
Excel Loader C# Example
A basic code snippet showing the old and new methods used by an Excel Loader:
// Creating old ADE Excel Source
// ExcelSource es = new ExcelSource();
// Creating new OpenXML Excel Source
ExcelSourceOX es = new ExcelSourceOX();
Excel Exporter C# Example
A basic code snippet showing the new method used by an Excel Exporter:
public void WriteDataToFile(string fileName)
{
DataTable dt = GetSourceData();
var writer = new ExcelSourceOXWriter();
var package1 = new DataPackageOX
{
DataTable = dt,
SheetName = "Sheet1"
};
writer.WriteDataToSpreadSheet(fileName, new List<DataPackageOX>{package1});
}
Security option to overwrite on import
An additional option has been added to the Security by Object Import to allow for an overwrite action on the security permissions. This is accomplished as a two-step process by first removing the target permissions and secondly by adding the new ones.
Remove Existing
First select the Import file and choose Remove Existing.
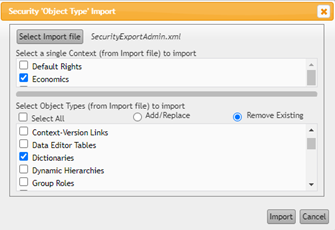
Add Permissions
Second select the same import file and use the Add replace option.

Installer Improvements
The Installer has had numerous additions including support for Command line installs to support automated installation, increased dependency checks, and multi-server environment options.
Command line installs
Reserves.Installer.exe [path]\settings.json
Reserves.Installer.exe -agent [path]\agentSettings.json
Command line uninstalls
Reserves.Installer.exe -uninstall [path]\ instance.resin
Reserves.Installer.exe -uninstall [path]\instance.agentin
Multi-Server environment options
The Advanced tab now has a checkbox and textbox for multi-server environments. When deploying to multi-server environments, all application elements must have a unique Instance Name in order to be correctly subscribed to the Service Bus messaging.
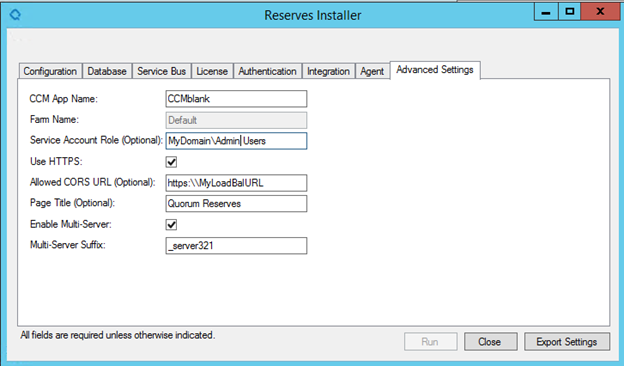
Enabling multi-server will append the suffix to caller names in the web.config file and to the CCM Instance Names for all application elements (main web application, web services, agent).:

Installer Additions and Fixes
A detailed list of the items for the Installer:
Description |
|---|
Install from Command Line - automated installs |
Investigate C# only version - convert powershell script to C# methods |
Uninstall without a resin file |
Multi server environments - option to append appname to CCM Instance Names |
Standalone Agent Install - generate a *.agentin file for same use as *.resin file |
Standalone Agent Install - Add export settings |
Standalone Agent Uninstall |
Standalone Agent - Add select settings file |
Add field for COR URL and set in CCM |
Add fields for Title and File Management to installer and set in CCM |
Implement database migrations into schema manager |
Options to allow for alternate web service naming |
Pre-check Windows Feature dependencies |
Folder permissions check |
Service Account Role check |
Make the "Run" mode for Installing like Uninstalling |
Export Settings after Install completes |
Correct the pop-up message for "Test Windows Service Bus" |
Update the Task Launcher config file for the CCM Farm and URL |
Installer - Set the defaults for Forecast Modules as unchecked |
Installer - add a dash in the web services naming convention |
Issues Resolved 5.16.0
Issue ID | Description |
|---|---|
249525 | Approvals - Object Level Thresholds to work with Zero value objects |
244174 | Approval Definitions - disable ineligible levels for threshold option |
244735 | Allow CCM email option Ignore Certification Errors to be set for all emails notification |
