
Use the Project Manager page to create your projects and link them to versions.
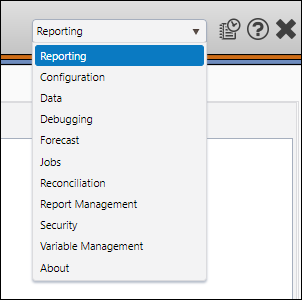
- Select Reporting from the Navigation Toolbar.
- Select Forecast from the Context drop-down menu in the Context/Report Selection pane.
- Click on the Forecast tab, and then the Project Manager page.
Create Projects
To create a new project, follow these steps:
- Select the version of your data within which you want to create your project using the Version drop-down menu in the Hierarchy/Version Selection pane.
- Click the Create button.
- Enter a name for your new project in the Project field near the top of the Display pane.
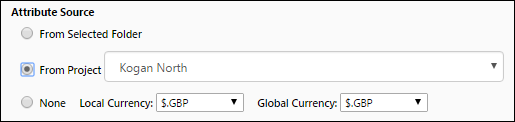
- Select an attribute source for your new project.
- From Selected Folder: Toggling this option will copy attributes from the level of the hierarchy you selected before creating your project.
- From Project: Toggling this option will allow you to use the drop-down menu to select any of your other existing projects. The attributes of the project you select will be copied and used for your new project.
- None: Select this option when you are creating new projects and have not yet defined attribute sources. After selecting this option, use the Local Currency drop-down menu to set the local currency of your project, and the Global Currency drop-down menu to set the global currency of your project.
- When you have finished configuring your project's options, click the Save button.


Copy a Project
To make a copy of a project, follow these steps:
- Select the version of your data containing the project you want to copy using the Version drop-down menu in the Hierarchy/Version Selection pane.
- Select a hierarchy to display your data using the Hierarchy drop-down menu in the Hierarchy/Version Selection pane.
- Use the Hierarchy to add your project to the editor.
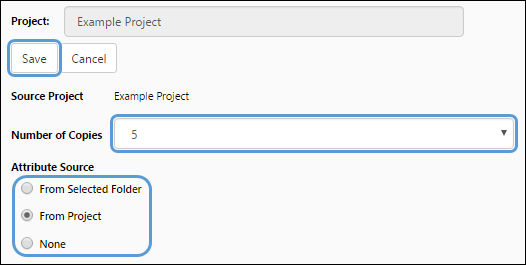
- Select the project you wish to copy using the Project drop-down menu near the top of the Display pane.
- Click the Copy button.
- Use the Number of Copies drop-down menu to indicate how many copies you want to create.
- Select an attribute source for the copied projects.
From Selected Folder: Toggling this option will copy attributes from the level of the hierarchy you selected before creating your project.
From Project: Toggle this option to copy the attribute source of the original project and apply it to the copy you create.
None: Select this option when you are creating new projects and have not yet defined attribute sources. After selecting this option, use the Local Currency to set the local currency of your project, and the Global Currency to set the global currency of your project.
- When you have finished setting up your copy options, click the Save button.

Click image to expand or minimize.
After creating your copies, use the rename function (explained later on this page) to rename your projects, as required.
Link Projects to Versions
You can modify the list of projects that are linked to your forecast version using this page. To do so, follow these steps:
- Select the version you want to link your project to using the Version drop-down menu in the Hierarchy/Version Selection pane.
- Click the Link button.
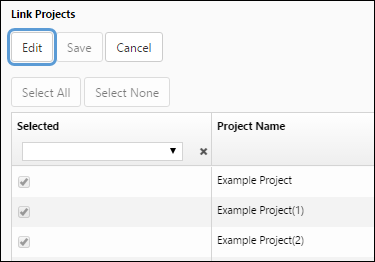
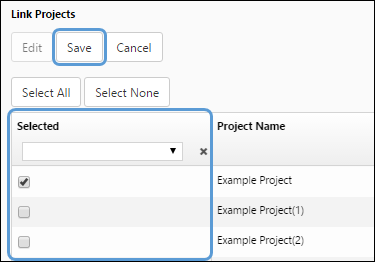
- All of the objects in your hierarchy will be listed in the table on screen. Click the Edit button.
- Use the Projects table to select the objects you'd like to link to your project:
- Add objects to your project using the checkboxes in the Selected column of the table.
- Use the Select All and Select None buttons to quickly change your selection.
- (Optional) Once you have selected the objects you wish to add to your project, verify your selection by selecting True from the drop-down menu at the top of the table. Only those objects that you have selected will be shown. Selecting False will only display the objects that are not included in your project. To remove this filter, click the Cancel icon (
 ) to the right of the drop-down menu.
 - When you have finished selecting the objects you wish to link to your project, click the Save button.

Click image to expand or minimize.
Click image to expand or minimize.
Rename a Project
You will only be able to rename a project if it has been unlinked from the objects in your hierarchy.
- Select the version of your data that contains your project using the Version drop-down menu in the Hierarchy/Version Selection pane.
- Select a hierarchy to display your data using the Hierarchy drop-down menu in the Hierarchy/Version Selection pane.
- Use the Hierarchy to add the project you wish to rename to the editor.
- Select the project you wish to rename using the Project drop-down menu near the top of the Display pane.
- Click the Rename button.
- Enter a new name for your project in the Project field.
- Click the Save button to save your changes.

Modify your Project Data
Once you have created your projects, use The Single Project Page to begin modifying your project's data.