
You can use the Resource Object Editor to manage your change records.
Create Change Records
Change records can be added in the Resource Object Editor while in the edit mode.
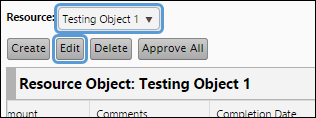
- Use the Resource drop-down menu to select the reservoir you wish to modify, and click the Edit button.
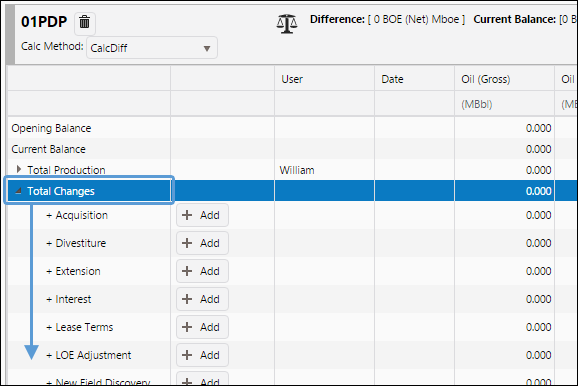
- Each resource category table will have a row with Total Changes in the first column. Click on the Total Changes cell to expand the row and visualize all the changes.
- All of your change categories will be listed on the table. To add a change record, click the + Add button beside the change category that corresponds with your change. A row will be added to the table, and available for editing. In this example, an acquisition will be added.
- Begin by selecting an effective date for the change record. Click on the cell in the Date column of the table to set the change record’s effective date. Use the calendar tool to select your date.
- Input product balances associated with your change into the appropriate cells on the table.
- (Optional) Use the cell in the Comment column of the table to enter additional information about the change record.
- Repeat steps 3-6 to create as many change records as you require.
- Once you have created all of the change records you require, click the Save button.
Click image to expand or minimize.


Click image to expand or minimize.
Approving Change Records
To approve change records while using the Resource Object Editor, follow these steps:
- Use the Resource drop-down menu to select the reservoir you wish to modify, and click the Edit button.
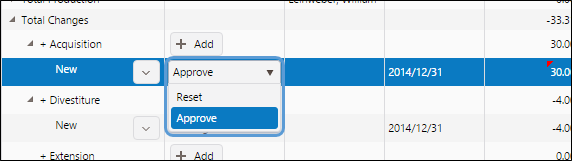
- Locate the change record you wish to approve. You will find a drop-down menu in the second column of the table. Double-clicking on it will allow you to choose the Approve or Reset options.
- Approve: Approve the change record.
- Reset: Revert the change record back to its working state.
- Repeat step 2 to approve or reset any other change records.
- Click the Save button to submit your approval.
Click image to expand or minimize.
Delete Change Records
You can delete change records by following these steps:
- Use the Resource drop-down menu to select the reservoir you wish to modify, and click the Edit button.
- Click the Edit button.
- Click the icon beside the change record ID number, and select Delete from the options.
Change records can only be deleted if they are in a working state. Once change records are approved, they cannot be deleted until they are rejected and reverted back to their Working state.
