
All of the jobs that can be run with Reserves (reports, loaders, ... etc.) will be added to Reserves's job log when they are initialized. Use the Job Results page to view this log, and monitor the progress of all of Reserves's tasks.
How to Access the Job Results Page
You can access the Job Results page in three different ways:
- From the Reporting part of Reserves.
- Opening the Job Results page in a separate window.
- Selecting Jobs from the Navigation Toolbar.
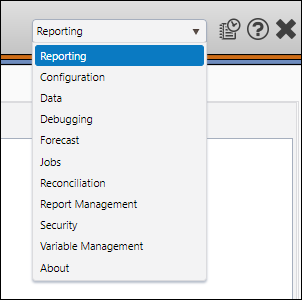
The Reporting Part of Reserves
- Select Reporting from the Navigation Toolbar.
- Click on the Jobs tab. The Job Results page will open automatically.
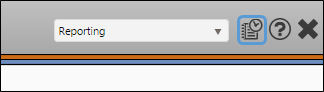
Open the Jobs Page in a Separate Window
You can open the Job log in a separate browser window by clicking the Jobs button beside the Navigation Toolbar.
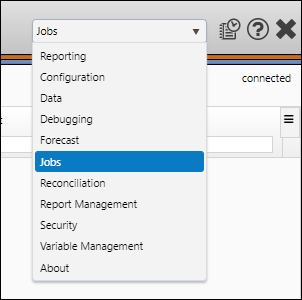
The Navigation Toolbar
- Select Jobs from the Navigation Toolbar.
- Click on the Job Results page.
Click image to expand or minimize.
What you can do on this Page
Choose the Jobs you Wish to View
When you access the Jobs page, use the State, Owner, and Date drop-down menus to limit the jobs that will be displayed in the jobs table.

- Use the State drop-down menu to limit the jobs listed in the table to only active or finished jobs. Three options can be selected:
- All: Select this option to display all jobs, regardless of state.
- Active: When this option is selected, only jobs that are in the queued, initializing, or running states will be displayed in the table.
- Finished: When this option is selected, only jobs that are in the stopped, succeeded, failed, succeeded with errors, or lost states will be displayed in the table.
For more information on active states, see Active States later on this page.For more information on finished states, see Finished States later on this page. - Use the Owner drop-down menu to hide jobs created by other users. Two options can be selected:
- All Jobs: When this option is selected, jobs run by every user will be displayed in the jobs table.
- My Jobs: When this option is selected, only the jobs that you run will be displayed in the jobs table.
- Use the Date drop-down menu to limit the jobs displayed in the table to jobs that were created in a certain time frame. Today, Yesterday, Last 5 Days, Last 10 Days, Last Month, and Custom can be selected.
- When you select the Custom option, two date options (From and To) will appear to the right of the Date drop-down menu. Use these options to create a date range.

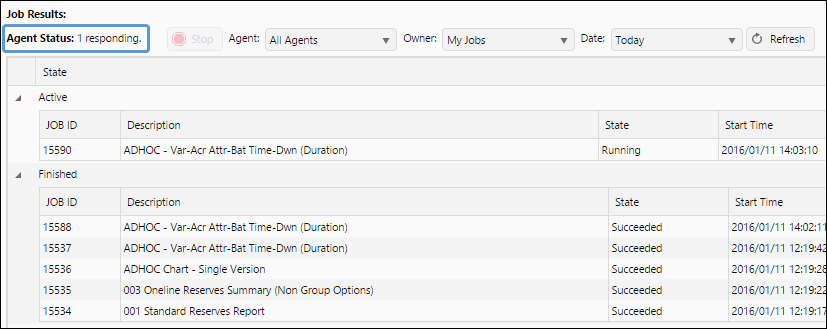
View the Status of your Active Agents
When you access the Job Results page, basic information about your agent(s) will be displayed.
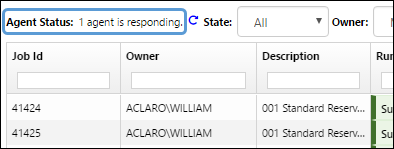
The following agent statuses may appear:
| Status Message | Meaning | Action |
|---|---|---|
| 1 agent is marginal. or [>1] agents are marginal. | Your agent has not responded to a RollCallMessage, which is sent every 30 seconds. After 10 consecutive failures to respond to a RollCallMessage it is removed from the list of agents until it starts responding again. | From the agent’s server, check the status of your agent service and check the agent log files for exceptions. |
| 1 agent is responding. or [>1] agents are responding. | Your agent is running and available to run jobs. | None. |
No agents are responding at this time. | None of your agents are running. | From the agent’s server, restart your agent's service and try again. Check the agent log files for exceptions. |
| 1 agent is responding, 1 agent is marginal. | A combination status will be displayed if you have more than one agent in different states. |
Refresh Agent Status
Click the Refresh Agent Status icon ( ) to recheck the status of your agent(s).
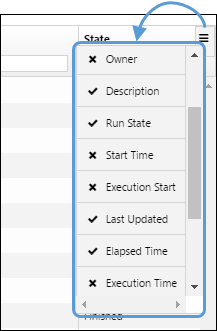
Add or Remove Columns from the Table
You can hide or display any of the columns on the jobs table. To add or remove a column from the table, follow these steps:
- Click the Filtering Options icon (
 ).
). - Click on the column you wish to add or remove from the table.
- Add columns: Columns with an "X" beside them (
 ) are not displayed in the table — clicking columns with an "X" beside them will add them to the table.
 - Remove columns: Columns with a checkmark beside them (
 ) are already in the table — clicking columns with a checkmark beside them will remove them from the table.
- Add columns: Columns with an "X" beside them (
- When you have finished selecting the columns you wish to display, click on the table to close the menu.
Click image to expand or minimize.
| Filter | Description |
|---|---|
| Job Id | Numbered job Id's are automatically assigned to each job you create. |
| Owner | The username of the user who created the job. |
| Description | The name of the item being processed will be listed here (e.g. report names, loader names... etc.). |
| Run State | There are 8 different run states that can be seen on this page — each used to indicate if a job has been queued, if it is running, if it has been completed... etc. For more information on run states, see Run States below. |
| Start Time | The date and time when the job was created (e.g. the time when a user clicks on the hierarchy to create a report). |
| Execution Start | The date and time when an agent began processing the job. |
| Last Updated | The most recent time when a progress message was sent back to Reserves from the job. |
| Elapsed Time | The total time involved in processing the job. For example, the time between when a user clicks on the hierarchy and when your agent has successfully executed the job. |
| Execution Time | The time it took the agent to complete processing the job. |
| Progress | This column will list the percentage completion for each job in the table. |
| Agent | The name of the agent used to run the job. |
| Last Action | Some jobs are scripted to send incremental progress messages back to the Jobs page. These messages will be displayed here. When the job is completed, the last message sent will be displayed indefinitely. |
| State | This column will list if the job is in an Active or Finished state. |
Run States
Eight run states can appear on the jobs page. Each run state, and a description of it is listed in the table below.
Active States
| Run State | Description |
|---|---|
| Queued | The state for jobs that have been submitted, but are waiting to be picked up by an agent for processing. |
| Initializing | Jobs that have been assigned to an agent, but haven’t been started will show this state. Most jobs will only be in the initializing state for so short a time, you won’t actually see this state on the jobs page. Batch reports are an exception to this though — batch report jobs are run by a single agent. As such, once the batch job has started, reports that have yet to run can be flagged as initializing. |
| Running | Once an agent begins working on a job, its status will change to Running. |
Finished States
| Run State | Description |
|---|---|
| Stopped | Jobs that you stop will be flagged with the Stopped state. |
| Succeeded | Jobs that complete without logging errors will be flagged with this state. |
| Failed | Jobs that do not complete due to critical errors will be flagged with this state. |
| Succeeded with Errors | Certain errors can be scripted into your jobs that, when triggered, won't stop the job entirely, but will log an error message. When an error is logged, but the job is still able to complete, it will be flagged with the Succeeded with Errors state. See View Logged Information About Jobs later on this page for instructions on viewing a job's logged information. |
| Lost | Jobs that, while running, fail to return a progress message back to Reserves after a certain amount of time (15 minutes by default) will be flagged as lost. Additionally, if a job remains queued for a lengthy amount of time (24 hours by default) it will be flagged as lost. When a job is lost, it isn't necessarily stopped. Jobs are flagged as lost when they don't return messages to Reserves after a certain amount of time — but this doesn't mean that the job has stopped, or the agent can't finish processing the job. This means that there are cases where a lost job may complete after an extended amount of time. |
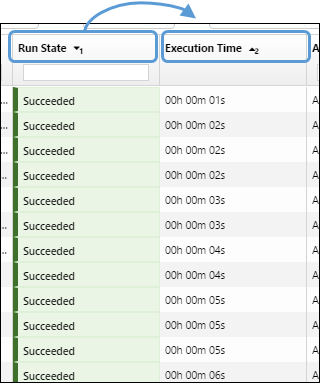
Filter Values in Columns of the Job Results Table
Clicking on a column title will allow you to sort the values in the column by alphabetical, numeric, or timed order (depending on the values in the column). You can apply more than one filter at a time by holding the SHIFT key on your keyboard while selecting columns. When you sort multiple columns, numbered icons will be added to the column title to indicate the order in which they are sorted. In the example below, the Run State column was sorted before the Execution Time column.
Click image to expand or minimize.
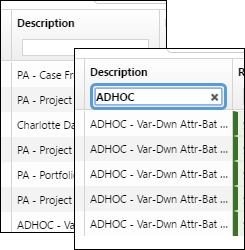
Some columns also include search fields. Use these to search for values in the table.
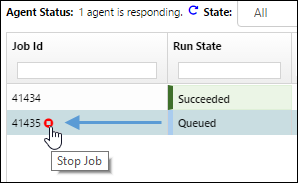
Stop Queued Jobs
Before a job is executed you can stop it by following these steps:
- Select the job you wish to stop.
- Click on the Stop icon (
 ) next to the job's Id.
View Logged Information About Jobs
You can view basic information about your jobs by selecting them. Logged information about the job you select will be listed below the jobs table.
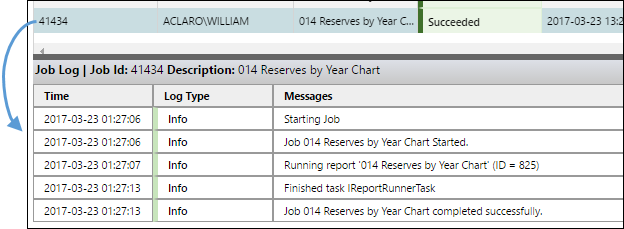
You can copy all of the logged information for a job you select by clicking the Copy ( ) icon in the upper-right corner of the log window.
When you access the Job Results page, basic information about your agent(s) will be displayed.
Click image to expand or minimize.
The following agent statuses may appear:
| Status Message | Meaning | Action |
|---|---|---|
| (1) marginal. | Your agent has not responded to a RollCallMessage, which is sent every 30 seconds. After 10 consecutive failures to respond to a RollCallMessage it is removed from the list of agents until it starts responding again. | From the agent’s server, check the status of your agent service and check the agent log files for exceptions. |
| (1) responding. | Your agent is running and available to run jobs. | None. |
| No agents are responding at this time. | None of your agents are running. | From the agent’s server, restart your agent's service and try again. Check the agent log files for exceptions. |
Use the three drop-down menus near the top of the Display pane to filter the list of jobs displayed.
- Agent: Use this option to display only those jobs that were completed by the agent you specify.
- Owner: Use this drop-down menu to select the user who launched the report.
- Date: Use this drop-down menu to reduce the list of reports to those that were run in a specific time period. Selecting the Custom option will allow you to select a range between two dates.
Once you have selected your filters, click the Refresh button to filter the list of Jobs.

You can view basic information about your jobs by selecting them. Logged information will be listed at the bottom of the Display pane.
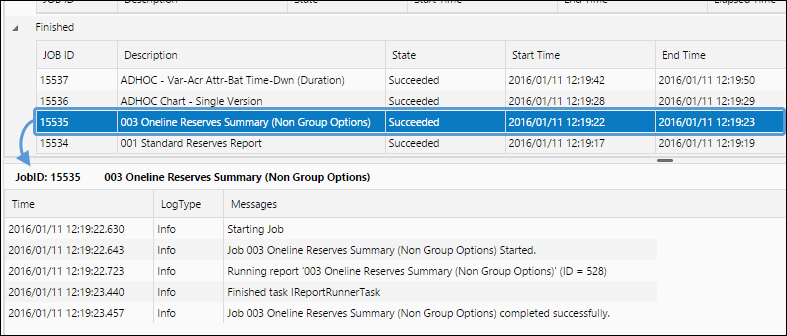
Click image to expand or minimize.