
Items described on this page can be found throughout the application and function the same way.
Tables
The tools you can use when working with tables are described in this section.
Adding Attributes to Tables (Show Attributes)
Use this option to add attribute values to tables throughout the Portfolio application. In this example, attribute columns will be added to the Selections table (found on The Active Scenario Page Overview):
To add attributes to tables
- Click Show Attributes near the top of the table. The Show Attributes popup will open.
-
All of the available attributes will be listed on the left side of the popup. Click Add (
 ) next to an attribute's name to add it to the table. Click Add All (
  ) to add all the attributes to the table in one step.
-
To reorder the list of attributes, click and hold Reorder (
 ) next to the attribute you wish to move, and then drag and drop it onto a new position in the list.
- Click on the table to close the Show Attributes popup. The attribute columns you selected will be displayed in the table.

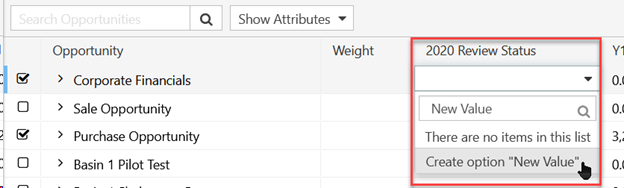
Editing Attributes in Tables (Editable Attributes)
If an Attribute is selected as Editable in the Attributes Tab then the characteristic of the Attribute can be edited in Tables.
- Click the Attribute value cell in the table.
- Type a new value and select Create option “ ” or use the Enter key.
The value is added to the list and populated in the cell.
Filtering in Attribute Columns
After you've added attribute columns to a table, you can hide rows of the table with attribute values you specify.
To filter values:
-
After you've added attribute columns to a table, hover over the header cell of the column you wish to filter and click the Filter icon (
 ). Each one of the attribute values in the column will be listed in the filter popup.
- Use the checkboxes to indicate which attribute values you wish to show/hide in the table.
- You can enable/disable all of the checkboxes in one step by clicking the (Select All) checkbox.
- To deactivate a filter, click the (Select All) checkbox.
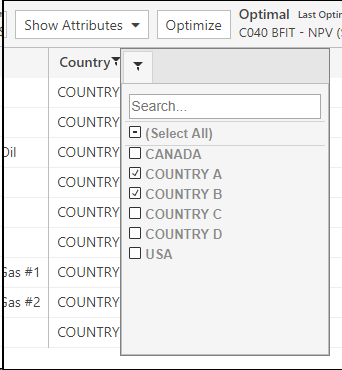
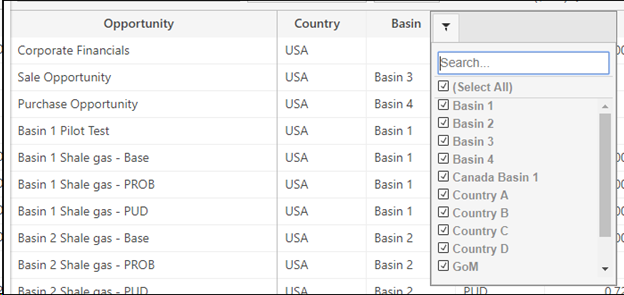
Importantly, only the attribute values that are currently displayed in a column will be displayed in the filter popup. This means that activating a filter in one column can affect how many attribute values are displayed in the filter popups for other columns. In the example below, no filters have been applied and all of the basin values appear in the filter popup.
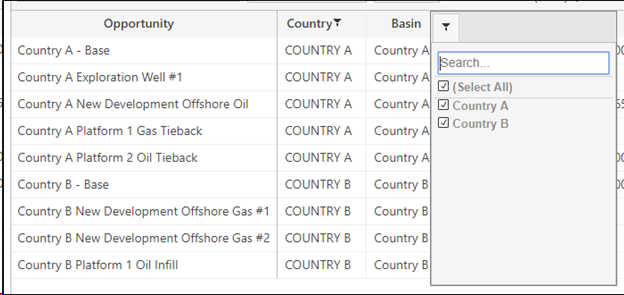
After applying a filter in the country column, a smaller range of basin values can be selected.
Sorting Values in Columns
To sort the values in a column (alphanumerically), click on the column's header cell.
- The first time you click on a header cell, values in the column will be sorted alphabetically (for text values), from smallest to largest (for numeric values), or from oldest to newest (for date values).
- The second time you click on a header cell, values in the column will be sorted in the opposite direction.
- The third time you click on a header cell, the sorting will be deactivated and values will be displayed in their default order.
You can apply sorting to multiple columns at the same time. Hold the SHIFT key on your keyboard while selecting columns to activate more than one sort at the same time.