Using IPS Manager
Access control for IPS Manager: IPS Server administrators
Access to IPS Manager is granted to Windows accounts by membership of the Windows security group which is set as the 'IPS Administrators Group' during installation. By default it is a local security group 'Palantir IPS Admin'.
You need local Administrator level permissions to edit this group. You can extend group membership by adding user accounts or security groups (either local, or from Active Directory) to the IPS Administrators Group.
Important: IPS Server administrators have control over creating, deleting and enabling/disabling of tenants, however they are not granted access to run Planning Space applications, or to access any tenant data, or tenant administration settings. Each tenant has it own set of users and administrators: see Tenant users and administrators.
Logging in to IPS Manager
IPS Manager runs as a web-based service, which is by default located at
'http://{server FQDN}/admin'
for a single IPS Server, or use the URL of the load balancer for an IPS Server cluster (this may be a server FQDN, IP address, or DNS alias if configured). You can control network access to IPS Manager as you would for any web site, by configuration of the firewall at the IPS Server machine, load balancer and/or external firewall.

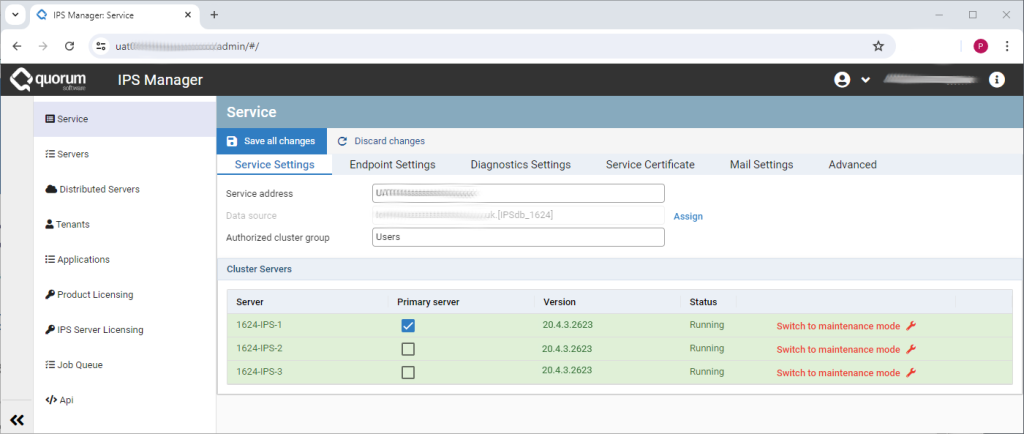
The currently-logged in user is displayed at the top right corner of IPS Manager. If you click the down arrow next to the username, and click Sign in as... you will get a login dialog box to connect as a different user.
Use the menu buttons on the left-hand side to access the IPS Manager's settings and functions:
- Service
- Servers
- Distributed Servers
- Tenants
- Applications
- Product Licensing
- IPS Server Licensing
- Job Queue
- Api
The Api screen contains a live interface to the IPS Admin API. This is described in a separate document: IPS Admin API Guide.
Note: The Distributed Servers screeen contains settings that are part of current beta-test functionality and not intended for general use.
Saving changes, errors, and warnings
After making changes on a screen, click the Save all changes button to implement those changes. If you click in the left-hand menu to move to a different screen, without saving, a warning dialog will appear to confirm that you want to forget the changes you have made. If you click the Discard changes button then the contents of the screen will reset to their currently-saved values.
Errors: If you save changes and there are errors, message(s) will appear in red in an 'Errors' box. All errors must be fixed before you can save the changes in a screen.
Warnings: A Warnings box may appear when you save changes. Warnings will not prevent changes being made, however IPS Server or the application programs may not function correctly if a warning has been triggered.
IPS management with the PowerShell module
A PowerShell module is available which implements many of the IPS configuration and management operations as PowerShell cmdlets.
Cmdlets are convenient tools to combine operations into runnable scripts which can be used for automation.
For details of how to install and use the module, see IPS PowerShell module (Automation cmdlets).
'About' and version numbers
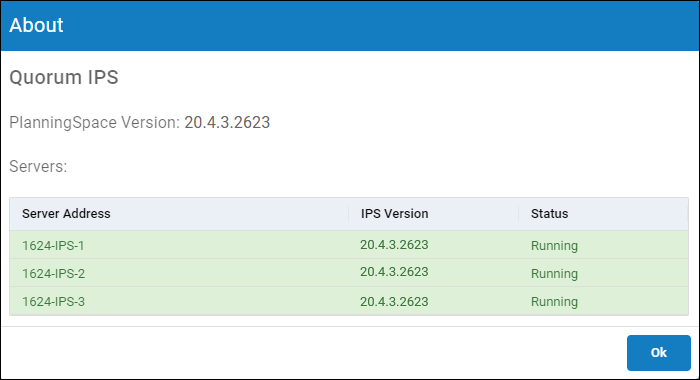
Click the  symbol at the top-right corner to open the About dialog:

This shows the version number of the IPS Server/Planning Space installation and a list of the server machines in the deployment, with their status and their installed IPS Server version.
Version numbers for Planning Space software use the format '20.X.XX.XXXX' where:
- '20.X' is the major version number;
- 'XX' is the Update version number: '0' is the first release of a major version, '1' is the first update, and so on;
- the final 'XXXX' digits are the build number; this is normally only significant for users in case of troubleshooting software issues.
