Create a database mapping template
Mapping templates establish the correspondence between data contained in the database files to be imported, and the variables and settings of Dataflow documents. The connection configuration for the database is also stored in the mapping template.
The procedures for creating and editing mapping templates are similar, so this topic only shows the creation process in detail.
Template management
Template management interfaces can be accessed from the dropdown menu in the Advanced section of the Database Batch Import screen. The following table describes the controls.
| Option | Description |
|---|---|
| New Template | Creates a new template. |
| Edit Template | Opens the selected template for editing. |
| Rename Template | Enter a new name for the selected template. |
| Delete Template | Deletes the selected template. |
| Import Template | Imports a template from a specified local file. |
| Export Template | Exports the template as a local file ('.XET' format). |
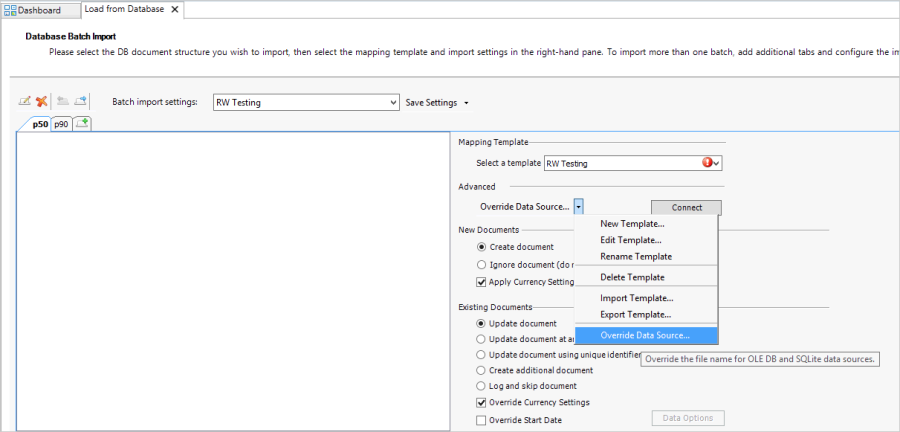
| Override Data Source | (Only used for Load from Database with OLE DB and SQLite data sources) Allows a user to override the data source file name. |
Create a new template
To create a new template, select the New Template option from the menu. In the New Template dialog, enter the name in the New Name field. To copy mappings from an existing template, check the Copy from box and select the source template from the list.
To open the new template for editing, make sure that the template is selected in the Select a template field, then select Edit Template from the drop-down menu. The Template Mappings window will be opened. This contains the tabs as described below.
DB Connection
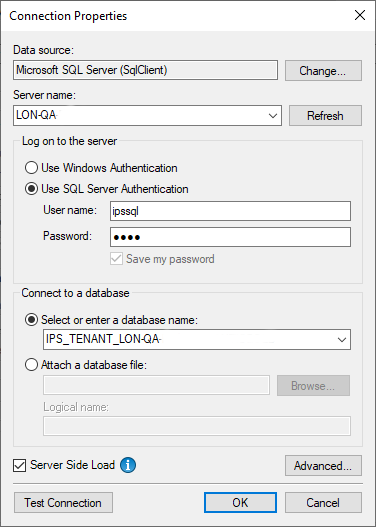
This tab specifies the connection configuration for the database server from which data will be loaded. Click Change to specify the configuration in the Connection Properties dialog:

In this dialog you specify the type of database connection, the server name and login credentials, and the database name. You can use the Test Connection button to check that the server/database is reachable and that the login is active.
Important: If the Server Side Load option is enabled, this requires that the IPS Server must have Microsoft Office Excel installed (see the Planning Space Deployment Guide: Hardware and software requirements).
Important: When connecting to an Azure SQL Database data source using the 'Microsoft SQL Server' connection type, it is recommended to use a named SQL account (i.e., the option 'Use SQL Server Authentication') rather than Windows Authentication, because the latter can cause interruptions due to the user's session expiring during the execution of long-running queries.
Once the connection has been set up, close the dialog and click Connect to open the connection. You need to be connected to edit the other parts of the template.
For some database types (OLE DB and SQLite), the data source file name can be overridden by using the Override Data Source option in the mapping template menu, as shown in the screenshots below:


Note: Overrides are separately-stored for each user account.
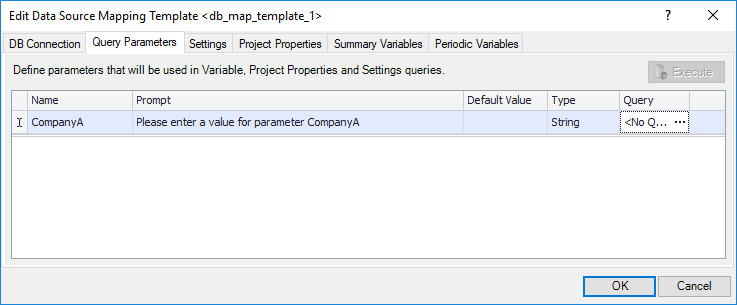
Query Parameters
This tab is used to specify parameters for the database queries that will be used to import data. An example is shown below:

Settings
This tab is used to map document settings. The fields are explained in the table below.
First, you must retrieve data from the database. You need to enter a query in the text field at the top of the tab and click Execute. Then the fields in the tab will be filled-in with database column names as appropriate.
| Field | Description |
|---|---|
| Document Name | Select the column where document names are stored. |
| Document Entity Type | Select the type of the imported document. |
| Document ID | Select the Document ID for import using the option Update document using identifier. |
| Document ID Property | Select the Property ID for import using the option Update document using identifier. |
| Periodicity | Select the periodicity of the imported data. If you select Mixed, more fields will appear where you can specify the settings. |
| Table Format | Select how your data are organized (see below). |
| Start Year | Select a column or choose the automatically-calculated <First Value Date>. |
| Duration | Select a column or choose the automatically-calculated <Distance to Last Value Date>. |
| InflationDate | Select a column or choose <Default Inflation Date>. |
In the Table Format section, select how your data are organized:
- Select the Column per Setting option if your column headers are your project properties, as shown in the image below.
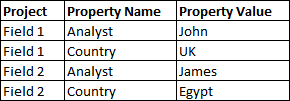
- Select the Setting data in one column (multiple rows) option if your data are structured as shown in the image below. In this case you need to specify two more settings: the name of the database column which contains item names (Name Column), and the name of the database column which contains item values (Value Column).


Variables: Periodic Variables
The Variables tab is used to map variables to columns in the database. It contains three sub-tabs for different types of variables as described in this sub-section and the next two sub-sections.
The first step is to retrieve data from the database. Enter a query in the text field at the top of the tab and click Execute. If the query executes successfully, the fields in the Mappings section will become active, which are explained in the following table.
| Field | Description |
|---|---|
| Document Name | Select the column where document names are stored. |
| Period | Select a column. Periods can be specified as month/year or year only. |
| Document ID | Select the ID of the imported document. |
| Document ID Property | Select the Property ID of the imported document. |
| Scenario | Select the scenario of the document. |
| Table Format | Select how your data are organized, as Variable per Setting or Variable data in one column (multiple rows). |
| Template | Select which Dataflow template will be used to create Dataflow documents. |
The table at the bottom is used to map variables. The Variable Name column contains variables taken from the selected Dataflow document template; click inside the column and then click the '+' sign to open the Dataflow Variable selector grid and select variables using the check-box column. Then in the Variable Source Column column, select which item in the database corresponds to the chosen variable. If you selected the Column per Variable option above, then the source cells will be filled with database column names. If you selected the Variable data in one column (multiple rows) option, then the source cells will be filled with values from the column selected in the Name Column field.
Values in columns can be filtered. Move the mouse pointer over the column name and the filter button will be displayed.
Variables: Scalar Variables
The first step is to retrieve data from the database. Enter a query in the text field at the top of the tab and click Execute. If the query has been executed successfully, the fields in the Mappings section will become active, which are explained in the following table.
| Field | Description |
|---|---|
| Document Name | Select the column where document names are stored. |
| Document ID | Select the ID of the imported document. |
| Document ID Property | Select the Property ID of the imported document. |
| Table Format | Select how your data are organized, as Variable per Setting or Variable data in one column (multiple rows). |
| Template | Select which Dataflow template will be used to create Dataflow documents. |
The first table at the bottom is used to map variables. The Variable Name column contains variables taken from the selected Dataflow document template; click inside the column and click the '+' sign to open the Dataflow Variable Selector grid and select variables using the check boxes. Then in the Variable Source Column column, select which item in the database corresponds to the chosen variable. If you selected the Column per Variable option above, then the source cells will be filled with database column names. If you selected the Variable data in one column (multiple rows) option, then the source cells will be filled with values from the column selected in the Name Column field.
In the Display Property Name table at the bottom you can map document properties which will be used to
create a tree view for document selection. In the Display Property Source Column column, select which item
in the database corresponds to the chosen property.
You can organize documents by several properties at once, for example, by country and region. To add a property, click in an empty row at the
bottom of the table. To remove a property, click the 
Values in columns can be filtered. Move the mouse pointer over the column name and the filter button will be displayed.
Variables: Working Interest Variables
The first step is to retrieve data from the database. Enter a query in the text field at the top of the tab and click Execute. If the query executes successfully, the fields in the Mappings section will become active, which are explained in the following table.
| Field | Description |
|---|---|
| Document Name | Select the column where document names are stored. |
| Template | Select which Dataflow template will be used to create Dataflow documents. |
| Scenario | Select the scenario of the document. |
| WI Variable | Select the WI Variable of the document. |
| Table Format | Select how your data are organized, as Variable per Setting or Variable data in one column (multiple rows). |
The table at the bottom is used to map WI settings. The Setting Name column contains the settings for the selected Dataflow document template. In the Setting Source Column column, select which column in the database corresponds to the Dataflow setting. If you selected the Column per Variable option above, then the source cells will be filled with database column names. If you selected the Variable data in one column (multiple rows) option, then the source cells will be filled with values from the column selected in the Name Column field.
Values in columns can be filtered. Move the mouse pointer over the column name and the filter button will be displayed.
