Reconcile data
Reserves reconciliation is the process where you need to allocate values to explain the differences between each node's opening and closing balance. The reconciliation figures are saved, thus creating change records, and these changes must be approved by an appropriate authority. Depending on the requirements of your business, you may want to balance all before using the closing balance for reporting.
Reconciliation is done on the Change Records tab of a reconciliation document which shows the opening and closing balances, and the unexplained balance which you need to allocate to available reconciliation reasons. There are two ways to reconcile data:
- Automatically, when reserve volumes are tagged with reconciliation reasons when data are loaded into the Reserves workspace. However, this will work only if you specify the reason when you save changes to documents in the Manage Data workspace (for an example, see Save a document) and check the Automatically classify changes box when you load data (see Load data into a reconciliation). Automatic updates are also available for historical production between the opening and closing balance; this requires a specially set-up mapping template for data loading.
- Manually, when you allocate volumes by editing cells with white background. Manual editing can be used to correct automatically loaded values.
Note: Manual reconciliation is available only for lowest-level nodes; values for higher-level nodes are aggregated from the nodes below and cannot be edited.
To help you with the process, values are shown on a chart in the Visualization tab (see Charts). As you allocate more volumes of the unexplained balance, the bar representing it gets smaller as the bars for reconciliation reasons become bigger, reflecting the change. The goal is to reduce the unexplained balance to zero.
You can view the history of changes for each value and add new change records (see View and add change records). You can also open the source document in the Manage Data workspace (see View the source of data).
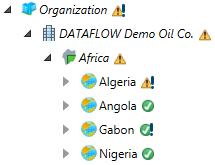
When all unexplained balance has been allocated, the node is considered balanced. The status icon
in the hierarchy will change from  to
to  as shown below. Note that tasks are independent of the approval procedure: a node can be balanced and still have tasks against it.
Note: A higher-level node becomes balanced once all its lower-level nodes have become balanced. However, since the reserves hierarchy is displayed in accordance with security permissions, this status will be based only on the status of the nodes available to you; thus, you may see a node as balanced while another user with access to a different set of nodes will see it as unbalanced, and vice versa.

After you have allocated all unexplained volumes, you need to submit the changes for approval (see Submit changes for approval). If you are authorized to approve changes made by other users, see Approve reserves changes.
