Configure the approval process
The Approval Configuration screen is used to specify steps for reserves approval in the Reconciliation
workspace.
You can add and remove steps but you cannot set up more than one approval procedure. To open the screen,
navigate to the Reserves Configuration workspace,
and click the Approvals button  on the ribbon.
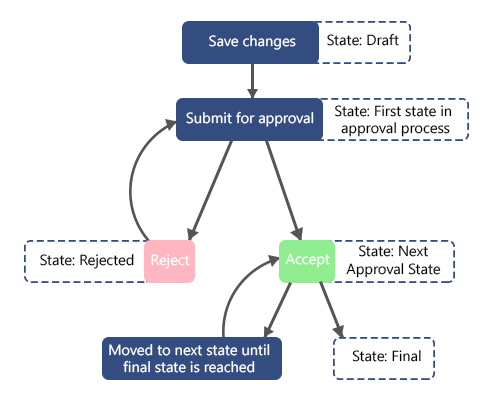
The approvals process contains configurable states and predefined states which cannot be edited. There are two pre-defined states, Draft and Rejected, and the configurable states are added and managed in this editor screen. The screenshot below shows the default approval process with the following configurable states: Pending (changes are waiting for approval or rejection), Approved By Manager (changes have been approved by a manager) and the Final State of Approved (no more changes can be made). You can change this default process to suit your requirements.
Note: If you modify the approval configuration process while the process is in progress for some reconciliations, submitted changes will not be affected. To reset an approval and use a new configuration it must be restarted (see Approvals).

The default approval process is explained in the diagram below.

To add a state:
- Click in Click here to add new item and a new row will be added to the table.
- Enter the name in the Name column. You can rename a state later.
- The Sort Order column shows in which order the states are applied; it is filled in automatically when
states are added. To change the order, use
the Move Up
 and
Move Down
  buttons on the ribbon.
 - Enter the description text in the Description column.
- Select which users and workgroups will be able to apply a state by clicking the ellipsis button in the Permissions columun.
- Click the Save button
 to save your changes.
To delete a state, click the Delete button  .
.
