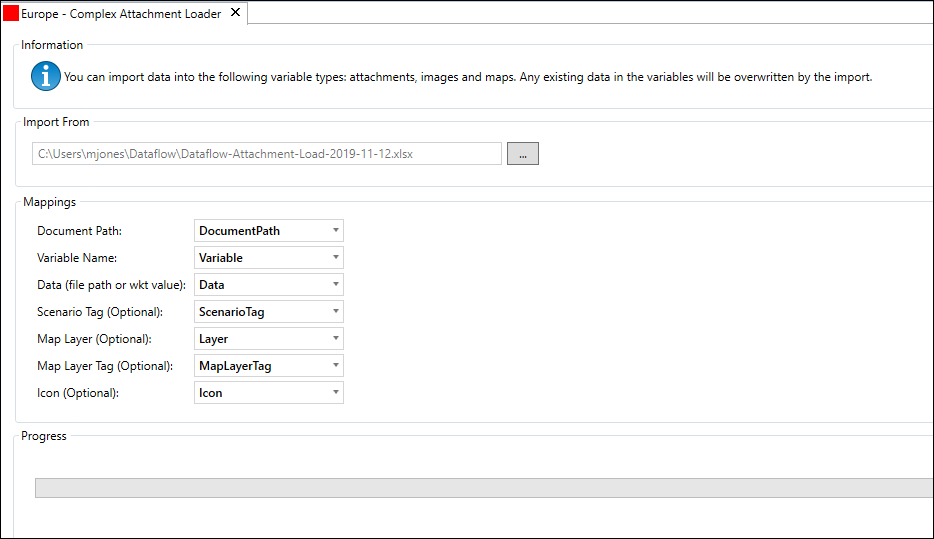
Complex Attachment Loader
Note: This tool is accessible only if your user account is a member of the Administrator
workgroup or the second authorized workgroup for this tool. Administrator users can set the
authorized workgroup using the Access Control button  for this tool
(see Tool Access Control).
The Complex Attachment Loader tool allows you to do bulk loads of attachments, images and maps into documents. You need to prepare a spreadsheet (or CSV) file, where each row specifies the parameters for one import. For example:

Note: Data can be imported into the following variable types: Attachment, Image, and Map. All existing data in a variable will be overwritten by the import. Non-Administrator users working with this tool must have 'Read' and 'Update' permissions for the documents that are going to be modified.
The Loader performs data optimization if you have the same attachment being loaded to multiple documents, as the attachment will be uploaded once to the database and then linked to all of the associated documents.
Note that the Loader does not currently perform attachment checking, or use the allowed type whitelist, that is applied to single attachment uploading.
To use the tool:
- Select a node in the hierarchy and click the Complex Attachment Loader button in the Tools tab on the ribbon. The Complex Attachment Loader page will open for that node, and the tool's ribbon tab will become visible.
- In the Import From field, select the file you want to import by clicking the ellipsis ... button to open a file explorer window. The file must be in XLS, XLSX or CSV format. For Excel format files, the import information must be located in the first worksheet of the file. The column names used in the Mappings dropdown selectors (see table below) will be taken from the first row of the worksheet or CSV.
- Fill in the Mappings fields.
- Click the Run button to begin the import process. The progress bar at the bottom of the page will display the status of the import operation. Details of the import operations, and any warnings or errors, can be found using the View Log.

The table below describes the Mappings input fields.
| Field | Description |
|---|---|
| Document Path | Specifies the column of the input spreadsheet which contains the document paths to which data will be imported. The full hierarchy path should be used (see the screenshot above for examples). |
| Variable Name | Specifies the column that contains the variable name for the data to be loaded into. The full variable name, as it appears in the Edit Variables window, should be used (see Variables). |
| Data (file path or WKT value) | Specifies the column that contains the data to be imported. This will be either a local file path specifying the file to be uploaded (an attachment file, image file, or SHP file), or a WKT (Well Known Text) value specifying data to import to a map variable. The following WKT types are supported: POINT, LINESTRING and POLYGON. The supported image file formats are GIF, JPG and PNG. |
| Scenario Tag (optional) | Specifies an optional column that can be used to load data into different scenarios by specifying the scenario tags. If a tag is not specified the 'Default' scenario will be used. |
| Map Layer (optional) | Specifies an optional column containing map layer names to which the given piece of WKT data will be imported. If this column is not included, map layer names will be automatically-generated. |
| Map Layer Tag (optional) | Specifies an optional column containing map layer tags which will be added to the map layer which is specified (or automatically-generated) for WKT data, or SHP file data. The tags used must be already defined, and set as 'Active', in the Dataflow Configuration (see Map layer tags); also your user account must have permission to apply the tag. You can only apply one tag per each data item, however you can apply several tags to one map layer by using several data items. |
| Icon (optional) | Specifies an optional column containing Icon key names for WKT POINT objects that are imported. See below for a list of the available icon keys. |
Icon keys
The icons and their key names are shown in the following table. You need to use the name exactly as shown (with spaces and capitalisation).
| Icon | Icon Key |
|---|---|
|
|
Area |
|
|
Business Unit |
|
|
Company |
|
|
Component |
|
|
Consolidation |
|
|
Country |
|
|
Derrick |
|
|
Development |
|
|
Discovery |
|
|
Document |
|
|
Dry |
|
|
Exploration License |
|
|
Gas Completed |
|
|
Lead |
|
|
License |
|
|
Liquid Natural GasShip |
|
|
Offshore Field |
|
|
Offshore Platform |
|
|
Oil And Gas Completed |
|
|
Oil Completed |
|
|
Pipeline |
|
|
PreDevelopment |
|
|
Producing |
|
|
Production License |
|
|
Project |
|
|
PumpJack |
|
|
Onshore Field |
|
|
Offshore Refinery |
|
|
Region |
|
|
Subsurface |
|
|
Tower |
|
|
Well Type 1 |
|
|
Well Type 2 |
|
|
Well Type 3 |
|
|
Well Type 4 |
|
|
Well Type 5 |
|
|
Well Type 6 |
|
|
Well Type 7 |
|
|
Well Type 8 |
|
|
Well Type 9 |
