Create a project template
A project template is an Excel workbook associated with a particular Regime. It determines such project properties as text formatting, names and contents of worksheets, and variable links. Once you set up a template for a Regime, all projects created under this Regime will look the same and contain the same input and output fields. Templates are managed on the General tab of the Regime (see The General tab).
The template is constructed by linking variables to the worksheets. The list of input variables available for linking is determined by Regime modules: you must link all variables which have their source module set to <User Entered> (see Regime Designer). As for result variables, you can choose which ones to link depending on what information you would like to see. Instructions on how to link inputs and outputs are given below. You can also use the Template Utilities tool to change variable settings.
Example: You must link the oil rate variable so that you can enter the rate value to calculate production volume. But you might like to see this volume in a project next to the rates, and in this case you also need to link the production volume variable.
To edit a template, open the corresponding Regime and switch to the General tab. In the Project Template section, select Open from the Manage Template menu.
When you open a template, a new tab is added to the Excel window, named Palantir. It contains tools for editing the template.
| Icon | Description |
|---|---|
| Unit System | Changes the unit system. |
| Periodicity | Changes periodicity: Monthly, Quarterly, Semiannually, Annually or Mixed. |

|
Opens the window to link input variables. |

|
Opens the window to link result variables. |

|
Opens the window which shows all existing links. |

|
Opens the Project Template Utilities window. |
You can also link reference information such as project settings or notes. For detailed instructions, see the following sections:
- Click on
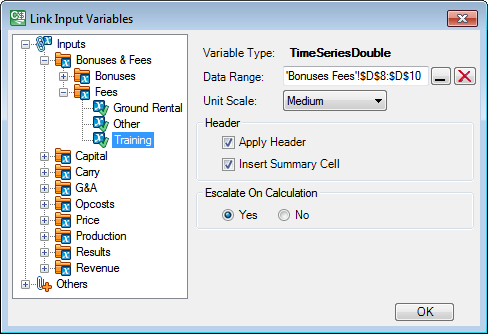
on the Palantir tab on the ribbon and the Link Input Variables window will be displayed.
- Expand the Inputs section and select a variable. Variable link settings will now be activated. The number of fields depends upon the type of the selected variable.
Note: Input variables can be linked only once while result variables can be linked as many times as needed.

- Click on
in the Data Range field. The Link Input Variables window will be collapsed and you will be transferred to the Excel file.
- In Excel, select the cells where you want the linked data to appear. The cell names will be displayed in the collapsed Link Input Variables window as shown below.

- Click on
in the collapsed window. The window will be expanded and the cell names will appear in the Data Range field.
- Specify the variable link settings. The settings depend on the variable type.
- Check the Apply Header box to display the variable name as the column header.
- Check the Insert Summary Cell box to insert a cell between the header and the data cells. You can use this cell, for example, to enter formulas for total or average values.
- Click OK to save the changes.
- If the variable has been linked successfully, its name will appear as a column on the worksheet and cells selected in the Data Range field will contain the <VALUE> placeholders.
- When you have finished linking the variables, we recommend typing test values in all cells to make sure that they are formatted correctly.
- Click on
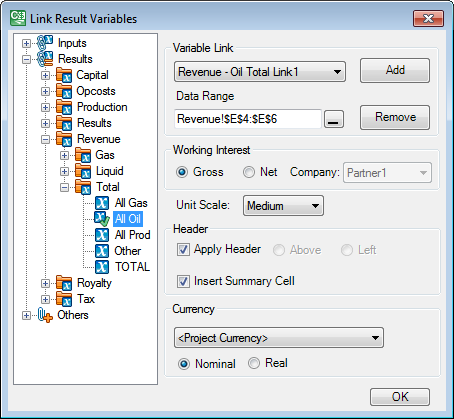
on the Palantir tab on the ribbon and the Link Result Variables window will be displayed.
- Expand the Results section and select a variable. The Variable Link section will now be activated.

- Click on the Add button and the variable will appear on the list in the Variable Link field. A result variable can be linked several times within the same template, so the variable name in this field includes the number of the created link.
- Click on
in the Data Range field. The Link Result Variables window will be collapsed and you will be transferred to the Excel file.
- Select the cells where you want the linked data to appear. The cell names will be displayed in the collapsed Link Result Variables window as shown below.

- Click on
in the collapsed window. The window will be expanded and the cell names will appear in the Data Range field.
- All fields in the Link Result Variables window will now be activated. The number of fields depends upon the type of the selected variable.
- Specify the variable link settings. Currency variables can be linked as Real or Nominal. Real and nominal values are displayed in different colors in projects. For information about how to set up the colors, see Default Settings.
- Check the Apply Header box to display the variable name as the column header.
- Check the Insert Summary Cell box to insert a cell between the header and the data cells. You can use this cell, for example, to enter formulas for total or average values.
- Click OK to save the changes.
- If the variable has been linked successfully, its name will appear as a column on the worksheet and cells selected in the Data Range field will contain the <VALUE> placeholders.
- When you have finished linking the variables, we recommend typing test values in all cells to make sure that they are formatted correctly.
Change settings across the template
The Project Template Utilities tool is used to specify global variable settings for individual worksheets or the whole template. Settings for individual variables can be edited with the help of the linking options described above. To open the tool, click on 
- Check the Apply box next to settings you want to specify.
- Select the required value.
- Check boxes next to the names of worksheets you want to update.
- Click on Update.