Manage Templates
You can manage Decline database loader mapping templates using the Manage Templates tool. To open it, click the Manage Templates button on the Home ribbon. The Manage Templates tab will open with a grid representing a list of database mapping templates.
The buttons on the Manage Templates ribbon are explained in the table below.
| Button | Function |
|---|---|

|
Opens the template tab where all settings will be blank so that you can create and design a new template. |

|
Opens the template tab so that you can edit the currently-selected template. You can also double-click a template on the grid to open it for editing. |

|
Deletes the selected template. |

|
Opens the template tab so that you can create a duplicate template. All settings will be populated to that of the currently-selected template. |

|
Opens a file explorer dialog for you to select a location to export an XML template file. |

|
Opens a file explorer dialog for you to select an XML template file to import into Decline. |
You can also open the template tab for configuration by clicking a template in the Manage Templates grid.
The template tab is made up of three tabs: Data Source, Properties, and Products.
Click the Save button in the Edit Template ribbon to
save your template at any time.
in the Edit Template ribbon to
save your template at any time.
Once you have created and configured a template, you can use it to import data. For more information, see Load from a database.
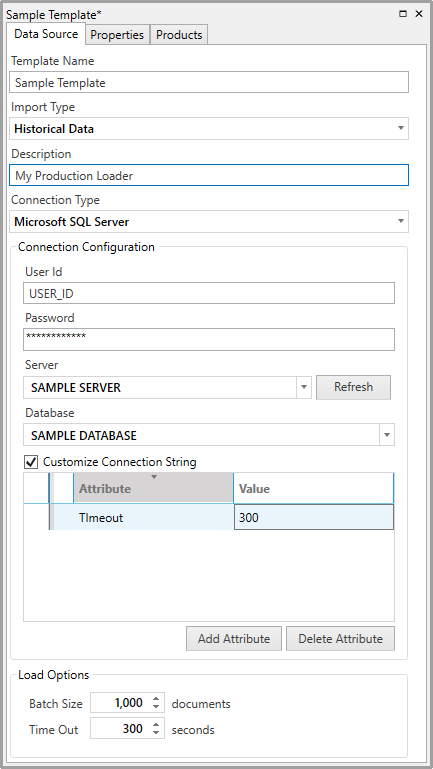
Template configuration: Data Source tab
- In the Data Source tab, type a name for your template under Template Name, select an import type under Import Type (see Historical and Forecast data for explanation), and a description of the template under Description. For the Connection Type, you can select either 'Microsoft SQL Server' or 'Oracle'.
- Available settings in the Connection Configuration section will differ dependent on which connection type you have selected in the section above. For both connection types, you will need to enter a User ID and password. If you have selected a SQL Server connection type, you will then need to select a server and database from the drop-downs. However, if you have selected an Oracle connection type, you will need to select a data source from the drop-down.
- Additional connection configuration can be completed by checking the box next to Customize Connection String. When this box is checked, you can enter connection string attributes in the table below by clicking on Add Attribute. To remove an attribute, select it and click Remove Attribute. For a list of available attributes, consult the user documentation of the database server that you are using. The only attributes that cannot be customized are the User ID, password and Integrated Security. The User ID and password must be entered in the fields above.
- The Load Options section enables you to adjust how the load is performed by Decline. You can specify how many documents the loader will process in sequence by using the scroll tool next to Batch Size. Adjusting this parameter will increase or decrease the amount of time per batch and the memory requirements for both the database and Decline. You can also specify the amount of time that Decline will wait for each batch of documents to be retrieved by the data source by using the scroll tool next to Time Out. Increasing the value of this parameter will help when the database connection is slow.
Template configuration: Properties tab
- Click theProperties tab. Enter a query in the Properties Query section and click on Validate Query on the right hand side of the tab. If the query is invalid, a warning message will appear underneath the Properties Query section. To preview your data, click the Preview Data button. The data will appear in a new window.
- The Properties in Row Format option can be enabled if your data is in a tall, row-oriented format. To specify settings for this option, check the Enabled box in this section. Then using the drop-downs, specify the Name Column and Value Column. Then click Validate Query; the properties will now be available in the Property Mapping section. Finally, select the Well Name from the drop-down.
- Properties are displayed in the Property Mapping section at the bottom of the tab. To add a property, click on the Click here to add new property header below the hierarchy. Once you have added a property, it will appear in the Document Property column. You will then need to select the Data Column Name field for this property using the drop-down list. You will be able to populate this name once the data is loaded.

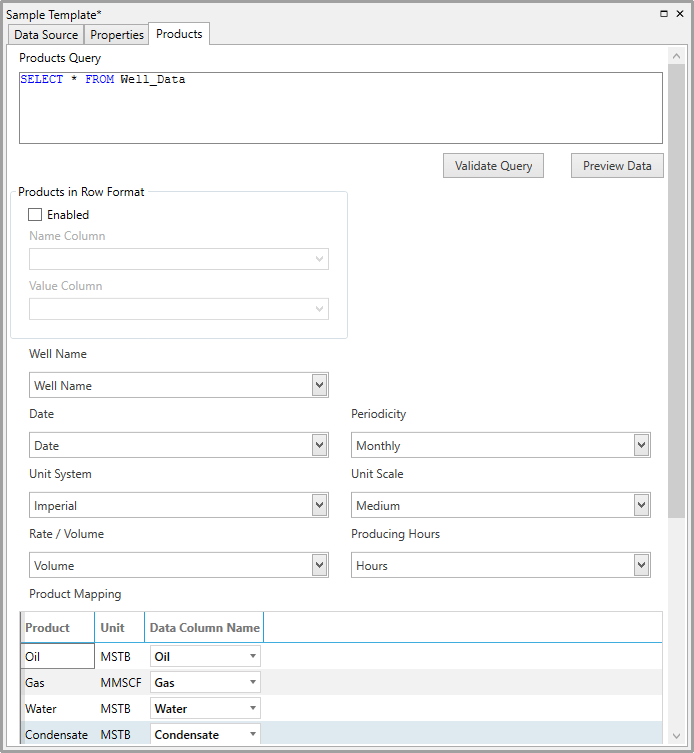
Template configuration: Products tab
- Click the Products tab. The Products Query and Products in Row Format sections function in the same way as the Properties Query section and the Properties in Row sections, respectively, on the previous tab. On this tab, you can also specify the Date, Periodicity, Unit System, Unit Scale, Rate/Volume, and Producing Hours using the drop-downs. (See Volumes, rate and producing time for for how Decline handles data in rate and volume formats.)
- Products are displayed in the Product Mapping section at the bottom of the tab. The Unit System and Unit Scale settings correspond directly to the Unit column; for example, units will be converted to imperial measurements if Imperial is selected in the Unit System drop-down.