
This document details the setup and usage of the integration between Execute and Peloton’s WellView and SiteView products.
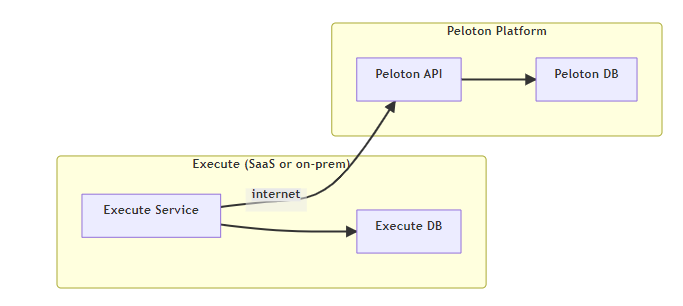
The integration can be graphically described as follows:
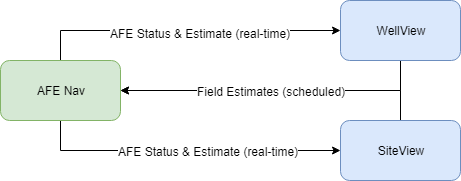
The system of record for AFE information is Aucerna Execute. The system of record for Field Estimates is WellView/SiteView. This integration supports this concept by copying data from the system of record, and ensuring it is read-only in the other system. Some features of the new integration include:
- Field estimates vs. AFE are prominently displayed throughout WellView. This integration ensures that the current AFE status and estimate are available in WellView so that field staff can avoid accidentally spending on unapproved AFEs, and highlight potential overspends faster.
- Field estimates in Aucerna Execute are often entered/imported monthly which means that they are not fresh enough to raise red flags until after a project completes. This integration makes it easy to refresh field estimates in Aucerna Execute daily. Administrators can use the AFE dashboard or daily email reminders to notify AFE owners that it’s time to supplement AFEs when the AFE field estimates are within a threshold of the AFE estimate.
- Cost Management is a primary concern for many of our clients: budget vs. field estimates vs. actuals. This integration simplifies data management and avoids wasted effort for duplicate entry.
Usage
Once configured, the behaviour of the integration with WellView/SiteView is the same whether you are using Peloton Platform, or an old on-prem deployment of WellView/SiteView.
Pushing AFE information into WellView / SiteView
In order to push AFE information into WellView/SiteView, the AFE must be mapped to the appropriate Job(s).
AFEs can be mapped to one or more Jobs under one or more Wells/Sites in WellView/SiteView (many:many). This mapping is manually created during AFE creation (in Execute) by the AFE owner, a reviewer, or an administrator.
This process of mapping creates a link which facilitates the integration between the two solutions, and also simplifies reporting and corporate dashboards across both.
The mapping screen can be accessed from the AFE under “More > WellView/SiteView - Set Mapping” (note that WellView/SiteView part of the label adjusts based on which modules are enabled). This menu item is available to users who would normally be allowed to edit the AFE (i.e., owners and reviewers on unreleased AFEs, administrators with the Edit Any AFE privilege) and administrators with the brand new “Peloton Modify Mapping” administrator privilege.
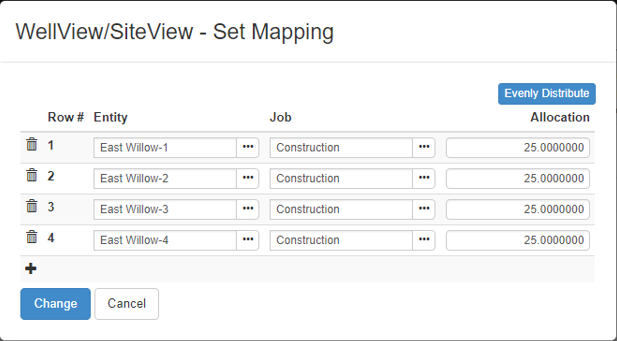
This integration supports many:many mappings of AFEs to Jobs/Wells. If an AFE links to more than one Entity/Job, the AFE estimate will be allocated to those jobs based on a single % allocation, or using a GL-based filter (i.e., “all 9300.* estimates go to the Drilling Job”). GL-based filtering requires additional configuration.
When mappings exist for an AFE, a new “Peloton Integration” tab will appear on the AFE and give a read-only view of those mappings:

Mappings can also be reported on from the AFE Browse screen using the “AFEs - Peloton Integration Mapping” report type. This makes it easy to find all AFEs mapped to a particular job or entity.

In general, AFEs that are mapped to WellView/SiteView will automatically sync changes across to those systems upon changes in Aucerna Execute. This means the integration is effectively real-time.
Very little configuration is required for this integration but plugins allow some additional control over:
- What additional AFE information is pushed to WellView/SiteView
- When we consider an AFE eligible to be pushed to WellView/SiteView
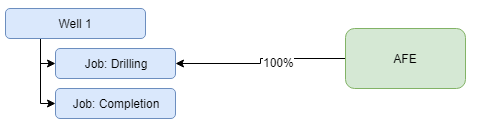
Mapping: Single AFE to Single Entity/Job
This most common case is a 1:1 mapping of an AFE to an Entity/Job. In this case, the AFE estimate is 100% allocated to the linked Job.
Mapping: Single AFE to Multiple Jobs on the Same Entity
In cases where an AFE combines costs from multiple jobs onto a single AFE (such as combining drilling and completion costs), the AFE can be linked to multiple jobs on the same Well and the AFE estimate allocated to each Job based on a % allocation.
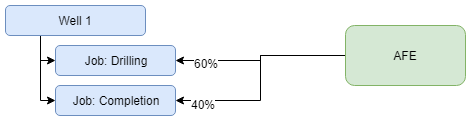
Alternatively, costs can be allocated to the appropriate job based on the GL account using the peloton_estimate_filter.config filter.
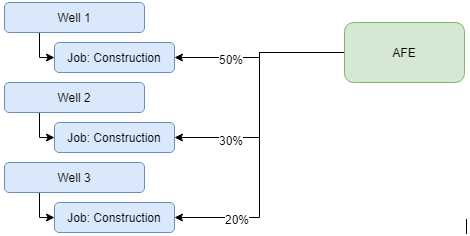
Mapping: Single AFE to Multiple Entities
In the case of a pad construction AFE, where construction costs are allocated back to multiple wells, the mapping could look like the following:
Syncing Entity and Job Names
The integration is built against the System ID (WV/SV), the Job ID and Entity ID. Because these aren’t very user friendly, we also store the Job Name and Entity Name at the point the mapping is made.
Periodically (2am every week day by default), a scheduled job (“Peloton Entity/Job Name Sync”) updates all the stored Job and Entity names in Aucerna Execute to reflect the name changes WellView/SiteView. This synchronization job can be manually run, if necessary.
Pulling Field Estimates from WellView / SiteView
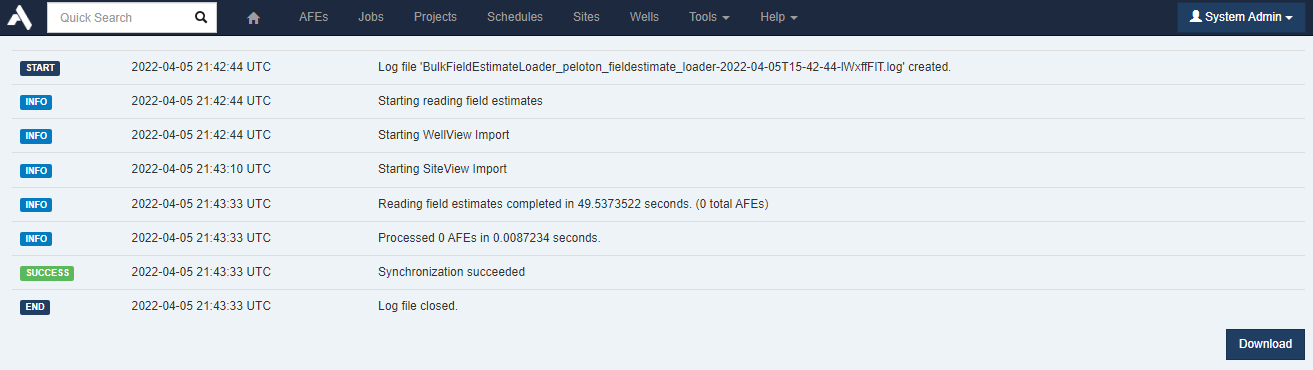
If configured, field estimates are imported either manually (Tools > Synchronization > Peloton Field Estimates), or automatically based on a configured schedule.
In its default behaviour, Execute will do it’s best to ensure that the total field costs on the AFE match between the two systems, while still respecting the rules within Execute.
- If a cost changes in a prior month within WellView/SiteView, and that month is “submitted” (locked) in Execute, the difference will be carried forward to the first unlocked month.
- If WellView/SiteView includes a cost booked against an account that does not exist in Execute or is not valid for the AFE, the import will allocated that cost to a special Monthly Import Account to ensure that the amount doesn’t get lost. Usage of this account can be found in the reporting tool to help guide data clean-up efforts.
Manually Pushing an AFE to WellView/SiteView
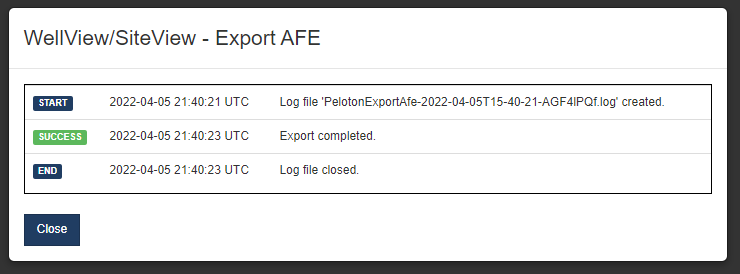
Sometimes it’s helpful to manually send/resend an AFE across to WellView/SiteView. This can be accomplished with the WellView/SiteView - Export AFE option under the More menu. This feature is particularly handy for troubleshooting activities because and warnings/errors are shown in the log window.
Setup & Configuration
This section details the setup and configuration of this integration with WellView/SiteView.
Peloton Platform (SaaS WellView/SiteView)
- Client ID
- Client Secret
- Username and Password for a service user in WellVIew/SiteView
- All import/export of data will be performed with this user account
Pre-setup Checklist
-
Pick/setup a WellView/SiteView service account that will be used for this integration.
- Find out the Client ID, Client Secret for that user…
- Verify that all Daily Reports have both a Start and End time
- Verify consistent mapping from Execute Account Number to CODE1…CODE6 (i.e. CODE1 = major, CODE2 = minor) for all Daily Report entries.
- Find out what versions of WellView and/or SiteView are used
- Find out whether your organization is using Peloton’s Commercial Integration
Base setup
Copy plugins_available\peloton\saas_peloton.config to the plugins folder.
If you are integrating with WellView, also copy plugins_available\peloton\saas_peloton_wellview.config to the plugins folder.
If you are integrating with Siteiew, also copy plugins_available\peloton\saas_peloton_siteview.config to the plugins folder.
Update saas_peloton.config with your Client ID and Client Secret. The other parameters should not need to be changed.
<parameters>
<organization>aucerna</organization>
<wellAppId>WellView</wellAppId>
<siteAppId>SiteView</siteAppId>
<clientId>SERVICES.2D0AA</clientId>
<clientSecret>myclientsecret</clientSecret>
<idUrl>https://id.peloton.com</idUrl>
<apiUrl>https://api.peloton.com</apiUrl>
<versionLocation>v1.1</versionLocation>
<userLocation>user</userLocation>
<tokenLocation>connect/token</tokenLocation>
<wellsLocation>provisional/wells</wellsLocation>
<?if USE_COMMERCIAL_INTEGRATION ?>
<usingCommercialIntegration>true</usingCommercialIntegration>
<?end?>
</parameters>
versionLocation above may need to be adjusted based on the verison of WellView / SiteView.Account Mapping
The integration requires a mapping between Execute account numbers (i.e. 9300.123) and Peloton’s cost codes (Code1=9300, Code2=123, Code3=, Code4=, Code5=, Code6=). This is done with the peloton_accountmapping.config file.
Copy plugins_available\peloton\peloton_accountmapping.config to the plugins folder.
The default behaviour in this file is to assume the format “MAJOR.MINOR” in Execute, and a mapping of Code1=MAJOR and Code2=MINOR. If your account structure in Execute, or mapping in WellView/SiteView is different, the peloton_accountmapping.config file will need to be adjusted.
Approved AFEs only?
Often it is necessary to ensure only internally approved AFE information is pushed into WellView/SiteView. This can be enabled by copying plugins_available/peloton/peloton_export_filter_approved_only.config to the plugins folder.
Field Estimates
To enable the import of Field Estimates from WellView/SiteView, you’ll need to copy plugins_available/peloton/peloton_fieldestimates.config to the plugins folder.
The default configuration requires an administrator to manually kick-off an import of Field Estimates. You can enable an automated nightly import of Field Estimates by changing that above configuration file and replacing <!-- <?define SCHEDULE_FIELDCOST_SYNC ?> --> with <?define SCHEDULE_FIELDCOST_SYNC ?>.
First Start and the Refresh Token
Once the above configuration changes have been made, start or restart the Execute service.
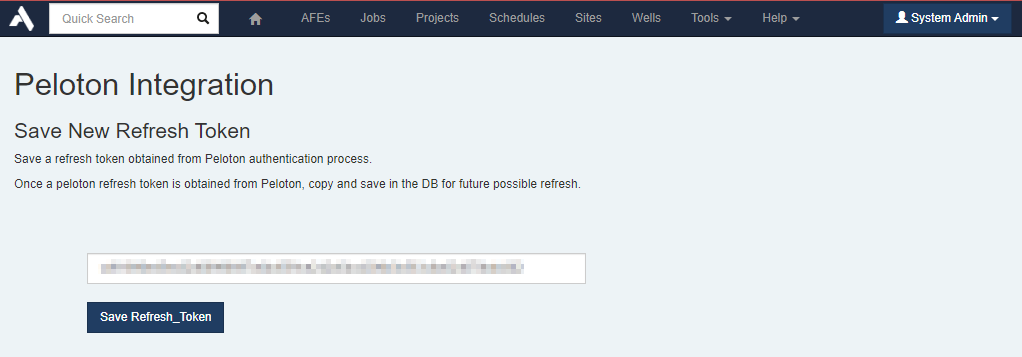
Before the integration will work a new Peloton Refresh Token will need to be created and entered into Execute.
Your refresh token can be obtained by visiting and logging in with the username and password obtained above:
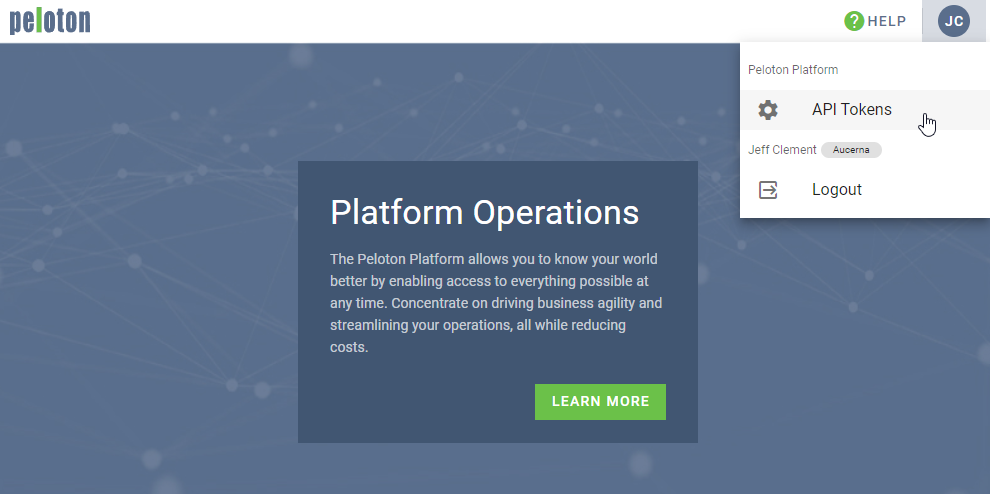
https://platform.peloton.com/tokens/
- Choose API Token from the menu in the top right.
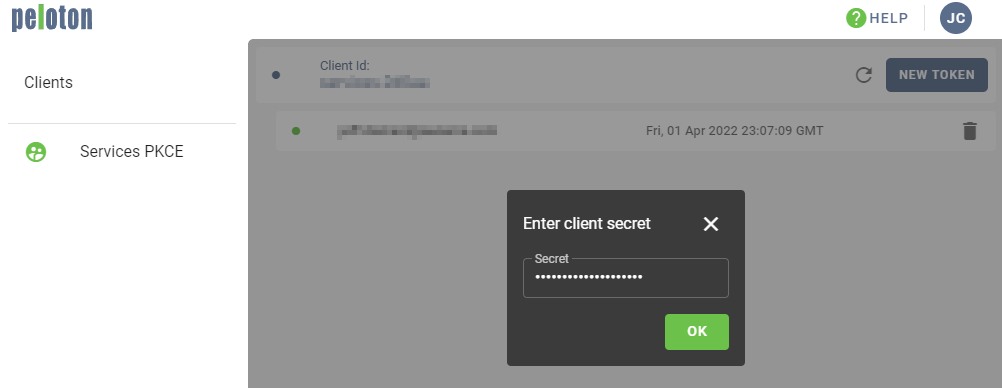
- Select New Token and enter the Client Secret from earlier.
- This will generate a new token and copy it to your clipboard.
- Paste this newly generated token into the Refresh Token field under Tools > Configuration > Peloton Refresh Token and click Save Refresh_Token.
At this point, the new integration should be configured and ready to go.
On-Prem WellView / SiteView (legacy)
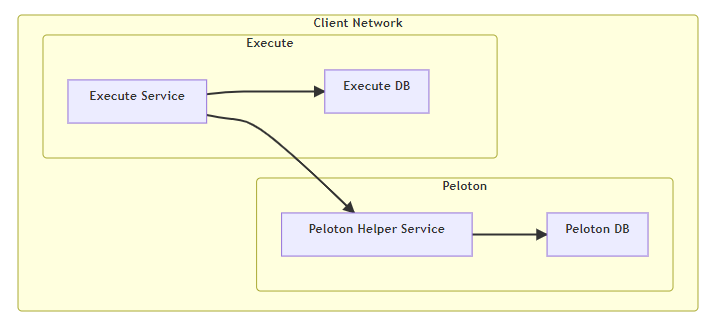
Integration with on-prem instances of Peloton’s WellView/SiteView require an additional Peloton Helper Service provided by Quorum. If you require this integration, get in touch with Quorum Support for this additional package.
Once you’ve obtained the helper service:
-
Unzip it to a folder on the same machine as the Execute service (i.e.,
c:\Quorum\PelotonIntegration\Prod). -
Copy Peloton integration DLLs from WellView/SiteView (from
admin/sdkfolder) to the above folder (overwriting any that are already there). - Copy the configuration files provided by Quorum Support.
-
Register the Peloton Helper Service by running
InstallServiceScript.ps1.
A folder peloton should be created in the plugins folder and that should contain peloton.config (from plugins_available/peloton/), Eni.AfeNavigatorServer.Components.PelotonIntegration.dll and the appropriate integration DLLs from WellView/SiteView (found under the admin/sdk folder).