Extracting information from Execute using OData
Overview
Execute’s OData module provides a simple way of reading Execute information from external tools such as Spotfire, Microsoft Power BI, data warehouses, and even Microsoft Excel. Using OData to integrate Execute into corporate reporting and business intelligence tools provides a robust integration that avoids the need to build queries against the underlying database (whose schema may change during upgrades).
OData is offered as an optional module that may be licensed separately from other modules in Execute. By default, Execute includes a trial version of OData support that is limited to smaller reports.
Converting a Browse Report to an OData URL
The OData module is built upon Execute’s browse reports and provides simple tools from converting a browse report into an OData URL.
To obtain the OData URL for a report you are looking at in Execute, click the drop-down arrow next to the Excel button and choose “Export as ODATA”.

This will create an OData URL that represents the current report you are looking at including the current filters, sorting, columns, etc. The URL will look something like this:
https://afenav.microeggbertoil.com:443/odata/AFE/AFE/Rows?$filter= TotalGrossEstimate ge 1000000M and substringof('DRILLING', Custom_AfeType) and Archive eq false&$select=AfenumberDoc_Afenumber, VersionString, Description, Custom_AfeType, Custom_Area, Custom_District, TotalGrossEstimate, TotalGrossActual, TotalGrossFieldcost, OurWi&$orderby=AfenumberDoc_Afenumber asc
This URL can be pasted into many BI and reporting tools and will produce the same results seen in the browse view.
Documents and Report Types
Execute exposes one OData endpoint for each Document / Report Type. These endpoints define a collection of Rows based on the columns available for the underlying report type.
The pattern of these URLS is https://SERVER/odata/DOCUMENT_TYPE/REPORT_TYPE.
Most document types (AFE, RTD, PROJECT, …) have an identically named report type that for the default top-level view on documents of those type. The following endpoints would return top-level information for commonly used document types in AFE Nav:
| Document Type | Report Type | OData End-point |
|---|---|---|
| AFE | AFE | https://SERVER/odata/AFE/AFE |
| RTD | RTD | https://SERVER/odata/RTD/RTD |
| PROJECT | PROJECT | https://SERVER/odata/PROJECT/PROJECT |
There are also many other detailed report types such as the following:
| Document Type | Report Type | OData End-point | Description |
|---|---|---|---|
| AFE | AFE/LINE_ITEM | https://SERVER/odata/AFE/AFE-LINE_ITEM | Line-item details for an AFE |
| AFE | AFE/PARTNER | https://SERVER/odata/AFE/AFE-PARTNER | Partners on an AFE |
| PROJECT | PROJECT/MONTHLY | https://SERVER/odata/PROJECT/PROJECT-MONTHLY | Monthly capital details for projects |
| PROJECT | PROJECT/CAPITAL | https://SERVER/odata/PROJECT/PROJECT-CAPITAL | Capital summary for projects |
| PROJECT | PROJECT/AFE_ALLOCATION | https://SERVER/odata/PROJECT/PROJECT-AFE_ALLOCATION | Details on any AFEs allocated to Projects |
Some report types such as “AFE/LINE_ITEM” have forward slashes in their name. These must be converted to dashes when included in ODATA URLs.
Most BI / reporting tools, when given a url like “https://SERVER/odata/AFE/AFE-LINEITEM“, will download all columns and all rows for that particular report type. This can be fine-tuned by adding column selection and filtering criteria to the URL.
OData Parameters
Execute supports the following OData query parameters to further control the data queries from Execute.
| Parameter | Description | Default | Example |
|---|---|---|---|
| $select | The list of columns to be returned by the OData query | All Columns for Report Type | $select=AfenumberDoc_Afenumber, VersionString, Description, Custom_AfeType |
| $orderby | How results should be sorted (list of columns) | Unsorted | $orderby=TotalGrossEstimate desc, Custom_AfeType |
| $top | Limit the number of rows returned in query | all data | $top=10 |
| $filter | Filter rows returned by query | all data | $filter=TotalGrossEstimate ge 1000000M and substringof(‘DRILLING’, Custom_AfeType) |
| $format | Whether results should be JSON or XML | XML | $format=JSON |
Filter expressions can be quite complex. The easiest way to build a valid filter expression is to build a report that performs the desired filter and then capture the OData URL for that report.
Column Naming
OData column names are based on the field IDs. These field IDs can be found in the document configuration for each document (on the Field Configuration tab) or by holding F4 while that column is shown on the browse page.
Field IDs are transformed into OData column by the following rules:
- Path elements (CUSTOM, AFE_TYPE, TOTAL_GROSS_ESTIMATE - the elements separated by the ‘/‘ character) are converted to mixed case where the first letter of the element, and each letter after an underscore are capitalized. Underscores are then removed. For example: CUSTOM becomes Custom, AFE_TYPE becomes AfeType, TOTAL_GROSS_ESTIMATE becomes TotalGrossEstimate
- Paths elements that were separated by ‘/‘ are now separated by underscore. For example: CUSTOM/AFE_TYPE becomes Custom_AfeType
- Detail fields, those that starting with “$”, are prefixed with Child_. For example: $ACCOUNT becomes Child_Account
- System fields, those that starting with “!”, are prefixed with Sys_. For example: !LAST_MODIFIED_USER becomes Sys_LastModifiedUser
Archiving
By default, OData does not return data for Archived documents. In order to return archived records and non-archived records add Sys_Archive eq true to the $filter expression.
For example: the following querys returns only non-archived AFEs with a gross estimate greater than or equal to 1,000,000 and “DRILLING” in the AFE Type.
$filter= TotalGrossEstimate ge 1000000M and substringof('DRILLING', Custom_AfeType) and Sys_Archive eq false
$filter= TotalGrossEstimate ge 1000000M and substringof('DRILLING', Custom_AfeType)
While this query returns all AFEs (matching the other filter criteria) regardless of whether or not they are archived.
$filter= TotalGrossEstimate ge 1000000M and substringof('DRILLING', Custom_AfeType) and Sys_Archive eq true
Authentication
Execute’s OData adapter supports HTTP Basic Authentication only.
The credentials provided can be any valid Execute account (users with an Execute password) or they can be a domain user (ie. “company\first.last” - if your environment uses Windows single-signon).
Known Issues
Filtering on very large numeric values (> $2b) will fail if the filtered amount is an integer. The workaround is to add one cent to the filter amount so that it is treated as a decimal instead of an integer.
Getting started with Bi Tools
Getting Started with Microsoft Excel
To add Execute data into Microsoft Excel, first generate an OData URL as described above.
Open Excel and click on the Data Tab.
Click Get Data, hover over From Other Sources, and select From OData Feed.
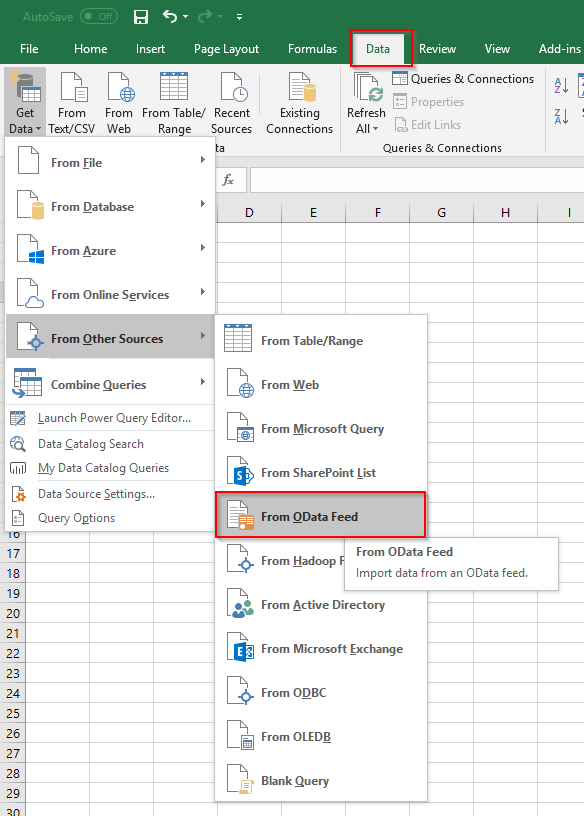
Click image to expand or minimize.
Paste in the URL provided. You will likely be asked for a username and password at this point. Enter those too.

Click image to expand or minimize.
Finally, you’ll see a preview of the data. Click the Load button.
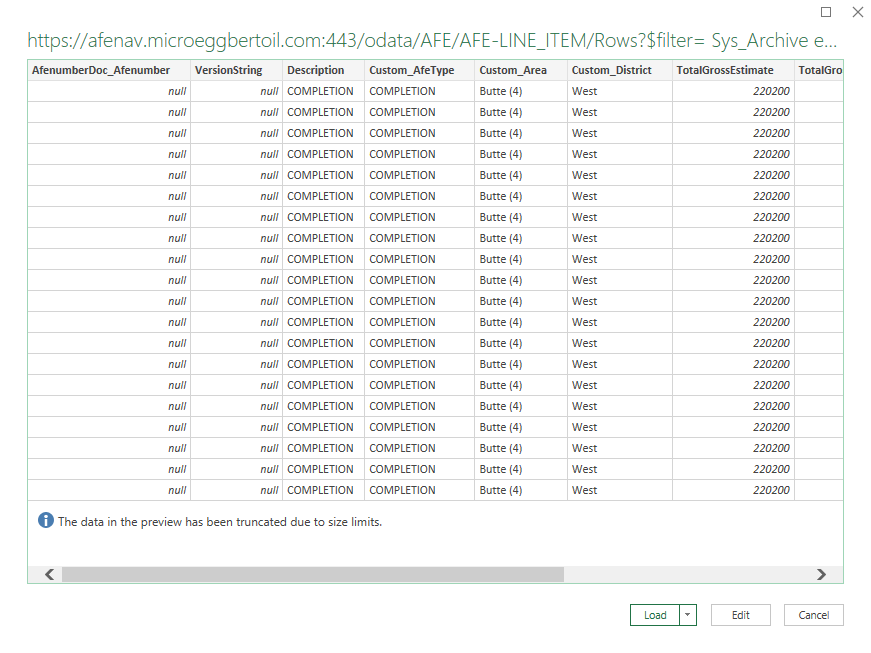
Click image to expand or minimize.
The result will look like the following:

At any time, you can refresh the information in Excel by clicking the Refresh All button on the Data tab.
Getting Started with Microsoft Power BI
To add Execute data into Microsoft PowerBI, first generate an OData URL as described above. Next, from the Power BI desktop tool select Get Data and click OData Feed.
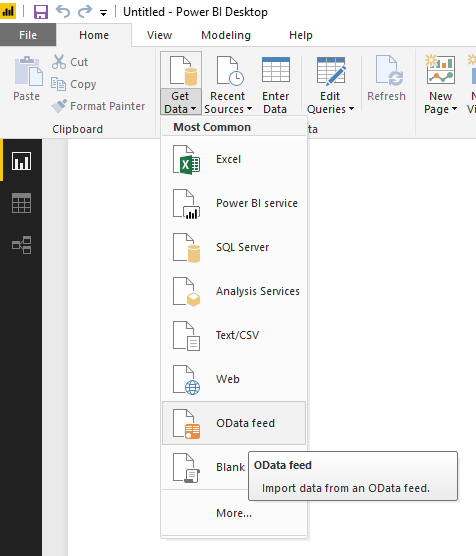
Click image to expand or minimize.
Paste in the URL provided. You will likely be asked for a username and password at this point. Enter those too.

Finally, you’ll see a preview of the data. Click the Load button.
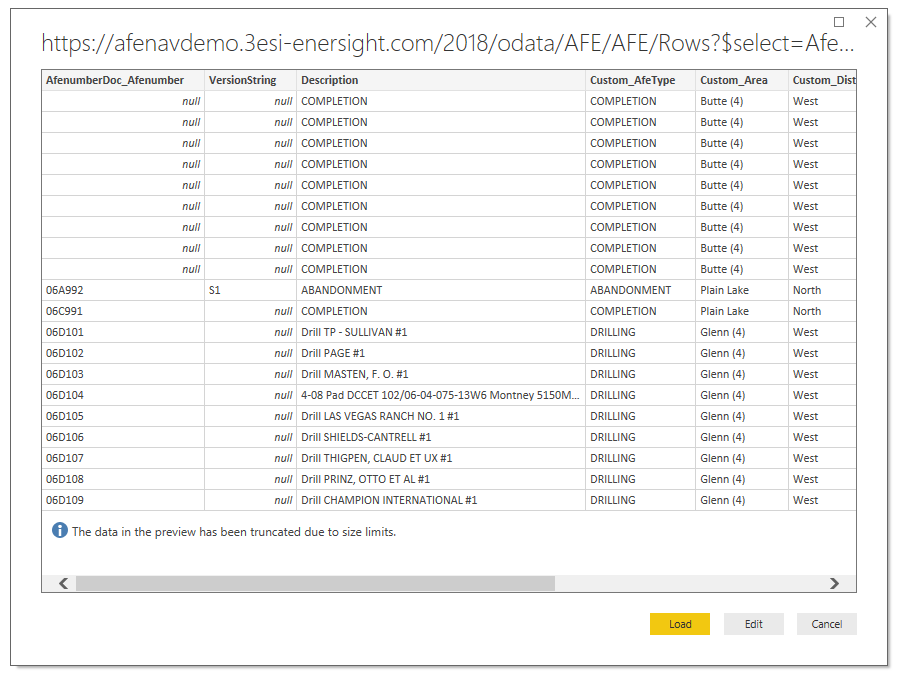
Click image to expand or minimize.
Continue to bring in any other data sources and author your reports as you would normally.
Getting Started with Spotfire
Under the file menu, select Add Data Tables.
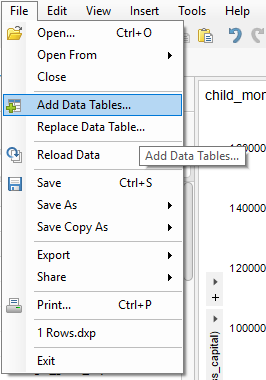
Click image to expand or minimize.
Next select Add (1) and then click OData (2).
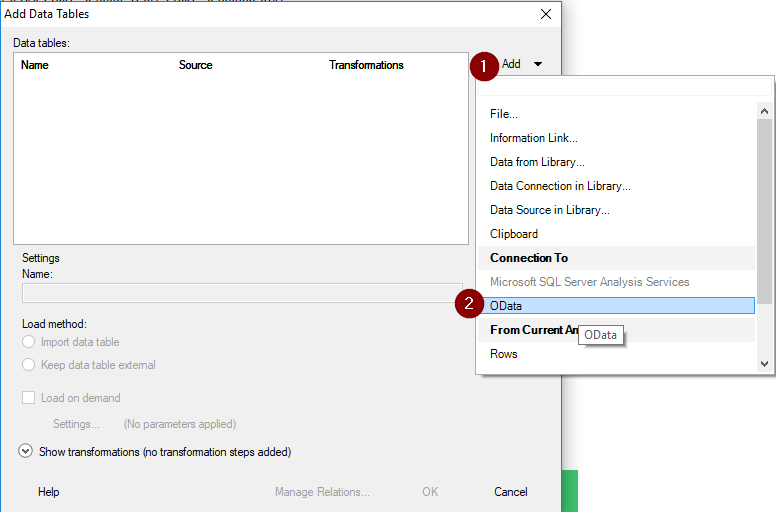
Click image to expand or minimize.
Now paste in the OData URL. Note that Tibco requires the base URL only (without the "/Rows?$filter..." part).
A valid URL for Tibco would look similar to the following: https://afenavdemo.3esi-enersight.com/2018/odata/AFE/AFE.
Select Basic Authentication and provide a username and password.
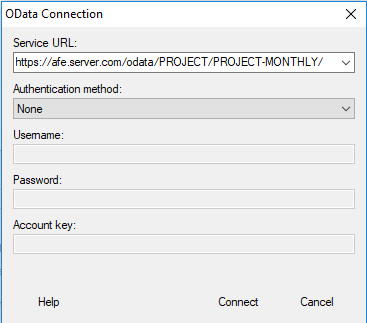
Click image to expand or minimize.
Click the Connect button.
Now add the Rows view and alter the column selection if desired.
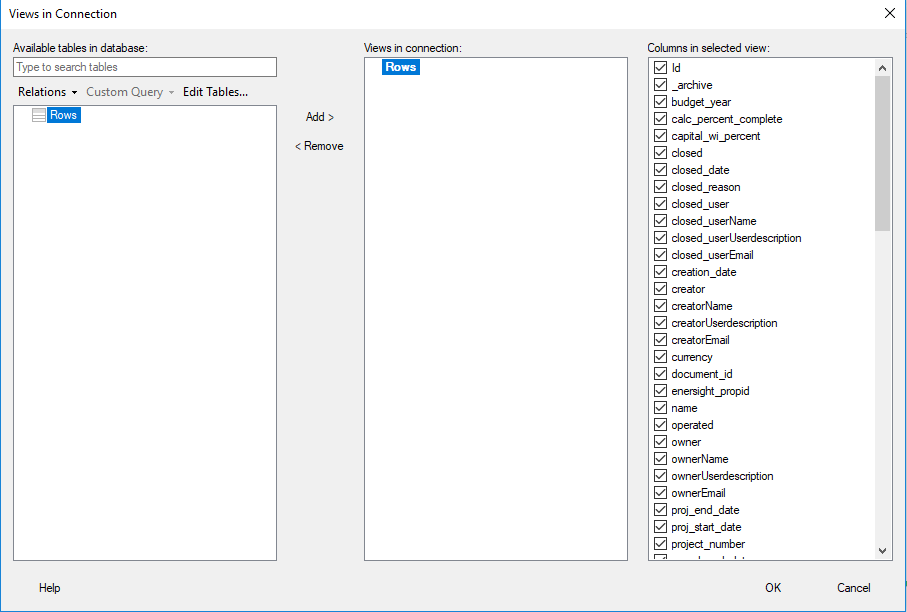
Click image to expand or minimize.
