
Reference guide for installing and upgrading Execute
Architecture and Hardware
Execute is a self-hosted web-based application that runs on your infrastructure or hosted by Quorum. These instructions apply only to client-hosted/on-prem instances of Execute.
You will need:
- The application server. A Windows-based server class machine to run the Execute service. (physical or virtual)
- A database server capable of hosting the Execute database (Oracle or SQL Server)
- Space on a user accessible file share to store attachments
- A name such as afenav.yourcompany.com (usually a DNS alias) for the URL to the service
- A valid SSL certificate
See the detailed System Requirements document for more detail.
Environments
It is standard practice to deploy Execute twice, to create both a test (TEST) and a production (PROD) environment. For environments with extensive integrations between Execute and external systems, it may also make sense to add an additional development (DEV) environment to facilitate their development and configuration.
More than one copy of the Execute service can be installed to the same computer by using different port numbers. It is convenient to install TEST and PROD Execute environments on the same application server so they can share the same DNS and SSL configuration.
Ideally, the TEST environment will be routinely refreshed to match PROD environment so that administrators can try out changes in TEST prior to implementing them in PROD.
See Test Environments for details.
When installing the Execute Service to virtual machines, it is important to ensure that these virtual machines do not share a Windows SID (caused by cloning the virtual machine without running SysPrep). Failure to ensure that Execute virtual machines have unique SIDs will cause problems when licensing Execute.
For more information see https://support.microsoft.com/en-us/help/314828/the-microsoft-policy-for-disk-duplication-of-windows-installations.
The Installation Package
The Execute installation package is distributed as a ZIP file with the following files:
| File | Description |
|---|---|
| DatabaseTool.exe | Database Tool. Used for creating new databases, upgrading existing ones (created prior to Execute 21), and copying databases (i.e., from Oracle to SQL Server). |
| ExecuteSetup.exe | The installer for the Execute Service. |
| Database\create_tablespace.sql | Oracle script to a tablespace. |
| Database\create_user.sql | Oracle script to create a user with the appropriate permissions. |
Installation of a new Execute Environment
Execute requires:
- All end-users have access to the server through a common hostname (usually something like afenav.yourcompany.com)
- That you have a valid SSL certificate for the above hostname
The steps for installation will consist of:
- Planning
- What application server will the Execute service be installed to?
- What user account will the Execute service run under? (usually this should be a domain user account which has been added to the local Administrators group on the application server)
- Where will the database be hosted?
- Where will the network components (reports + logs + attachments) be located?
- What hostname will users access this server by? (We strongly recommend something like: execute.yourcompany.com)
- Where will you acquire a valid SSL certificate for the above hostname from?
- Will Execute be exposed users outside of the LAN? If so, how? VPN or direct access?
- Creating the Execute database
- Installing the Execute Service
- Acquiring and installing the SSL certificate
- Tuning Network Components file system permissions
- Verifying connectivity
- Obtaining a license
- Deploying to users
Setting up the Database
The first step when installing an Execute environment is to create the database.
A new database is created using the Database Tool (dbtool.exe), or by manually creating a new empty database (Execute automatically creates tables when the Execute Service first starts). The Database Tool is a wizard-based tool. If you choose to go that route, follow the prompts and select “Create a New Execute database”. You’ll need DBA level privileges to create the database user.
Installing the Execute Service
Once the database is configured you should install the Execute Service on your application server.
Execute is installed using “ExecuteSetup.exe” from your installation package.
The installer should be run on the application server by an administrator with domain admin privileges.
Domain admin privileges are recommended because the installer must register an
The installer will require you to provide:
- Installation path for the Execute Service.
- This should be a local drive on your application server and will need to be writable by the user account the service runs under.
- Usually “c:\Execute\service” for application servers with a single Execute instance or something like “c:\Execute\PROD\service” for application servers with multiple instances.
- The Network Components path is the network share used for storing attachments, reports, logs and other shared content. Usually, this path should be a UNC to a common folder. The user running the Execute service will need permissions to this folder.
- The Environment Name is used to identify the environment (in log messages and emails) and usually should be something like “Prod” or “Test”. The environment name can never be changed so it should not include a version number.
- SMTP Server information. SMTP Server used for outbound email notifications and the from-address for those notifications. If the SMTP Server is left blank, no notifications will be sent. Often it is desirable to install with SMTP disabled (blank) and only enable it once implementation is complete.
- Server Name. This is the machine name (hostname) for the server. Ideally this will be something like execute.yourcompany.com that will already be configured to resolve to the server’s IP address internally, and if direct remote access is enabled, the firewall IP address externally (split-horizon DNS)
- Web Services Port - is the port the Execute Web Server listens on. It should usually be port 443 (the default for HTTPS) except in circumstances where multiple environments are hosted on a single application server (in that case, PROD should be on port 443 and the other environments should be configured to use some other available port)
- User credentials for the user the service will run as. This should be a domain user account which has been added to the local Administrators group on the application server.
- Database credentials for the database created in the earlier step.
Ensure that you have allowed incoming connections to these ports in Windows Firewall and in any other firewall software or devices.
SSL Installation
Upon installation Execute generates a temporary
Execute requires you have a valid SSL certificate for your Execute installation. Certificates can be purchased from a certificate provider, you can use an internal Certificate Authority to issue these certificates, or you may be able to use an existing certificate.
For simplicity we recommend purchasing a single-domain SSL certificate from a Certificate Authority and installing that on your Execute Server. This process is usually the easiest approach and will have the greatest compatibility with user devices such as mobile phones and tablets.
Full details on this process are covered in the SSL Reference documentation.
The basic steps are:
- Run ssltool.exe (in the service folder) and generate a certificate signing request (CSR) by clicking “Request Certificate from Certificate Authority” (make sure the Common Name matches your Execute service’s hostname - execute.yourcompany.com).
- Go to your SSL certificate provider and use the generated CSR to request an SSL certificate. Carry out any verification steps required by the certificate provider.
- Once the certificate is obtained, use the “Install Certificate From Certificate Authority” feature in ssltool.exe to install the certificate. Also use the “Install Intermediate Certificate” button to install any provided intermediate certificates.
This will install the certificate into the Windows Certificate store and associate it with the Execute service.
Initial Administrator Credentials
On first start, Execute will generate a strong random password for the default Administrator user. This password is found in the file “config\initial_system_admin_password.txt” in the service folder. If Execute is unable to write to that file due to filesystem permissions, the password will instead be captured in the Execute log (either log file or Windows Event Log).
Best practice is to send “initial_system_admin_password.txt” to the initial administrative user for the Execute environment and then remove it from the application server. The administrator password should then be changed within Execute and stored securely using your organizations preferred approach.
Verifying connectivity
At this point you should be able to visit your Execute service in your web browser and verify that it loads without certificate errors by entering the url https://execute.yourcompany.com (if you are using the default port 443) or https://execute.yourcompany.com:9999 (where 9999 is replaced by the port you configured Execute to run its web server).
You should be able to login with:
| Database Type | Username | Password |
|---|---|---|
| New / EmptyDB | System Admin | see config\initial_system_admin_password.txt |
If you are having difficulty connecting to the Execute service:
- Does the hostname you are using to access Execute resolve to the IP address to the server?
- Does the name in the SSL certificate match the hostname you are using?
- Are the client machines able to ping the Execute service machine?
- Is Windows Firewall preventing access to the two ports you configured for the service?
Outbound Internet Access
For proper functioning of the Execute service, it is required that outbound permissions to the following domains be permitted.
- https://afenavlicense.energynavigator.com/ - licensing
- https://grid.energynavigator.com/ - DLS/NTS grids for mapping
- https://updates.aucerna.app/ - update notification + release notes
- https://api.mapbox.com/ - map tiles
Obtaining a License
On the first attempted login to Execute, the license dialog will be displayed (below). Use the “Email this ID to Execute Support” link to email the Installation ID to Execute Support. This identifier is needed to generate a license file. Once Execute Support confirms that a license has been created, clicking the “Download New License” button will download and install the license. After the license has been installed, all users with access to Execute will be able to log in.
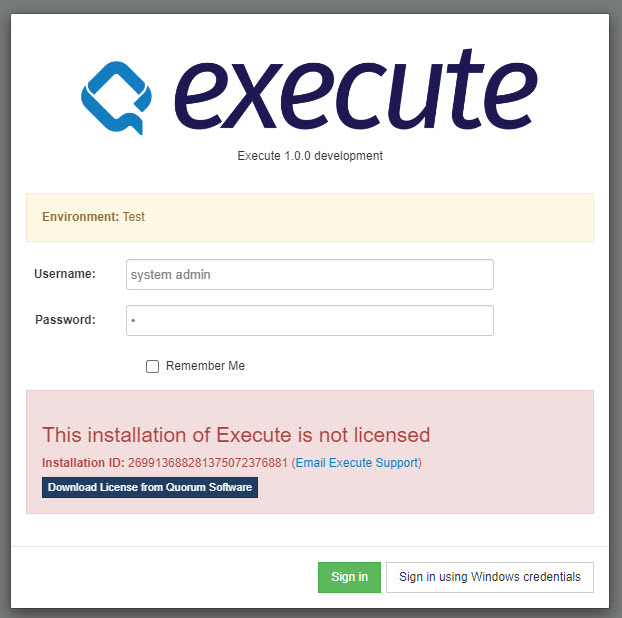
Click image to expand or minimize.
Tuning the Network Components Permissions
The Network Components folder contains client executable files, log files, global reports, attachments and a few other things. These folders should be locked down in the following way:
| Subfolder | Description | Permissions |
|---|---|---|
| Attachments | Stores files attached to AFEs/RTDs. | read/write by service user only |
| Database | Some sample database scripts and the database tool | |
| Documentation | Links to documentation site | |
| Logs | Log files for service and integrations | read/write by service user , read by administrators |
| Messages | Queued email messages (those that failed original delivery) | read/write by service user only |
| SavedForms | Folder where saved partner letters are saved | read/write by service user only |
| TemplateReports | Excel-based Template Reports | Read by service user. Read/write by any user permitted to author new global template reports. |
| Uploads | Temporary folder for uploading CSVs with actuals or field costs | read/write by service user and any user providing this data |
If using the Legacy Desktop Reporting tool, the following folder permissions may also need to be adjusted. If not, these folders may be readonly.
| Subfolder | Description | Permissions |
|---|---|---|
| LegacyReporter | Some configuration for the LegacyReporter | Read for all Executeusers (if using) |
| Config | Some configuration for the LegacyReporter | Read for all Executeusers |
| Reports | Global Reports for Desktop Reporting tool | Read for all Execute users, write for any Executeuser who will author global reports |
Deploying to Users
Deploying Execute typically only requires distributing the link to the Execute Service (https://execute.*yourcompany.com*). This can be done via email or pushed out as a shortcut using group policy.
Server Maintenance
There are a few special considerations to be aware of with the Execute Service:
- Changes to configuration files (those in the config or plugins folder in the service folder) require the service to be restarted to take effect. This can be performed through the Services control panel or from within Execute.
- Execute aggressively caches data. Never make writes directly to the Execute database while the service is running unless the writes are being made to specifically designated staging tables.
- Ensure you maintain backups of
- the Execute database
- the Network Components folder
- the config and plugins folders from the service
- the installed SSL certificate including the private key
Upgrading an Existing Execute Environment
Steps for upgrading an Execute instance:
- Make a backup of the service, network components folders, and the database.
- [OPTIONAL FOR UPGRADES FROM EXECUTE 2020 OR EARLIER] If you are upgrading from a version prior to Execute 21, upgrade the database using the Database Tool (dbtool.exe). The Database Tool always creates a new database and never modifies the source database, so it is safe to run against your PROD environment.
- Run the ExecuteSetup.exe against your existing service folder to upgrade the Execute service and network components. The installer will pick up your existing configuration and should not need any changes.
In some cases the Database Tool may stop with an error. This may indicate that you have historical data that was not expected by the Database Tool. In this case, get in touch with Execute Support for a resolution.
Upgrade Considerations
-
If you are upgrading form Execute 2019 or earlier and using Quorum provided integration with Peloton's WellView/SiteView, please get in touch with support for more information. The integration, while still supported, will require some manual steps to re-enable.
-
If your organization is using Data Navigator for integration with QByte, please contact support. Your upgrade will require manual steps to re-enable these integrations.
-
When upgrading an Oracle database, it is strongly recommended that the character set of the target database matches that of the source database. Failing to do so may cause long text fields to be truncated.
-
If your organization uses the legacy Windows Desktop-based reporting tool, note that this tool is now packaged separately and will need to be manually deployed to any users/admins who require this tool.