
Operational Scheduling - User Guide
This guide is intended to provide an overview of the Aucerna Execute Operational Scheduler for users who build, manage, or view operational schedules.
Browsing Schedules
Your environment will likely have multiple schedules to allow separating scheduling activities between areas or business units.

You can view the list of schedules available in Aucerna Execute by clicking the “Schedules” link in the Main Menu.
There are two main types of schedule that will appear in the Schedule Browse page:
- A Master Schedule is intended to represent the current plan / reality. Integrations and reporting will usually reference Master Schedules. There are often only a small number of Master Schedules (usually broken by area or business unit).
- A Schedule Copy is a copy of another schedule (Master or Copy) that can be used as a sandbox for trying a set of changes without impacting any reporting, or integrations. A common workflow is for changes to be made in a Schedule Copy and periodically have those published to an appropriate Master Schedule as a way of versioning when information is shared with the broader organization.
Using the column configuration screen (gear icon) you can include the “Is Master?” field to differentiate between Master Schedules and Schedule Copies. The “Master Schedule” field allows you to see which Master Schedule a Schedule Copy is associated with.
Viewing Schedules
From the Schedule Browse screen you can open a schedule by clicking the green “view” button next to the schedule row.

The diagram below outlines the major components of the Schedule interface:
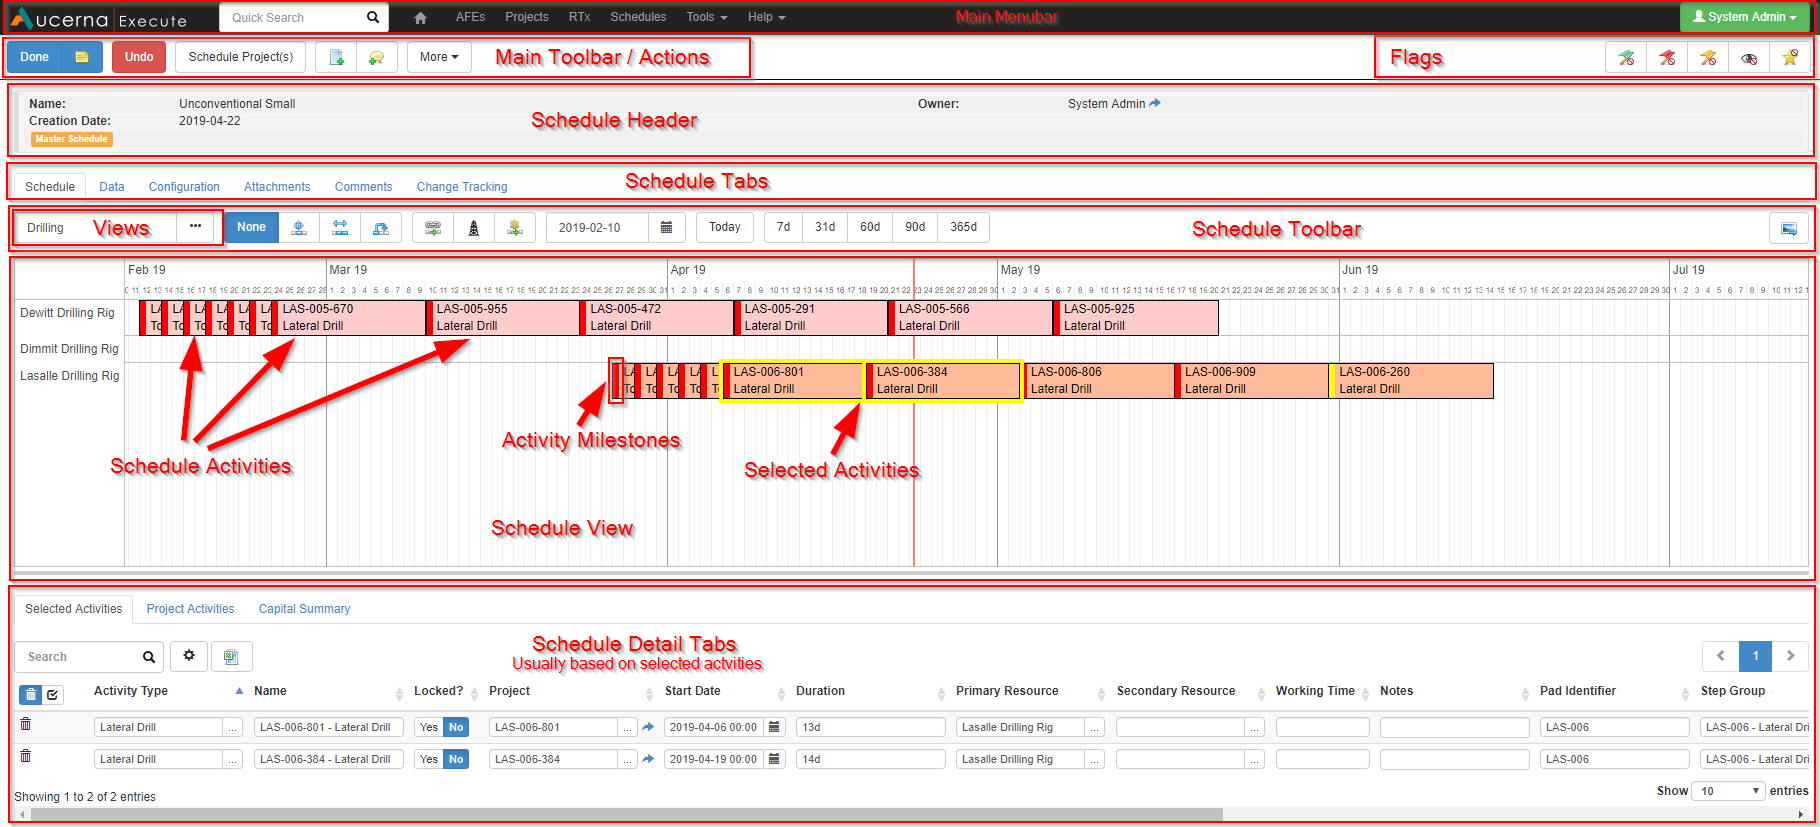
Click image to expand or minimize.
Upon opening a schedule for the first time, you’ll see the default view for that schedule. The default view is the view whose name is alphabetically first. You can change between views by clicking the “…” button on the view list.

The system will remember, for each schedule, which view you looked at last and use that one next time you open that schedule.
When you open a schedule, it opens in read-only mode. In this mode you can move around in the schedule in several different ways:
- You can drag the schedule with your mouse to scroll up/down and left/right
- You can use the mouse wheel to scroll up and down (for schedules with many rows)
- You can hold CTRL and use your mouse wheel to change zoom (show more or less time on your schedule)
There are also a series of helpful tools in the schedule toolbar that allow you to change the starting date for your view on the schedule (date of the leftmost edge) and the duration (number of days of data to show).

- This date picker lets you select the starting point for your current schedule view
- The today button is a quick way to set the starting point to today (meaning the leftmost edge will be today’s date)
- The quick zoom buttons let you easily change the scale of your schedule to presets
Schedule Views
The list of views on a schedule is configurable.

Click image to expand or minimize.
By default, new schedules include several out-of-the-box views to get you started and allow you to see the activities in your schedule.
During an implementation of Aucerna Execute Operational Scheduling, additional views are created to present the appropriate data to each of the teams that work with the schedule.
If there is information that you’d like to see in a schedule, but you can’t find an appropriate view for, contact your System Administrator.
View configurations include the following:
- The schedule swim-lanes (rows & sub-rows). Wells? Areas? Resources?
- Activity filtering? Only specific activity types? Only activities in a certain area?
- What text/content to show on the activity box
- What milestones to show on the activity box
- How to color the activity box
- How to group adjacent activities (i.e., showing one box for pad drill instead of individual wells)
Printing a Schedule
Sometimes it’s helpful to be able to create an image or a PDF from a schedule for printing, or to include in an email or presentation. For this, use the Print button in the right of the schedule toolbar.

The Print button allows you to generate one or more images from the current schedule, adjusted to your preferred paper size (either from pre-sets for a custom size).
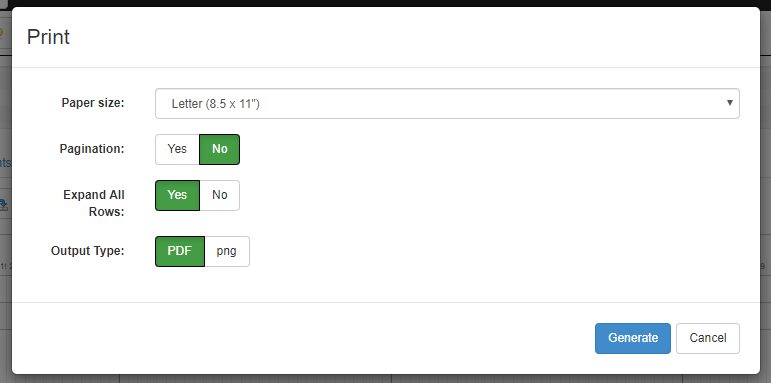
Click image to expand or minimize.
The image generator includes two options:
- Setting Pagination to No will generate a single image of the defined width whose height is adjusted to include all content in the current view. Setting pagination to Yes will generate multiple images if the height of the content exceeds the page height.
- The Expand All Rows option is useful to control whether the generated image shows sub-row detail, or is limited to summary data only.
- Use Output Type to select between PDF and PNG based outputs
Creating Schedules
Users with permission to create schedules will see a green “Create New Schedule” button on both the Dashboard and the Schedule Browse Screen.

All new schedules are created as Master Schedules. If you wish to prototype some changes to wells captured in an existing schedule, you should make a copy of that other schedule, rather than creating a new master schedule.
After creating a new schedule, it’s a good idea to give it a unique name by navigating to the Configuration > General tab on the schedule and providing a name.
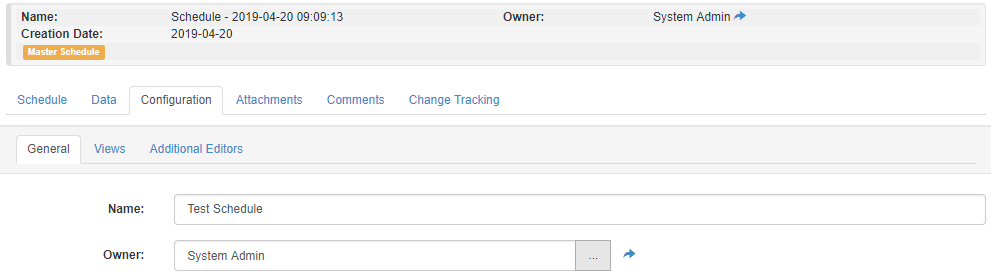
Click image to expand or minimize.
After creating a new schedule, you may also wish to assign additional schedule editors on the Additional Editors tab.
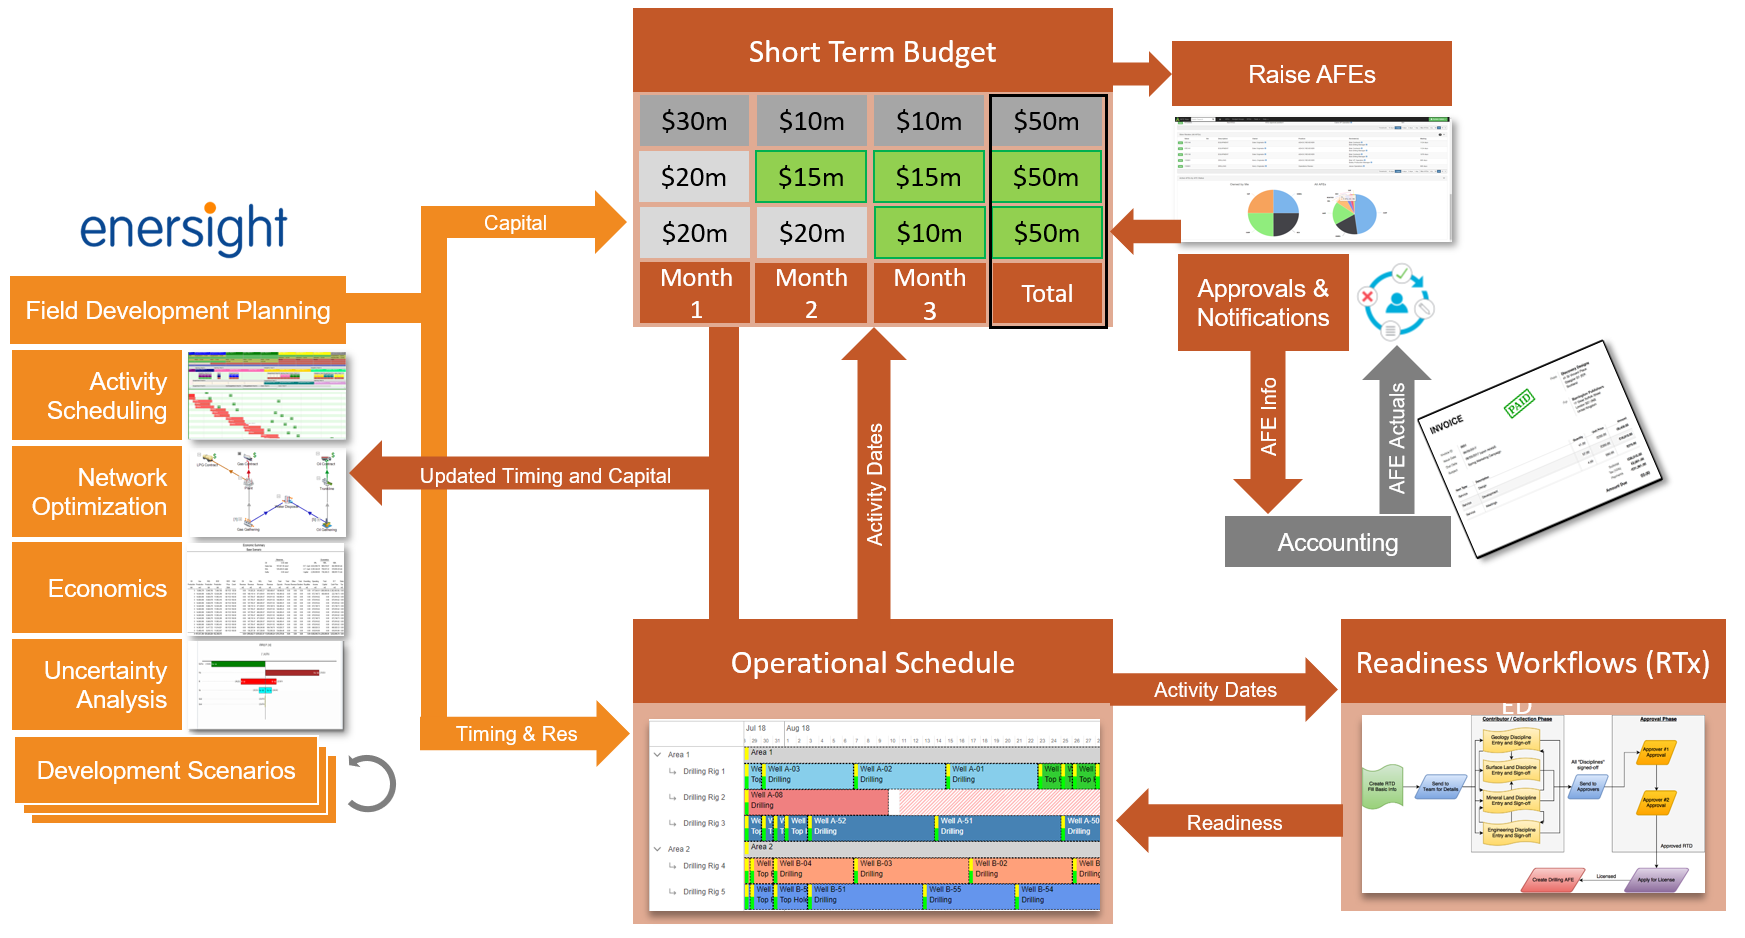
Depending on how your organization uses the Operational Scheduling module, your next steps may involve loading schedule data from your long-range plan in a system like Enersight, Value Navigator, or Excel. Alternatively, you may build your schedule up manually from available projects in the Budgeting & Forecasting (Projects) module.
Importing from Enersight
If your organization does its long-range/field development planning in Enersight, Aucerna Execute supports out-of-the-box two-way integration that allows you to build on the schedule that’s been created by Enersight.
Click image to expand or minimize.
The integration allows linking one Schedule with one Enersight Project/PDS.
The first step is to create a PDS from Enersight.
- Be sure that the PDS includes well level detail
- Each well in the Enersight Project must be assigned a unique PropID
- There must be a 1:1 relationship between Capital Class and Capital Type
- Each Drill Step in the Enersight Drilling Program must be assigned a unique “Booked As” value (you should not use the "Not Booked" step in your drilling program)
- If you are using formulas in Enersight to calculate durations, make sure that those calculations are rounded to the nearest minute to avoid overlap on the imported schedule
- The near-term of your Enersight project must not contain any wells with a well counter greater than one
- Any resources used by activities imported from Enersight must have a resource count of one in Enersight (i.e. no generic resources)
Make sure you configure Aucerna Execute with your Enersight username and password by navigating to Tools > Configuration > Enersight Credentials.
It’s strongly recommended that the Enersight assets should be imported into the Budgeting & Forecasting module (Projects) before loading activities into a schedule. This should already be done as part of the budgeting process.
On the schedule toolbar, the More menu will contain an Enersight Configuration Settings item that will bring up the following configuration screen. This screen links the current Schedule to a specific Enersight Project & PDS, and also configures the time window that will be imported into the Operational Schedule. Remember this is an operational schedule and bringing in years of activities will slow it down substantially!
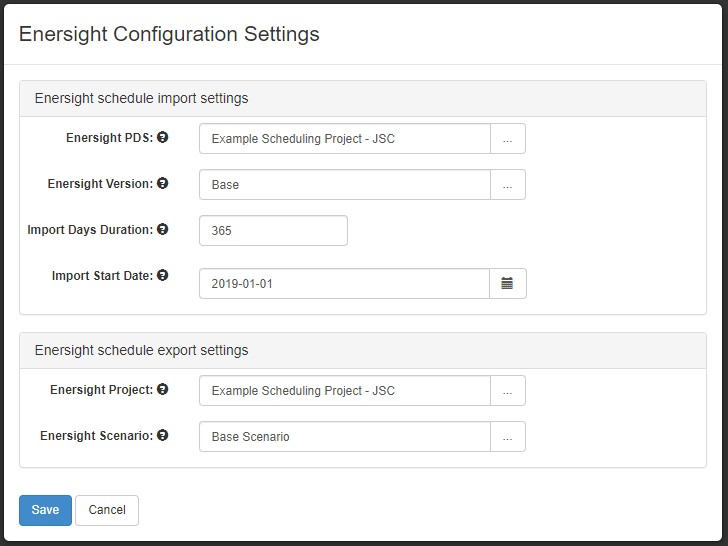
Click image to expand or minimize.
Once the configuration has been complete, you can select More > Import From Enersight to import/update your schedule from Enersight.
During the first import there will likely be messages like the following:

Resource Type 'Generic' has been created to support new activity 'E005-01-7 - Top Hole' for Resource 'Drilling Rig I (1)'.'
Resources are automatically created during the Enersight import but there isn't enough information to automatically pick an appropriate Resource Type in the Operational Schedule so the system installs a Generic resource type.
You'll want to review the list of resources under Configuration > Resources and assign appropriate resource types so that any "Allow Pad Overlap" settings are honoured.
The import from Enersight will never change the timing on activities whose “Scheduled” flag is set to Yes. Having a scheduled flag set to Yes means that the timing for that activity is owned by the Operational Schedule.
Importing from Projects
Alternatively, your environment may be configured to use the Budgeting & Forecasting module as a project inventory.
Click image to expand or minimize.
In this case, there will be a “Schedule Project(s)” button in the main toolbar on a schedule that allows you to add a project (from the Budgeting & Forecasting module) to the schedule.

The “Schedule Project(s)” screen will allow you to select one of your existing projects and add its activities to the current schedule.
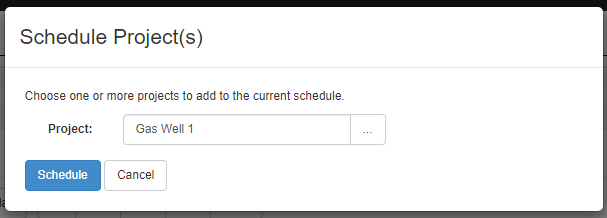
Click image to expand or minimize.
GIF demonstration. Click image to expand or minimize.
The newly added activities aren’t yet assigned to a resource. Once they are added, the new activities can easily be dragged onto specific resources from the “Unassigned” row, and we can also move activities around in time as required.
Manually Adding Activity Details
It is also possible to manually build up activities (or to manually edit the information from one of the above two processes). This data can be bulk loaded from Excel or using our Data Loaders.
Add Resources
We can add some resources on the Data > Resources tab. This will give us something to attach our activities to. This example shows a couple sample Drilling Rigs and a Frac Crew.
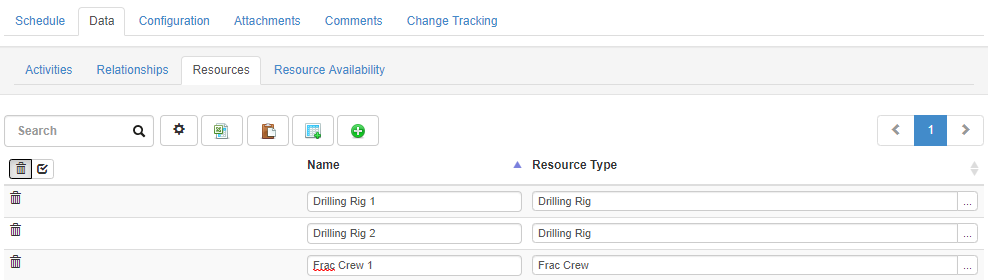
Click image to expand or minimize.
Add Resource Availability
We can also add availability to our resources on the Resource Availability sub-tab. The system will automatically warn you if you try and assign activities to a resource during a period it is not available. Below is basic availability for "Drilling Rig 1":
- Lease on the rig from Jan 1 - Dec 31, 2019
- Planned maintenance from April 14-20, 2019
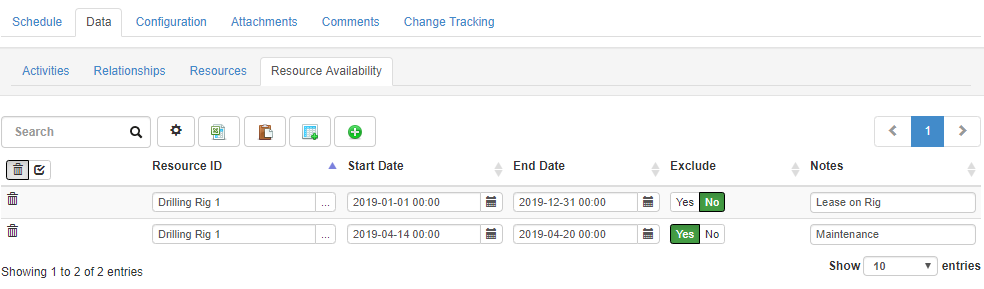
Click image to expand or minimize.
If we jump over to the Schedule view and select the "Primary Resource" view, we'll see the availability on the Gantt like this (you'll likely need to zoom out to see it - hold down CTRL and use your mouse wheel to zoom).

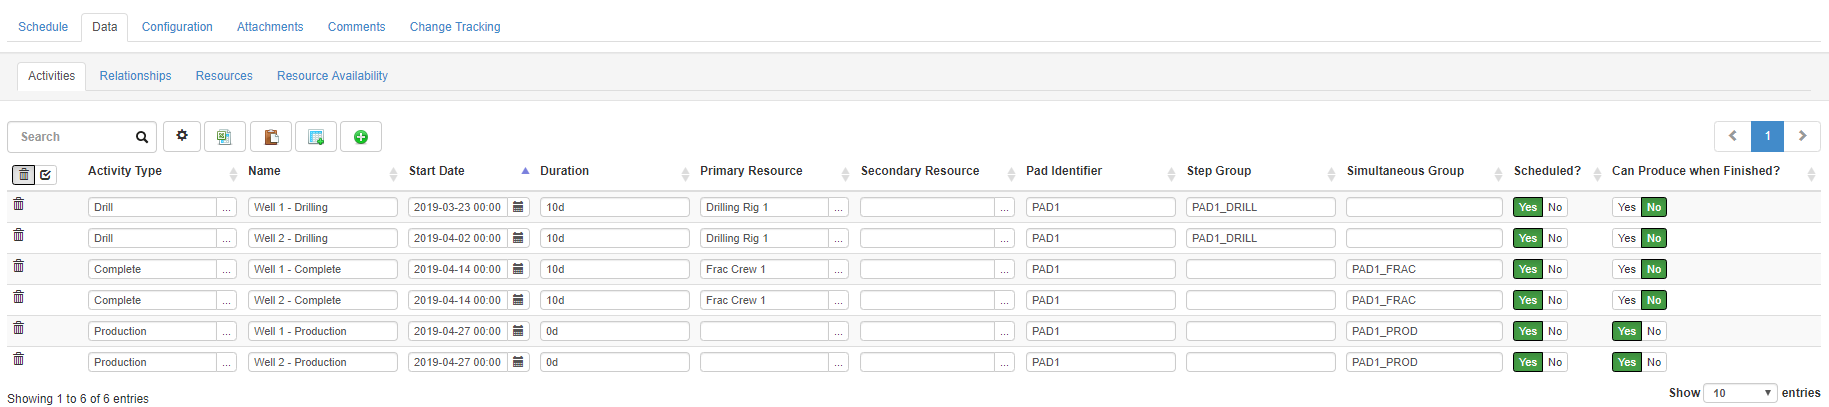
Add Activities
Activities can be manually added by adding rows to the Data > Activities tab. Here is a quick sample set of activities for a couple wells with a simple drilling plan.
Click image to expand or minimize.
A few quick explanations:
- This is a simple set of activities for drilling two wells that are part of a single pad.
- Each well consists of three activities: Drilling, Completion, and Production
- The Drilling activities are assigned a Primary Resource of Drilling Rig 1
- The Completion activities are assigned a Primary Resource of Frac Crew 1
- The Production activity is marked as "Can Produce After."
- This is used for indicating the producing date which can be used to update production forecasts in other systems.
- The Drilling Activities are in a "Step Group" which means that they must happen sequentially.
- The Completion and Production Activities are in two separate "Simultaneous Step Groups" which mean that those activities must happen simultaneously.
- Step Groups & Simultaneous Step Groups are used to make it easier to keep related activities together when editing the schedule.
Add Activity Relationships
You can add relationships between activities on the Data > Relationships tab.

Click image to expand or minimize.
Relationship arrows are not turned on by default in the "Primary Resource" view but, behind the scenes, these relationships are linking these activities together so that the system can warn if we violate a relationship, and automatically move related activities when you ask it to. It looks like this:

Step Groups & Relationships
The Operational Scheduler supports several two main types of relationships: step groups, and activity relationships.
Step Groups
Step Groups are a way of specifying that two activities have to be done together. There are two types of Step Groups:
- Simultaneous Step Groups require that all activities in the group start and end at the same time.
- (Sequential) Step Groups require that all activities in the group happen one after the other with no space in-between them and no overlap.
All activities in a step group must be assigned the same Primary Resource.
Activities are assigned to step groups by setting the “Step Group” or “Sequential Step Group” field. Activities with matching step group values are considered to be in the same step group.
Step groups are a rigid constraint and, in general, any changes to the schedule will automatically update other activities in the same step group.
Activity Relationships
Activities can also have additional relationships added on the Data > Relationships tab. These relationships can make one activity (the “Destination Activity”) dependent on the timing of another activity (the “Source Activity”). Relationships can be created between any two activities, regardless of which well/project they are associated with. The system supports a number of different relationship types, such as:

| Relationship Type | Description | Strict Constraint |
|---|---|---|
| After End |
The Destination Activity must happen after the Source Activity completes |
No |
| After Start |
The Destination Activity must happen after the Source Activity starts |
No |
| Start |
The Destination Activity must start when the Source Activity starts |
Yes |
| End |
The Destination Activity must end when the Source Activity ends |
Yes |
| Just in time |
The Destination Activity must end on or before the start of the Source Activity |
For example, if we wanted to ensure that we don’t inadvertently complete a well before we drill it we would add a relationship row where:
- Destination Activity - Complete the Well
- Source Activity - Drill the Well
- Relationship Type - After End
We can add an additional offset to a relationship to ensure that a minimum distance between those two activities is met. (i.e., Complete must happen at least 10 days after Drilling completes)
By default, changes to the schedule don’t automatically update related activities. There are options, when editing the schedule, to allow updates to related activities.
Editing Schedules
The first step in making changes to a Schedule is to put the schedule into Edit-mode by clicking the “Edit” button in the main Schedule toolbar, or pressing F7. This will lock the schedule so that nobody else can make changes while you are working on it. This avoids any concerns about lost updates, or data being accidentally overwritten by another user. If someone else is currently editing a schedule, you will not be able to edit it.
Schedule Edit Permissions
By default, the user who creates a schedule is the schedule’s owner. The schedule owner can be changed on the schedule’s Configuration > General tab, if necessary.
Usually, the schedule owner has permission to edit their schedule. The schedule’s Configuration > Additional Editors tab also defines a list of additional users who are allowed to edit the content in that schedule. Finally, administrators with the Edit any Schedule privilege are able to edit any schedule.
Drag and Drop Edits
The Schedule view, while in Edit-mode, allows the user to make drag-and-drop changes to the schedule such as setting activity start dates, shifting activities on a resource, reordering activities and changing the activity duration.
The schedule toolbar (below) allows the user to select which drag-and-drop behaviour they require.
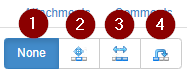
| Icon | Description | Supports Multi-Select? |
|---|---|---|
| 1 |
The “None” action doesn’t allow making drag-and-drop schedule changes. This mode allows click-drag scrolling and activity selection for the purposes of seeing activity detail. |
Yes |
| 2 | The “Move” action enables selecting one or more activities and moving them to a specific point in time, or to a different resource row. | Yes |
| 3 | The “Shift” tool allows shift an activity and all those activities following it on a row. This is useful for opening or closing gaps in rig line. | No |
| 4 |
The “Reorder” tool allows reordering one or more activities on a row. |
No |
By default, the above actions only effect the currently selected activities and step groups (and in some cases other activities on the same row). If you would like to also move related activities, you can use the following toggles:
| Icon | Description |
|---|---|
| 3 |
The “all dependent” toggle automatically moves all other activities dependent on the modified activities by the same amount. |
Table Based Edits
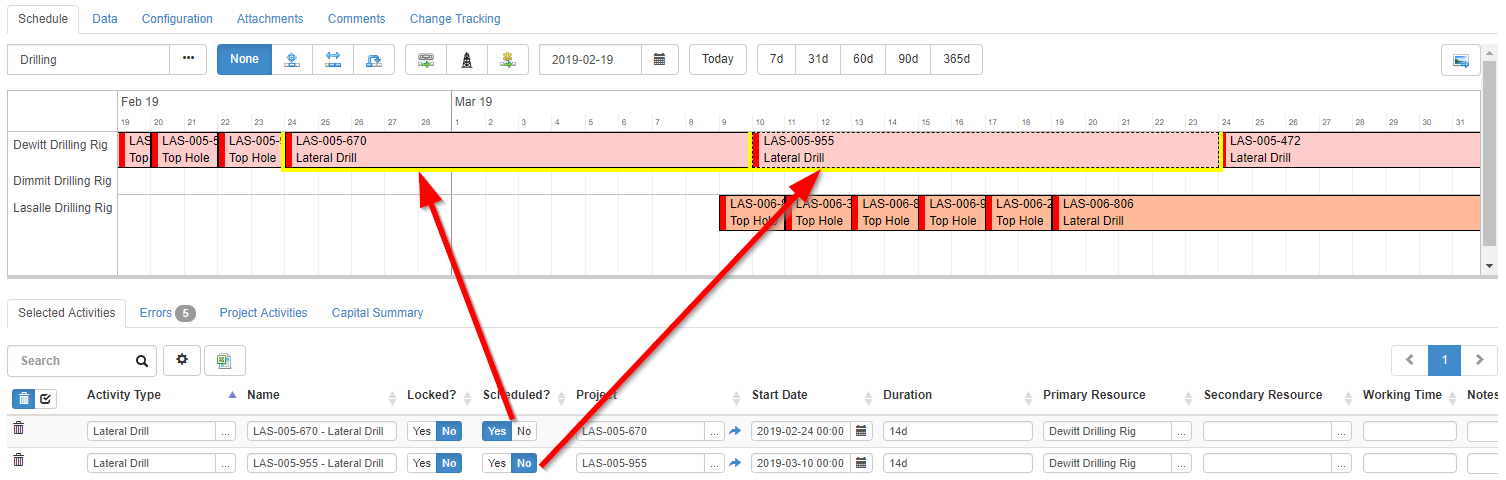
In addition to drag-and-drop updates, you can also modify detail for selected activities on the Selected Activities tab in the schedule detail pane underneath the schedule.
When changing a start date or duration in the Schedule Details tab, all following activities assigned to the same Primary Resource will be shifted by the same amount.
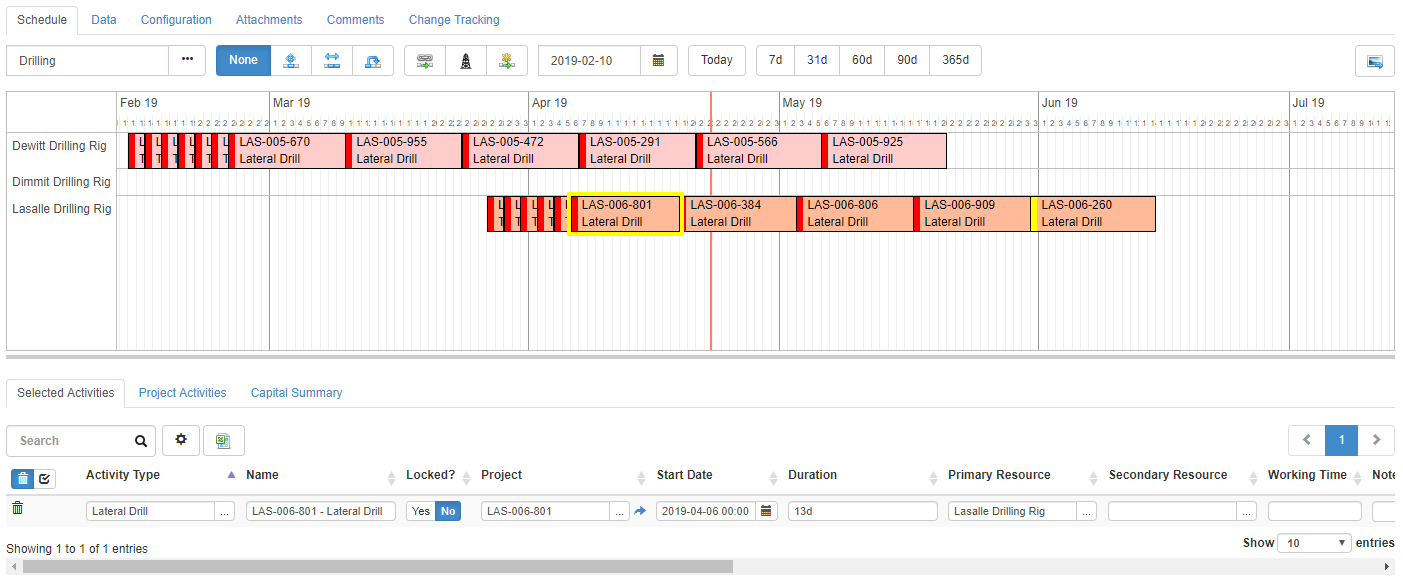
Click image to expand or minimize.
Bulk Edits
You can make bulk edits to activity data from the Data > Activities tab. Like other grids in Aucerna Execute you can use the icons above the grid to export the grid to Excel, make changes, and then re-import the data from Excel.
When changing a start date or duration in the Schedule Details tab, only the modified activity will be affected. This may cause overlaps in the schedule that will need to be fixed manually. The intent is that bulk updates of timing information are coming from an external scheduling tool and are assumed to generate a valid schedule.
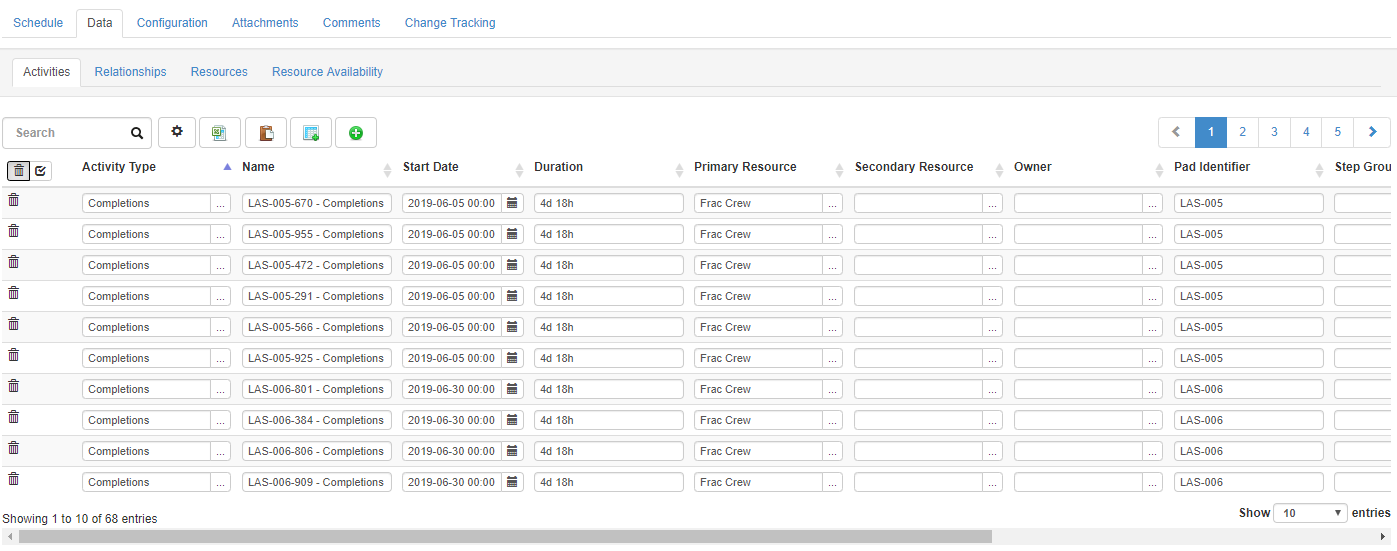
Click image to expand or minimize.
Resolving Errors in the Schedule
When moving activities in a schedule (whether by drag-and-drop, or by manually making changes in the details) table, errors may occur where activities violate one or more constraints.
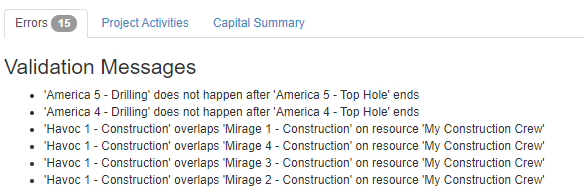
Activities that violate constraints are identified visually by a red cross-hatched pattern, as well as a label indicating the type of constraint being broken:

You can hover your mouse over an activity to see the details of the constraint violation:

Any errors will also be visible in the Errors panel underneath the schedule:
Errors can be manually resolved by moving activities to avoid the constraint violation or, in many cases, you can use the "Correct Errors" button to automatically resolve errors.

The Correct Errors button obeys some very simple rules:
- It will never move an activity to an earlier point in time to resolve an issue in the schedule
- It will never move an activity between resources to resolve an issue in the schedule
- It will never move a locked activity
- It will never move activities that start prior to the current date
- It will try and preserve ordering of activities on a resource
The Correct Errors button will automatically resolve issues such as:
- Broken step groups
- Activities overlapping on a resource
- Activities scheduled on unavailable resources (i.e. during a blackout period)
- Broken activity relationships (accidentally completing your well before drilling completes)
The Correct Errors button will not automatically fix the following types of issues:
- Activities that are scheduled after the Must Start By or Must End By dates (as these would require moving the activity forward in time)
- Activities that overlap the end of a period of availability on a resource (i.e. if an activity is scheduled after your rig lease ends, no amount of pushing that activity out in time will resolve the issue)
Marking Activities as Scheduled
Activities include a Yes/No field called “Scheduled” that is intended to indicate if the activity is owned by the Operational Schedule (Scheduled = Yes), or is potentially owned by the Long-range Plan (Scheduled = No).
Click image to expand or minimize.
When integrating with Enersight:
- Scheduled activities are never overwritten when reading from Enersight
- Scheduled activities only are pushed to Enersight
In general, near-term activities should be marked as scheduled to avoid unintended schedule changes when integrating with planning tools. Although not a requirement, all activities in a project should be marked as Scheduled at the same time. Individual activities can be Scheduled by selecting them in the schedule, and changing the value of the Scheduled field in the Selected Activities detail tab. It’s also possible to bulk Schedule activities using the bulk updates on the Data > Activities tab.
Publishing Schedule Data
Enersight
When an operational schedule is linked to an Enersight project, it’s possible to push updated timing information from the Operational Schedule back into Enersight. This makes it easy to re-run the long-range planning model and make sure the original assumptions still make sense.
This integration will only push “Scheduled” activities to Enersight and when it does, the corresponding Enersight Drill Steps will be marked as static so that Enersight’s scheduler will not make changes to timing for those activities.
To export data to Enersight select More > Export to Enersight.
Reporting on Schedule Data
The Schedule Browse page can be used to reporting on detailed activity information. This information can be accessed by selecting the drop-down arrow next to “New Report” and selecting “Schedules - Activities”. This report type will show one row per activity across all schedules in the system. Usually, it makes sense to filter the data so that only activities from Master Schedules are returned.
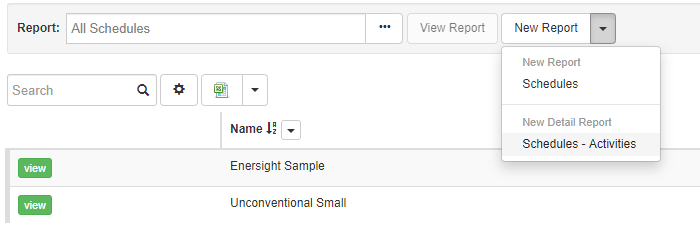
Click image to expand or minimize.
The following example reports on upcoming Production Dates by well. The filters ensure that only the “Can Produce” activity is included from Master Schedules.
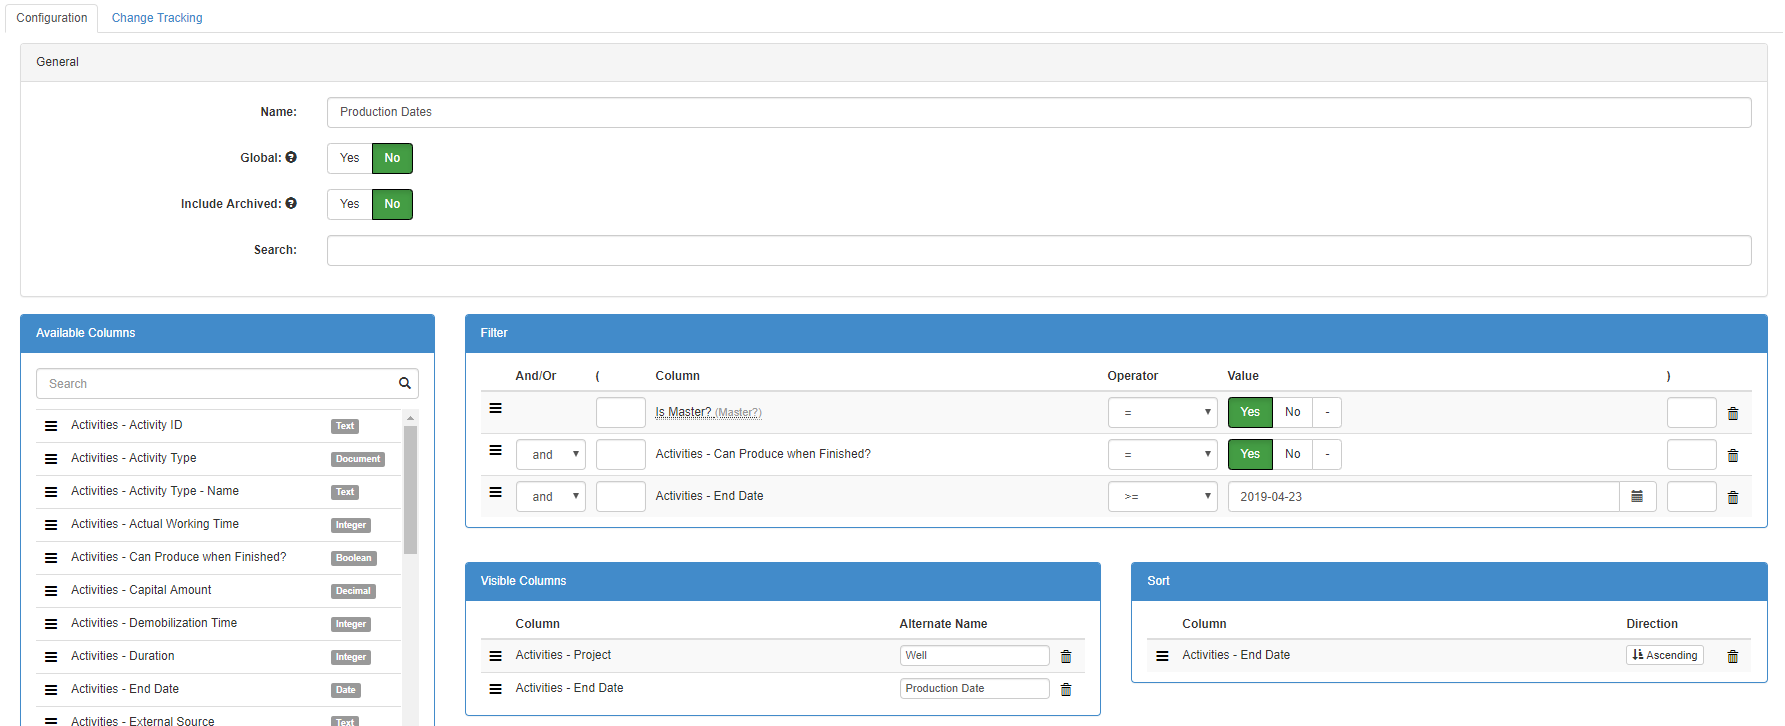
Click image to expand or minimize.
Copying and Merging Schedules
Any user who can create a schedule can also create copies of schedules. A schedule copy is in the same “family” (includes the same wells) but can be modified independently of its source schedule without affecting the source schedule. You can make a copy by selecting More > Copy from the Schedule’s toolbar.
Copies will be identified by the label “Schedule Copy” in their header. You can also use the “Is Master?” column on the browse page to identify Schedule Copies, and the “Master Schedule” column identifies which Master Schedule the copy is derived from.
You can use the More > Compare feature to compare a schedule with other schedules in the same “family”. The compare screen shows a summary of activities whose timing or primary resource has changed.
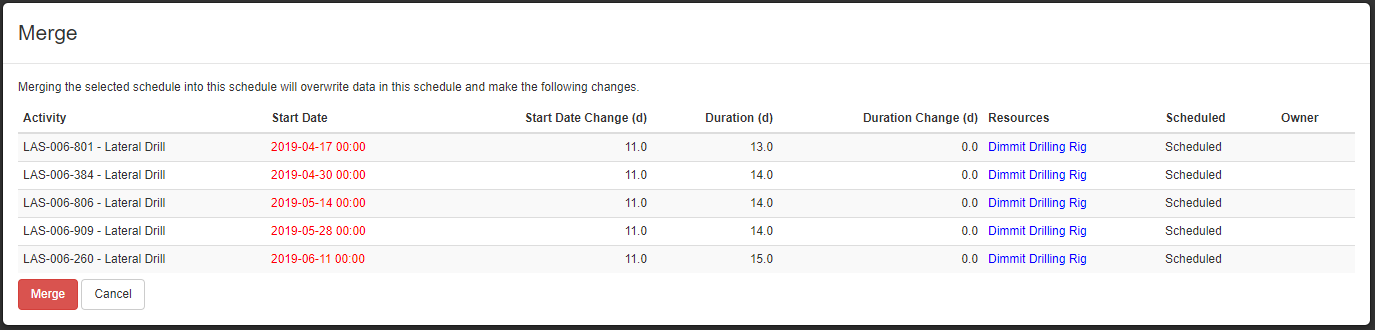
If you’d like to move changes from one schedule to another schedule in the same family you can use the merge tool More > Merge. The merge tool overwrites data in one schedule with the data from another. To use it, open the schedule you would like to overwrite and selected More > Merge from the toolbar. Select the source schedule and click “Merge”.

The system will show a summary of the changes it will make. Click “Merge” to go ahead and overwrite the current schedule with the information contained in the source schedule.
Schedule Copies are useful for:
- Prototyping schedule changes in a sandbox.
- Collaborating on the schedule in a sandbox and periodically promoting current schedules to the master schedule when it’s ready for the rest of the organization to see it.
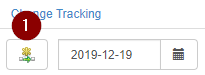
Schedule Change Notifications
There are two options for users wishing to receive email summaries about changes made by other people to schedules that they are interested in. Both are enabled by clicking one of the two flag icons in the top-right of a schedule. Enabling notifications in this way turns on notifications for that schedule only.
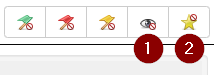
- Email summary of all changes to timing and primary resource to activities in the current schedule
- Email summary of changes to timing and primary resource for activities where the user is the owner in the current schedule. You can determine who the schedule owner is by inspecting the “Owner” column under the schedule’s Data > Activities tab.

Deleting a Schedule
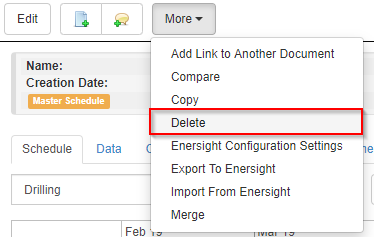
The default rules allow a schedule owner to delete Schedule Copies that they own but only an administrator with the Delete Schedule privilege are permitted to delete a Master Schedule.
To delete a schedule select Delete under the More drop-down in the schedule’s toolbar. A comment must be provided when deleting a schedule.
Click image to expand or minimize.
Change Tracking
Every time a user saves their changes to a Schedule, a new version is created and added to the Change Tracking tab. This makes it possible to see a list of edits throughout the history of that schedule, and open/view the schedule at any point in its past. This is useful for seeing how a schedule changes over time, or seeing how things changed from your initial plan.
Administrators with the Rollback a Schedule privilege are able to rollback a schedule to any point in its history. This can be very helpful if, for example, the wrong data is inadvertently loaded over top of a schedule, or a user makes a big schedule change in error.
In addition, any user who can create schedules is able to make a copy of a historical version of any schedule and use that for look-back purposes.