
Lifecycle of an AFE, including creating, reviewing and approving through field and actual costs
Lifecycle of an AFE
The lifecycle of an AFE generally follows the guidelines of creation, review workflow, approval workflow, field cost entry, actual cost import and then marked as completed and eventually closed.

Click image to expand or minimize.
Creating an AFE
Who can create an AFE?
An originator is a user that can create a new AFE or copy an AFE based on create rights given to that user. At the time an AFE is created the originator is also the owner of the AFE. Until an AFE is released for approval, the owner can transfer ownership to any other user in the system who has create rights (see Transfer of Ownership).
Creating a New AFE
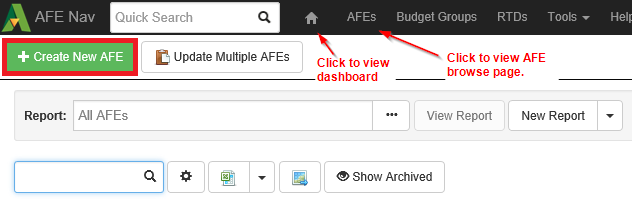
An AFE can be created by an originator using the Create New AFE button located on both the Dashboard and AFE Browse page.
Populating AFE Data
Because of Aucerna Execute’s configuration options, it is difficult to provide a manual that tells each company how to create their AFEs. There are, however, some common requirements where we can provide some direction.
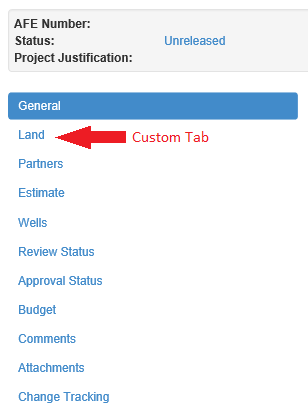
The out of the box tabs that are editable include the General tab, Partners tab, Estimates tab and Wells tab. An administrator can create additional custom tabs and can also edit the layout of custom tabs, including adding headers, moving fields, and adding help text on fields.
Click image to expand or minimize.
The fields on the AFE can be populated by the owner or during the review workflow. An administrator can create custom business rules in order to make fields mandatory or validate data prior to being routed for review or released for approval. For example, a rule can be created to validate that the description field has 100 characters or more, or an AFE for a vertical well requires the Total Vertical Depth field be populated.
General tab and Primary Attributes
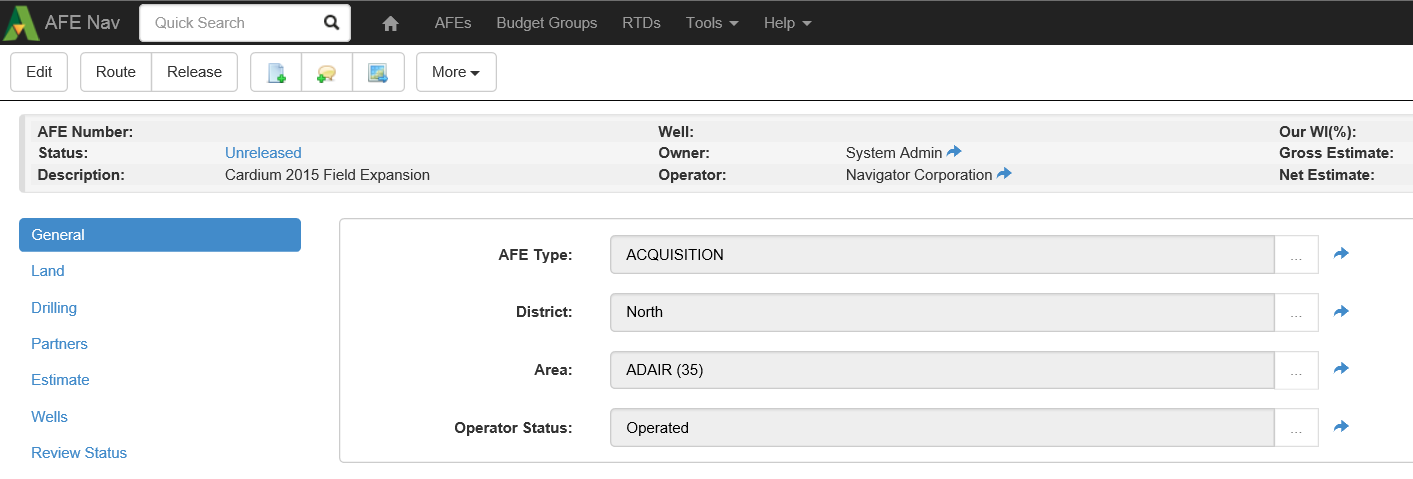
Once an AFE is raised, the originator should first populate the primary attributes. The primary attributes are the fields outlined in the grey box at the top on the General tab. These fields are used to determine the account codes, overhead rules and are often used to determine the workflow for an AFE. The create rights you have been granted may limit the values that you can select for the primary attributes. By default, primary attributes are mandatory fields and need to be populated before an AFE can be routed for review.
Click image to expand or minimize.
Partners Tab
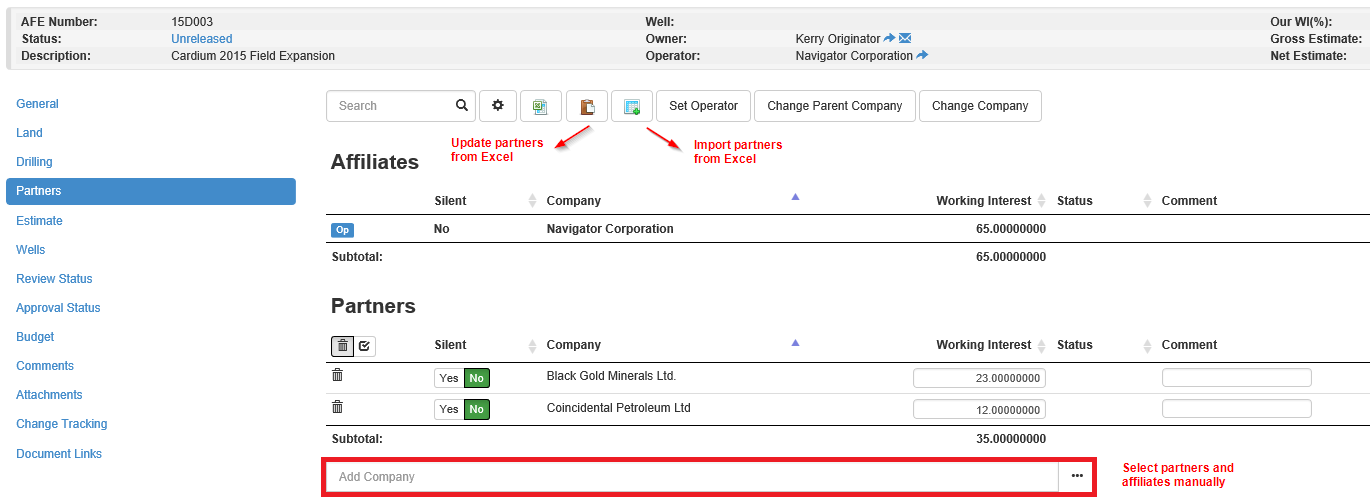
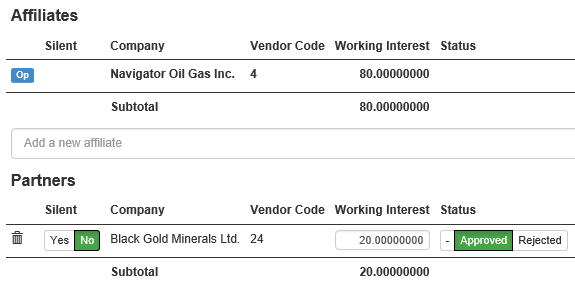
The Partners tab is home to the Partners table and tracks the partners, their working interest and statuses, as well as any other information that a client chooses to add to the Partners table.
By default, an affiliate (internal company) will automatically populate as the parent company. A user is able to change the parent company by using the Change Parent Company button. Other affiliates and partners can be added to an AFE using the Add Company drop down list. In this list, affiliates are highlighted in red to differentiate them from partners. The list of partners and/or affiliates is either maintained by an administrator or synchronized from another system. As a user adds partner and affiliates and their working interest, or modifies the working interest amount, the parent company’s working interest will be auto-calculated. This will ensure that the working interest will always total 100 percent. To select the operating company, click Set Operator.
A partner can be replaced with another partner by clicking the Change Company button. This allows users to replace an existing partner with a new one but keep all the related data in place (ex: working interest). Partners can be removed from the Partners table by clicking on the trash can next to the partner’s name.
To change the AFE to a mail ballot, click More and select Change to Mail Ballot Approval. Depending on whether the AFE is operated or non-operated, different fields appear under the partners table to add mail ballot information.
Click image to expand or minimize.
Exporting data from the Partners table can be done by clicking the Export to Microsoft Excel button.
You can import partners via an Excel spreadsheet using the Import New Data from Microsoft Excel button. In addition, partner information can be updated via an Excel spreadsheet using the Update With Data from Microsoft Excel button. Importing or updating data from a spreadsheet can be done be copying the data from Excel to the user’s clipboard (Ctrl+C). You do not need to include the parent company on your import sheet.
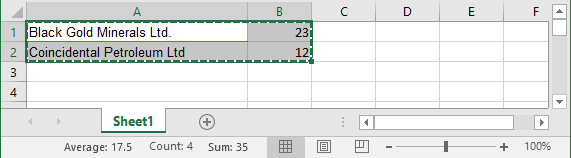
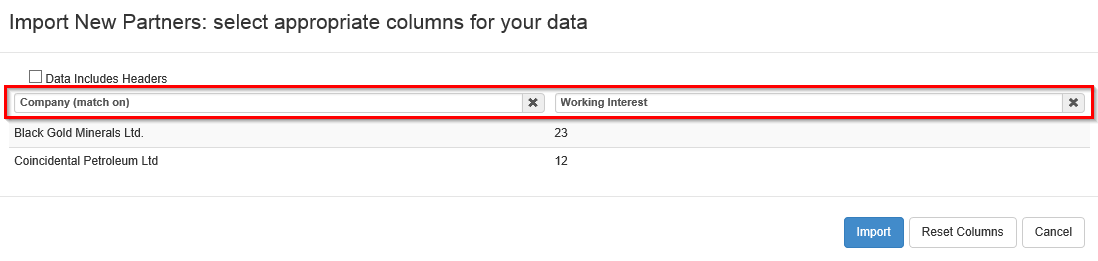
Then in Aucerna Execute, click either the Import New Data from Microsoft Excel or the Update with data from Microsoft Excel button and then paste the data into the open window. Once the data has been pasted, the user must assign labels to the columns of data. At least one column will need to be used as an identifier or a ‘match on’ column, this is usually the company name or the vendor code. Only data with column labels assigned will be brought into Aucerna Execute. Click the Import button to import the partners.
Click image to expand or minimize.
Estimate Tab
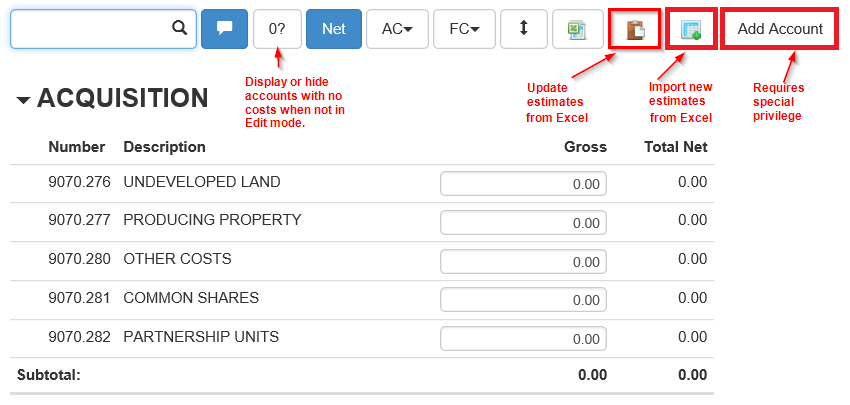
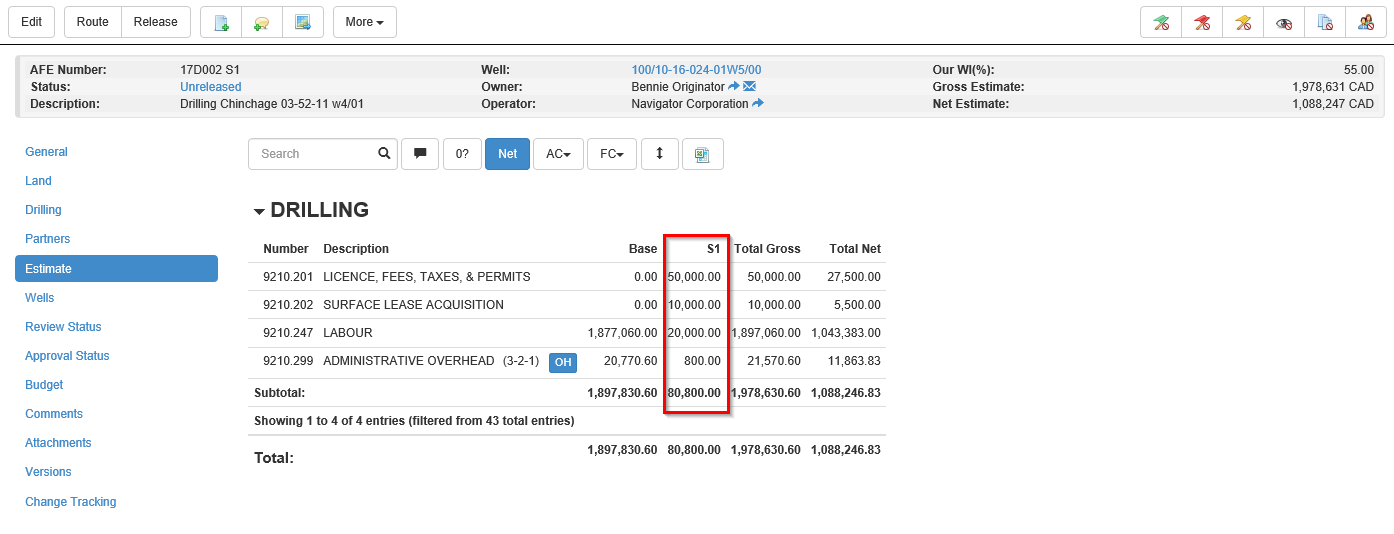
Estimates are entered on the Estimate tab. The account codes that are available to associate costs to are determined by the account rules, which are based on the primary attributes. Depending on the rules of your environment, it is possible that a user with special privileges has the ability to add accounts to an AFE that are not currently assigned. While in edit mode the entire list of accounts available to an AFE are visible. When not in edit mode only the accounts with dollar amounts associated to them will be visible unless the user has turned on the option to see all zero dollar accounts.
Estimates can be entered manually line by line, or the can be imported from an Excel spreadsheet using the Import New Data from Microsoft Excel button. In addition, estimate information can be altered or updated using the Update with data from Microsoft Excel button.
Click image to expand or minimize.
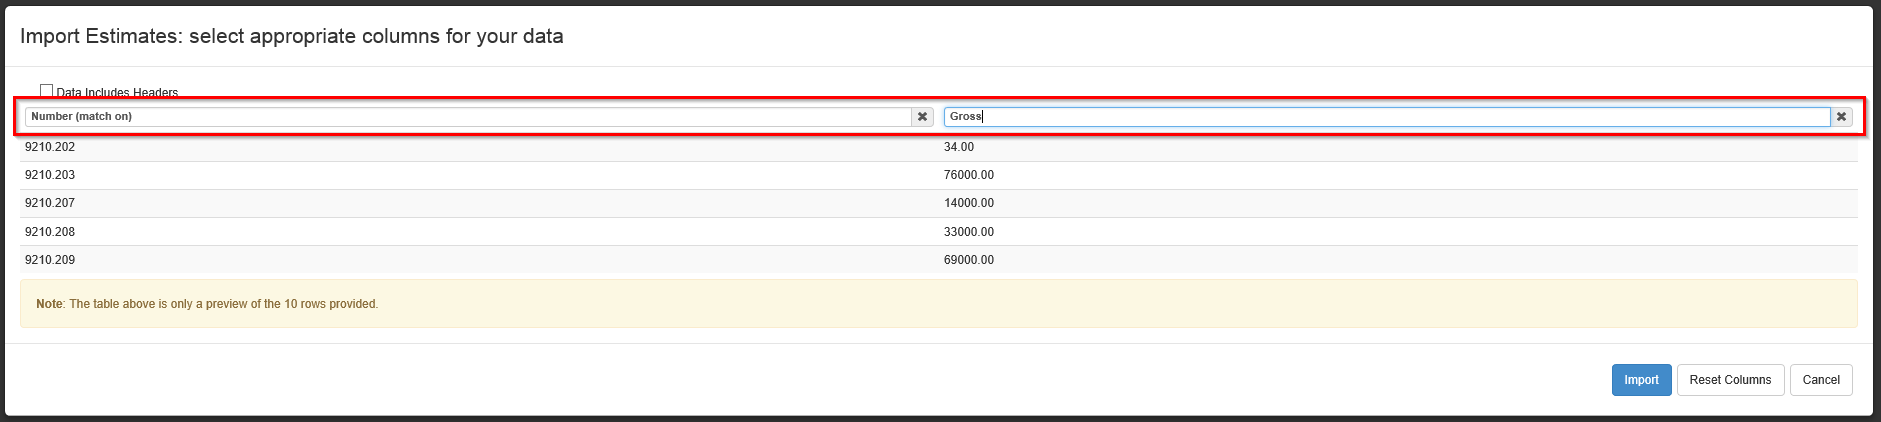
In order to use the Excel import functionality a user will need to copy the necessary information from an Excel spreadsheet onto their clipboard (Ctrl+C).
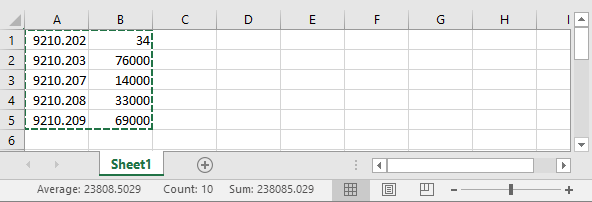
Then in Aucerna Execute, click on the Import New Data from Microsoft Excel button and paste the data into the import window. Once the data has been pasted the user will need to assign column headers to the data. Label the column containing the account number as Number (match on) and the estimate column as Gross. Data that is not assigned to a column will be ignored. Click the Import button to import the estimates.
Click image to expand or minimize.
There is also the ability to track estimates and costs in phases and/or periods. Tracking costs by periods allows for reporting on estimates over time. Phases allow costs to be separated out according to phases of a project (e.g., Prelim, Drilling, Completion).
Wells Tab
Well information is entered on the Wells tab. On this tab a user can add a single well or multiple wells, but only one well can be marked as a primary well.
Wells can be added manually one at a time using the Add Row button, or in multiples using an Excel spreadsheet. An Excel spreadsheet can also be used to update multiple wells.

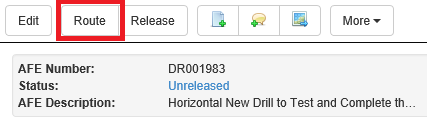
Route for Review
Once the Route button is clicked, the AFE enters the review workflow. Reviewers have the ability to edit an AFE as long as they have not yet completed their review and the AFE is still in the review workflow.
There are two type of reviewers: system reviewers and ad hoc reviewers.
- System reviewers are automatically added to the AFE when routed for review, based on workflow rules. These reviewers can be tiered (multiple reviewers at a time), or sequential (one reviewer at a time). All reviewers in a tier need to complete their review before it can move to the next tier.
- Ad hoc reviewers can be added by the owner at the time the AFE is routed. Ad hoc reviewers are not part of the tiered workflow and are able to edit the AFE at any point in the review workflow.
Your system may be configured to use only system reviewers, only ad hoc reviewers, or both. The system can also be configured as to which types of review are considered mandatory before the AFE can be released for approval.
Review Workflow
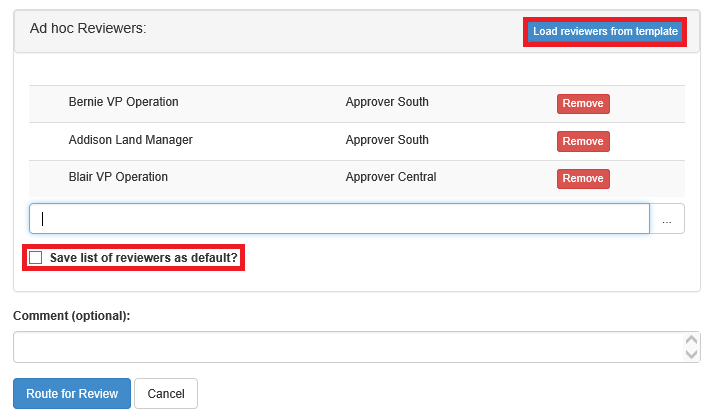
If the system has been configured to allow ad hoc reviewers, the owner will have the option to add these reviewers when routing for review. Ad hoc reviewers can be saved as a list by checking the ‘Save list of reviewers as default?’ box. The list of default reviewers is saved per owner and presented to the owner each time they route an AFE for review.
Click image to expand or minimize.
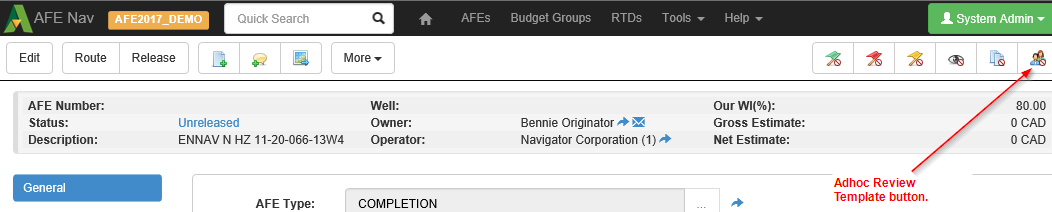
In addition, AFEs can be marked as an Ad hoc Review Template allowing the owner to choose different sets of ad hoc reviewers. The Ad hoc Review Template button is found in the toolbar when viewing an AFE. If AFEs are marked as ad hoc review templates, then the owner can click the Load reviewers from template button and choose which AFE’s ad hoc reviewers they want to add to the current AFE.
The owner can add or remove ad hoc reviewers from an AFE at any point in the review workflow. The Add Reviewer button appears on the Review Status tab under the list of ad hoc reviewers. In order to see the button to remove reviewers, the owner must click the Edit button.

Review Status Tab
As the AFE moves through the review workflow the Review Status tab will update. This tab shows the reviewers, the status of the review, review comments and the date-time stamps of when the AFE was assigned to be reviewed and when it was completed.
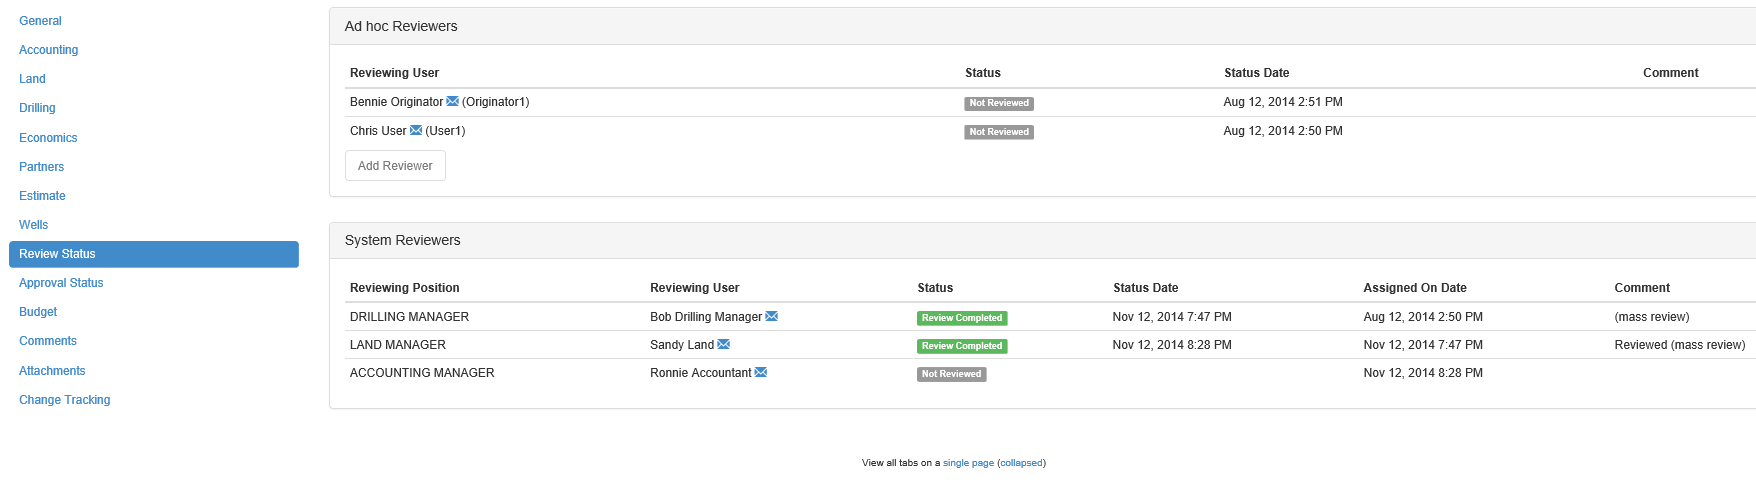
Click image to expand or minimize.
Once all users have completed their review, the owner will be notified via email that the review is complete. At this time the owner will have the ability to make changes to the AFE, if they are needed. As a best practice, it is recommended that the owner review the Change Tracking tab to see all changes made during the review process and read comments in the Comments tab.
Transfer of Ownership
Depending on your company’s business needs, you may have users who create AFEs on behalf of someone else. Up until the point that the AFE is released for approval, the ownership can be transferred to any user that has create rights. The new owner must have create rights to the AFE being transferred if they need to advance the AFE through the workflow (i.e. route for review or release for approval). To transfer the ownership of an AFE, while viewing the AFE click More and select Change Owner.
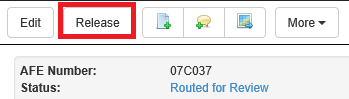
Release for Approval
Approval Workflow
Once the AFE is complete and ready to move to the approval workflow, the owner can click the Release button. At this point validation checks will be run and, upon success, the AFE will enter the approval workflow to follow the configured business rules.
An AFE in the approval workflow cannot be edited, except by users with special permissions and privileges. These privileges can be specific to fields, or applicable to the entire AFE. The approval workflow can be tiered or sequential, but all approvers in a tier need to complete their approval before the AFE can move to the next tier.
The approval status of the AFE can be found on the Approval Status tab. On this tab a user can find the list of approvers organized by tiers and the date-time stamp of when the AFE was assigned to be approved and when the AFE was either approved, rejected or recommended rejected (if the system configuration allows the recommend reject option). A rejected AFE will put the AFE back in the owner’s queue where it can be revised and sent through the approval workflow again. A recommend reject will allow the AFE to continue through the approval workflow, and potentially still reach a status of internally or fully approved.
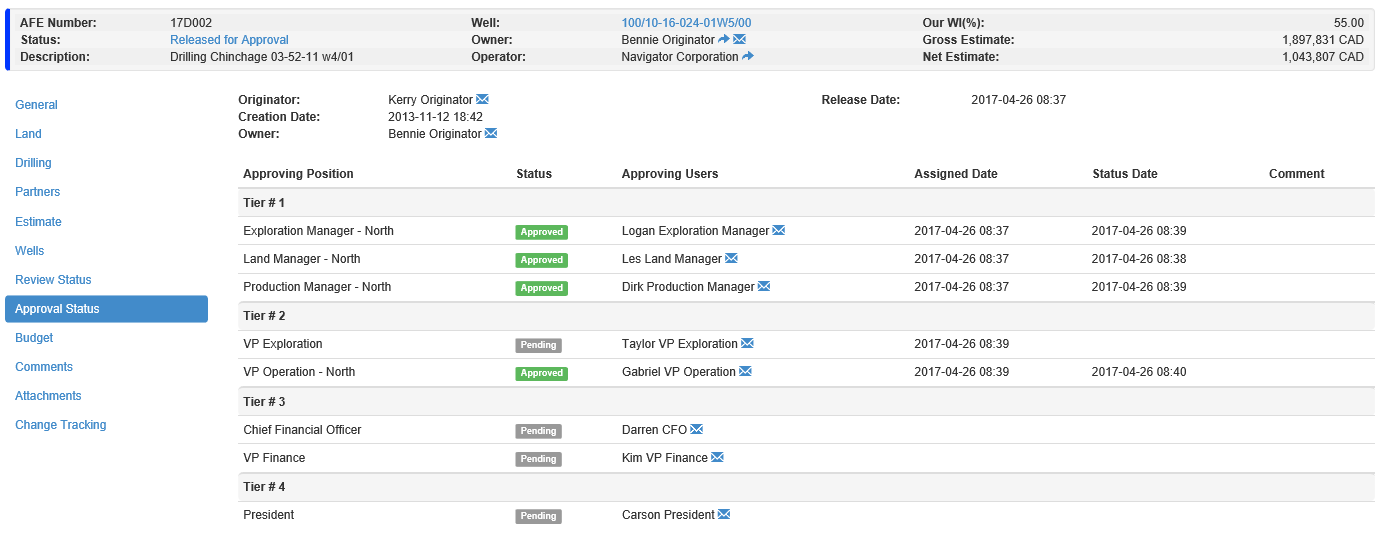
Click image to expand or minimize.
AFE Status
Once all users have approved the AFE it will be marked as either Internally Approved or Fully Approved.
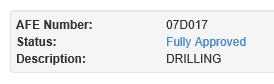
Internally approved AFEs are AFEs that have partners. A user with privileges to Edit Partner Status can update partner statuses on the Partners tab. A fully approved AFE is an AFE that all approvers have marked as approved and either has no partners or all partners have approved the AFE (special rules may apply to the status of mail ballots).
Click image to expand or minimize.
Revising an AFE
If a significant change is required once an AFE has been released for approval, a revision may be required. A change that would require a revision include updates to the primary attributes, changes to the estimate or potentially updates to partners and working interest (depending on the system’s settings). The owner will see the Revise button in the toolbar once the AFE has been released for approval. After an AFE has been supplemented, you cannot revise the AFE.

If the AFE is revised while still in the Released status, no partner status has been updated, and no previous revision (R#) exists, the revision will be deemed a “correction” and be marked with a version on C# (e.g., C1 for a first correction). If the AFE is revised after the AFE has been internally approved, has any partner statuses updated, or a previous revision (R#) exists, the revision is an official revision and marked with a version of R# (e.g., R1 for a first revision). Corrections (C#) will not be printed on partner forms or letters.
Once a revision has been made, a Versions tab appears on the AFE. In this tab you can view the different versions of the AFE. Any field can be changed on a revised AFE (some exceptions may apply based on your system’s configuration). If you want to compare different versions of an AFE, in the Versions tab right click on the view button and select to open the AFE in a new tab or window. Then you can have multiple versions of the AFE open at the same time.
Click image to expand or minimize.
Once changes have been made, the owner can route the AFE for review and release for approval.
Supplementing an AFE
If an AFE is overspent, a supplement may be required. The owner will see the Supplement button in the toolbar once the first version of the AFE is fully approved or once subsequent versions of an AFE are internally approved. Supplements are marked with a version of S# (ex: S1 for the first supplement).

Depending on the system’s configuration, a supplemented AFE may have restrictions on the fields that can be edited. Changing the original estimate would never be possible on a supplement. In the Estimate tab, new columns appear per supplement version to add the supplement amounts.
Click image to expand or minimize.
Once a supplement has been made, a Versions tab shows up on the AFE. If you want to compare different versions of a supplemented AFE, in the Versions tab right click on the view button and select to open the AFE in a new tab or window. Then you can have multiple versions of the AFE open at the same time.
Cost Tracking and Accruals
Entering Field Costs as Total or Monthly Amount
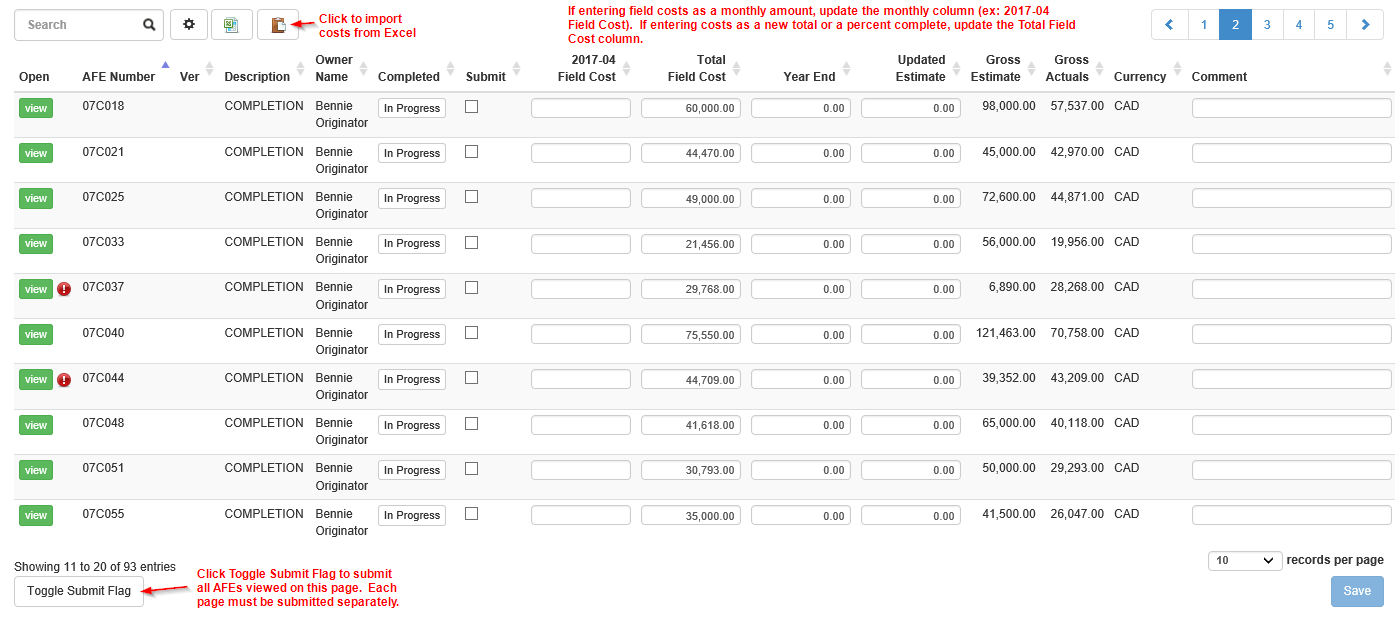
Once work begins and costs are incurred, field costs can be entered for the AFE. Typically this is done by the AFE owner or a user the owner has delegated their field cost entry to (Tools > Field Cost Entry Delegate). Field costs are usually entered at month end, however, they can be updated at any time as long as the costs have not yet been submitted for the entry period.
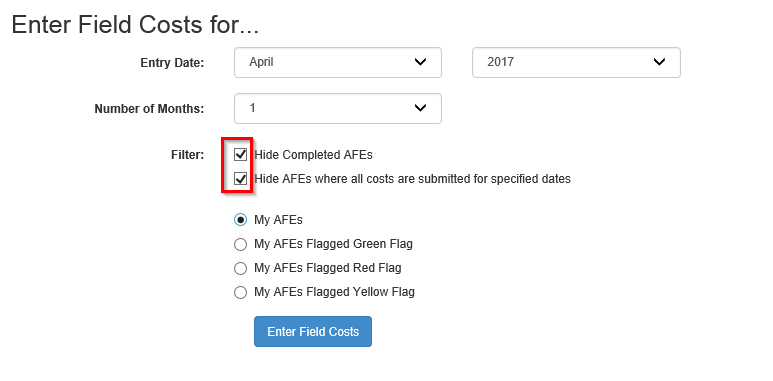
To enter field costs, either click the Field Cost Entry button on the dashboard or select Tools > Field Cost Entry. Before entering costs, select the entry date and the appropriate filters. Any reports created on the AFEs browse page will appear as a filter for field cost entry. To see a list of AFEs where cost entry is required, you would select the “Hide Completed AFEs” and “Hide AFEs where all costs are submitted for specific dates” filters as those AFEs costs are locked down for the entry period.
Click image to expand or minimize.
There are a few ways you can manually enter field costs:
- Update Total Field Cost – Enter a new total in the Total Field Cost column. The system will calculate the monthly amount spent.
- Update Monthly Field Cost – Enter the amount spent during the entry month in the monthly field cost column. The system will calculate the total field cost.
- As a percent complete – If you enter a percentage in the Total Field Cost column (e.g., 75%), the system will calculate 75% of the Total Gross Estimate and enter that value as the new Total Field Cost, and calculate the monthly amount.
Click image to expand or minimize.
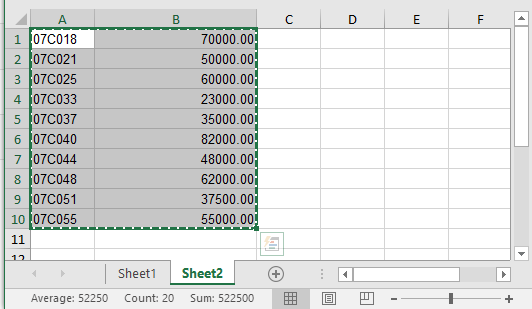
You can also import costs from Excel. To import costs, first copy the data from a spreadsheet.
Click image to expand or minimize.
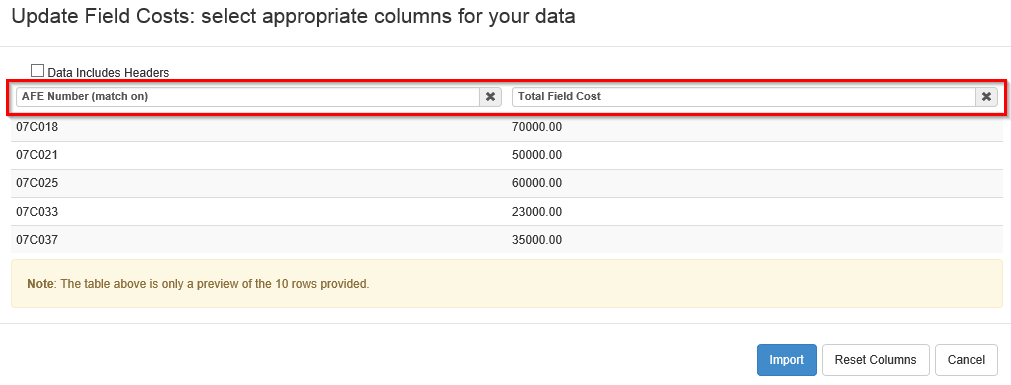
Then in Aucerna Execute, click the Update with data from Microsoft Excel button and click Ctrl+V to paste in the window. Label the column containing the AFE number as AFE Number (match on) and the column containing the costs as either the Total Field Cost or the Monthly Cost, depending on the data you are importing. Click Import to import the costs.
Click image to expand or minimize.
Field costs can be viewed on the Budget tab of an AFE.
Importing Field Costs by Account (CSV Import)
It is possible to import field costs on the account level. This is done via CSV import and requires certain configuration options and permissions to be in place. Field costs imported via CSV cannot be imported as a total amount per account, the costs must be imported as the monthly amount for the date specified on the file.
Submitting Field Costs
The recommended workflow is that once field costs are entered, they must be submitted. Submitting field costs locks down the costs for that month and serves as a notice to the person running the accrual calculation that your cost entry is complete. Once an AFE has submitted costs, costs are expected to be submitted every month until the AFE is marked as complete (gaps in submitted months will prevent the AFE from being marked as complete). By default, the accrual calculation ignores unsubmitted costs when calculating the accrual.
To submit costs, you can either check the Submit box for individual AFEs or click the Toggle Submit Flag button to submit all AFEs being viewed on the page. To save time, change the number of records being viewed per page to 100 to minimize the amount of pages to submit. If you submit an AFE for which you have not entered costs, the system will insert a monthly cost of $0. Once costs have been submitted, the Save button changes to Save & Submit.
To unsubmit the costs for an AFE, view the AFE and click More then select Unsubmit Field Costs Month(s). Select the months to unsubmit and click Unsubmit.
Completing AFEs
Once there are no further field costs expected for an AFE, the AFE can be marked as complete. This can be done on the Field Cost Entry page by clicking the In Progress button or by viewing an AFE and click More then select Mark AFEs as Complete (Field Costs). You must select a completion date and this date must be within the last month of submitted costs. There are a couple reasons to mark AFEs as complete:
- You can filter completed AFEs from the Field Cost Entry page so you are not prompted to enter costs for them.
- An administrator can set a check for the number of months since any new actuals are imported past the completion date. Once this number of inactive months has been reached, the AFE appears on the dashboard for an administrator to close.
If new field costs need to be entered for a completed AFE, you must mark the AFE as not complete. To do this, either click the button showing the completed date in the Field Cost Entry page or view the AFE and click More then select Mark AFE as not Complete (Field Costs). Select the first date that you will enter field costs for as the system will insert submitted months with $0 costs for every month between the original completed month and the new month you are entering costs for.
Actual Costs
Actual costs are usually imported by an administrator (Tools > Import Actuals Costs) or synchronized on a scheduled basis from another system. Users do not enter actual costs for their AFEs. Actual costs can be viewed on the Estimate tab and Budget tab of an AFE.
Calculating the Accrual
Once all costs have been submitted for a month and the actuals have been imported, an administrator can calculate the accrual (Tools > Calculate Accruals). The administrator will receive warnings regarding AFEs that have unsubmitted costs up to the accrual calculation date. All accrual information can be viewed on the Budget tab of an AFE.
Closing an AFE
Once all costs are entered or imported and the project is complete, an administrator can mark an AFE as closed.