
Operational Scheduling (Admin)
Implementation
Aucerna Execute includes an integrated Implementation Wizard that guides you through a new install / configuration of the Operational Scheduling module.
Click image to expand or minimize.
In many cases, the Implementation Wizard will automatically show but, if it doesn't, it can be enabled through the following steps:
- Grant your user the Implementation Wizard administrator privilege.
- Ensure that the value "OPSCHED" is in the list of enabled modules/tags in the Implementation Wizard Tags configuration setting (under Tools > Configuration > Settings).
- Ensure that the Show Implementation Wizard configuration setting (under Tools > Configuration > Settings) is set to "Yes".

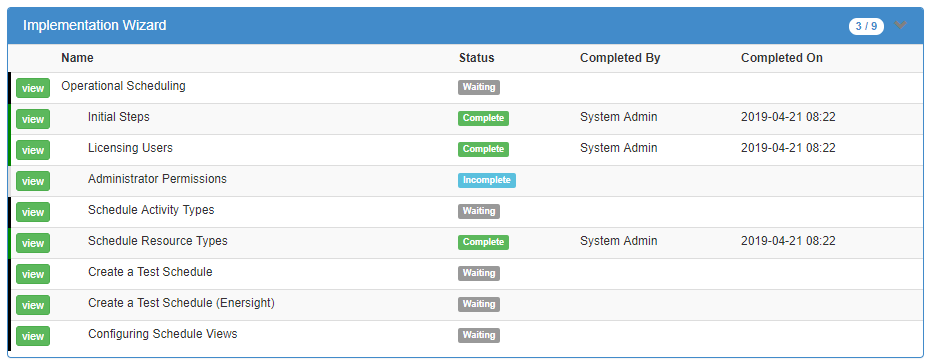
Once these steps are complete, the Implementation Wizard will be visible at the top of your Aucerna Execute Dashboard.
The wizard will guide you through the configuration of the Operational Scheduling module. Some steps are informational and guide you through steps that must be taken, while other steps will gather configuration.
Read through the steps in order. Tasks that are marked as "Waiting" have dependencies that must be completed before they can be completed. Tasks that are marked as "Incomplete" are ready to be worked on.
Be careful when completing steps because there is no ability to un-complete steps completed in error.
Schedule Permissions
In general, the user who creates an Operational Schedule is the owner of the schedule and has full permission to view and edit that schedule. By default, any user with "Can Create Schedules" set to Yes on their user record (the Permission tab on the user under Tools > Configuration > Users) can create an Operational Schedule, or can create a copy of an existing Operational Schedule.
If you would like to add additional editors to a schedule, you can do that from the schedule by adding additional editors on the Configuration > Additional Editors tab.
There are, however, a few additional administrative privileges you might want to assign to an administrator or power user. They are:
| Privilege | Description |
|---|---|
| Edit Schedule | This privilege allows users to edit any Schedule. |
| Delete Schedule | This privilege allows users to delete any schedule. |
| Rollback a Schedule | Rollback a Schedule to a previous version |
| Manage Schedule Configuration | Allows a user to edit the system wide list of Schedule Activity Types and Resource types |
Administrative privileges are assigned to User Roles on the Tools > Configuration > User Roles screen.
By default, a schedule is editable by that schedule's owner, any additional Editors (Configuration > Additional Editors), and any administrators with the "Edit any Schedule" privilege. A schedule owner is allowed to delete any schedule Copy they've created (a non-master schedule), but only an administrator with "Delete Schedule" is able to delete a master schedule. If you need more control over schedule creation, edit, and deletion policies you can edit the Custom View/Edit/Delete Rules for the Schedules document (for example: to allow for region specific administrative privileges).
Schedule Activity Types
An Operational Schedule is usually composed of a series of wells (your drilling program) and the associated activities for each of those wells. "Schedule Activity Types" define the types of those detailed activities.
The types of these Schedule Activities need to be defined by an administrator. You can add any number of activities to the system but keep in mind:
- Operational Scheduler is a high-level scheduling tool and should not be configured with very fine-grained activities. A rule of thumb is you should have between 5 and 10 activities per well (i.e. Construction, Top Hole, Lateral, Frac Prep, Frac, POL), and these activities are usually the ones with the most constrained resources.
- The RTx module should be used for pre-activity workflow steps such as tracking surveying, permits, design work, safety work, etc. Using RTx in this way can simplify your scheduling activities.
- If you are integrating with another tool such as Enersight or Value Navigator, you'll need alignment between the activities in that system, and Operational Scheduling (see below).
- Not every activity type you define has to be used for every well
- Not every activity type you define has to be used for a well. (i.e. Pad Construction)

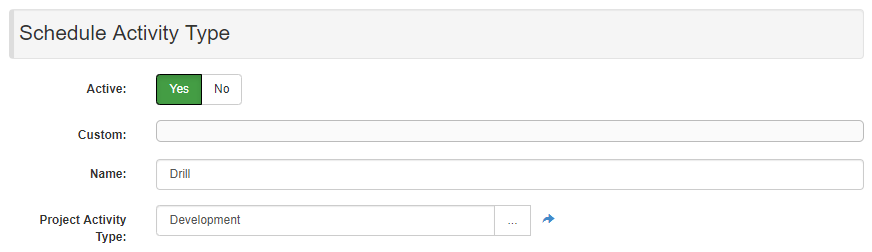
To configure the list of activity types available for use in your Operational Schedules, make sure you have the "Manage Schedule Configuration" administrator privilege and visit the Schedule Activity Types page (Tools > Configuration > Schedule Activity Types - view items).
When you add a new Activity Type, you'll be required to provide a name and, if you are using the Projects (Budgeting and Forecasting module), a mapping to the corresponding Project Activity Type.
Click image to expand or minimize.
Enersight
If you are syncing your Operational Schedule with Enersight, you'll need to ensure that:
- Each Drill Step on your Enersight Drilling Program is mapped to a unique "Booked As" value within Enersight.
- There is an Operational Scheduling Activity Type defined for each "Booked As" value that your Enersight schedule is using.
- There should be a single Project Activity Type defined for each Enersight Capital Type / Capital Class
- Each Schedule Activity Type should map to a Project Activity Type to allow for changes in the Operational Schedule to update timing on your Capital Projects.
Value Navigator
If you are syncing your Operational Schedule with Value Navigator, you'll likely want to skip configuring Schedule Activity Types as that workflow will automatically create these based on the Project Activity Types that are already configured.
For the most seamless integration, your Value Navigator capital categories will map 1:1 with your Project Activity Types and 1:1 with your Schedule Activity Types.
Aucerna Execute Budgeting & Forecasting Module
If you are using the Aucerna Operational Scheduler and Budgeting & Forecasting module without integration with your planning tools, schedule activity types will be automatically created as required.
Resource Types
Activities on an Operational Schedule can be allocated to one or more resources. Typically, resources are things like "drilling rigs," and "frac crews," but they can also be more general concepts like "land access" or "environmental stips."
The specific resources you use will be configured within the Operational Schedule, but Resource Types define the types available for those resources.
A good starting point for resource types would be:
- Construction Crew
- Drilling Rig
- Frac Crew / Completion Rig
- Lease
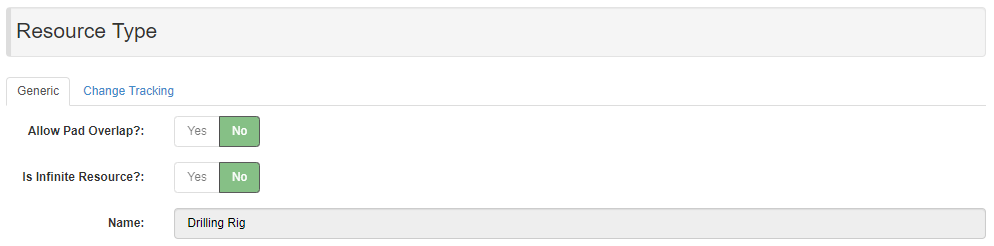
To configure the list of resource types available for use in your Operational Schedules, make sure you have the "Manage Schedule Configuration" administrator privilege and visit the Resource Types page (Tools > Configuration > Resource Types - view items).
Click image to expand or minimize.
When configuring a resource type, there are a couple options to consider:
- Allow Pad Overlap allows resources of this type to permit overlapping activities on the same pad. Typically a resource only allows a single activity at a time, but for situations like zipper fracs, where you want to enable multiple fracs for the same pad to overlap in time, set this option.
- Is Infinite Resource? allows any number of activities to overlap on resources of this type. This is used for resources like "leases" or "land access" where we can have multiple ongoing activities in that area. In this case, the benefit to using resources for tracking "lease" / "land access" is that you can define periods of availability for those resources (environmental stips, site access, etc.) and the system will warn users if their activities violate those time windows.
How many resources per activity?
Schedule Activities have a "Primary Resource" and up to fourteen additional resources. By default, the only resource fields that are enabled are the Primary Resource, and an additional Secondary Resource.
The Primary Resource (RESOURCE_01) is typically where you'd track which Drilling Rig or Frac Crew is being used. The scheduler includes some special behaviour for the Primary Resource such as automatically shifting out the timing for other activities on that same resource when an activity duration increases.
The Secondary Resource (RESOURCE_02) is typically used for tracking the lease/area.
If you'd like to add the ability to track additional resources per scheduled activity, or change the name of those resource fields (i.e. rename "Secondary Resource" to "Lease", or add a tertiary resource), you can do that from the Schedules Document Configuration page (Tools > Configuration > Schedules - configure rules & fields > Field Configuration). All of the Schedule Resource fields are named "RESOURCE_##" and are easy to find, activate, and rename. If you enable additional resources, note that the default views do not include those and users will have to select them from the column configuration screens to be able to see/edit them.
Schedule Versions and Rollback
Just like other document types in Aucerna Execute, Operational Scheduling stores a complete history of changes made to the schedule. These are visible on the Change Tracking tab. Each version is marked with a date, the person who made that change, and an optional comment explaining the change.
Clicking the view version button next to a version in the Change Tracking list will open the schedule at that point in time.
If a mistake was made in the schedule, such as accidentally importing the wrong data over-top of the existing activities, an administrator with the "Rollback a Schedule" privilege can use the Rollback button (when viewing a historical version) to roll that schedule back to that point in time. Alternatively, a user with permission to create a schedule can use the More > Copy button to make a new schedule by copying the data from the historical version.
Snapshots: Merge & Copy
When a new schedule is created, it is created as a "Master" schedule. If you copy a schedule (from More > Copy), a "Copy" schedule is created. In this case, the Master and the Copy are in the same "family" of schedules (they share a common set of wells). The Merge tool (More > Merge) allows merging (overwriting) a schedule with the information from another schedule in the same family.
This opens up a powerful workflow for ensuring that the schedule seen by the rest of the organization is vetted and not in the middle of being updated.
- Create a Copy of the master schedule and name it "Working Copy"
- Assign the team as additional editors on the "Working Copy" schedule and have them make their changes to that schedule
- Have a single person with edit permission to the master copy (this person decides when to publish changes)
- Periodically, when the schedule has been reviewed, the user with edit permission to the master schedule will merge the "Working Copy" schedule over top of the master schedule. The rest of the organization, external dashboards, and notifications are wired to the master schedule so they only see the schedule when it's ready to be seen.
When merging schedules the system shows a summary of activities whose timing or primary resource assignments have changed.
Email Notifications
It's often useful for users to be notified about changes to an Operational Schedule. This module has out-of-the-box notifications that allow users to subscribe to notifications to schedules they are interested in. These notifications do not need to be enabled or configured by an administrator.
See the User Manual for more detail.