Overview
This document explains how to set up the rules that affect the workflow of an AFE (create rights, system review and approval rules, account rules, and overhead rules) and the data the rules depend on (users, primary attribute values, accounts, overhead methods).
User Roles
Aucerna Execute has several administrator privileges that allow for system configuration and the maintenance of records. Your company can define a set of administrator roles, or User Roles as they are called in Aucerna Execute, and assign administrator privileges and people to the roles. You can also organize people into User Groups and then add a User Group to a User Role, instead of individual users. The User Group functionality is in place if you are looking to synchronize User Groups with Active Directory.
To create or edit a User Role, you must have the User Role Configuration privilege (Tools > Configuration > User Roles and click View Items).
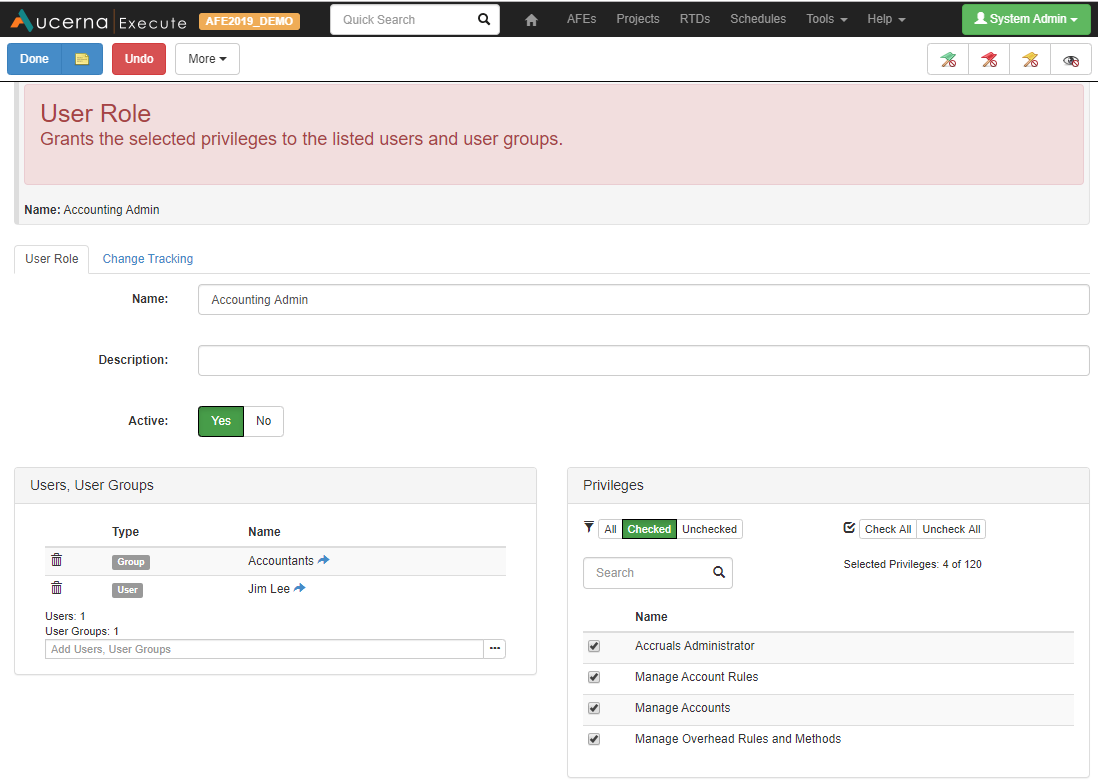
To create or new role, click Create New User Role. To setup the role, you must:
- Enter a name for the role. This should be a descriptor about the job function that the role supports, for example, AFE Administrator, Joint Venture Administrator, Accounting, etc. Avoid using people's names as the name of a user role.
- Select the users and/or user groups that will inherit the privileges assigned to the role.
- Select the privileges to be included in the role.
Click image to expand or minimize.
Users
Before you can set up rules around the creation of AFEs, you must set up the list of users. To set up new users, you need the Manage Users administrator privilege (Tools > Configuration > User Roles).
To see the list of users, select Tools > Configuration > Users and click view items. You can either add users one at a time or import them from Excel.
Create Users
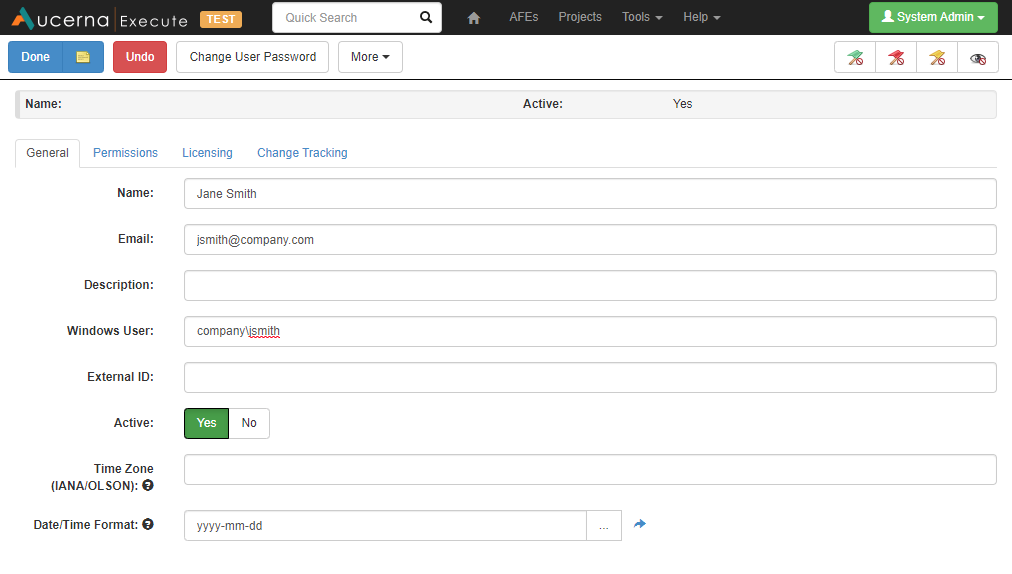
To create users one at a time, click the Create New User button. By default, certain fields are required by the application but your user document may have additional fields to update.
General tab
- Name: First and last name.
- Email: Required for the email notifications and reminders.
- Windows User: If users log into the application using their Windows credentials, then this must be populated with domain\Windows user name.
- Active: When creating a new user, this defaults to Yes. If users leave the company or they no longer need access to Aucerna Execute, you would set their Active flag to No. Users cannot be deleted in Aucerna Execute, only inactivated.
- Time Zone: If you have multiple offices in different time zones, you should set the time zone as this will allow the user to see dates and times in their local time. The IANA/OLSON time zone identifier should be referenced. If the time zone is left blank, the first time the user logs in it will update the time zone for their user account to the browser’s local time. If the time zone is incorrect, the user will be asked whether they want to update this setting when they log in.
- Date/Time Format: Controls how the user sees dates and times.
If users are not going to log in to Aucerna Execute using their Windows credentials, then you must create a password. Click Change User Password and enter and confirm the password. If users do log in via Windows credentials, you should not set up a password.
Click image to expand or minimize.
Permissions Tab
Some user permissions around creating primary documents, like AFEs, RTXs, Projects and Schedules, can be configured on the Persmissions tab. You can also see whether the user is assigned to a position role or a user role and, if needed, add or remove them from the role.
Licensing Tab
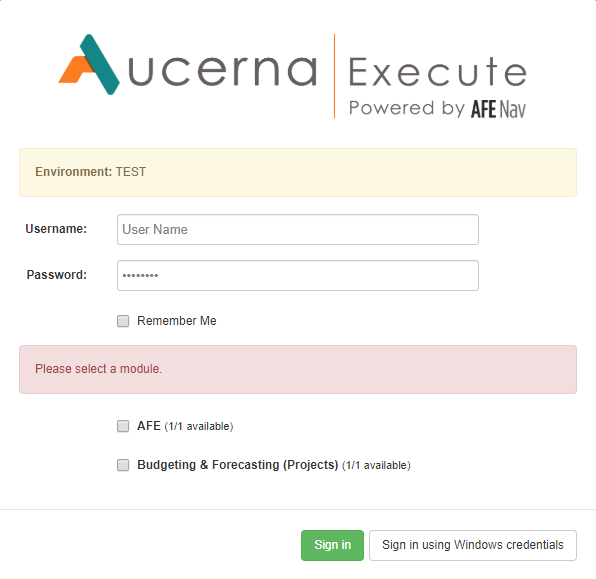
If your company has multiple modules of Execute, you can control the user access to each module. You can also set a Preferred Module as the default if the user can hold a license for multiple modules. If a preferred module is not specified, the user will have to choose which module they are logging in to when they launch the application.
Click image to expand or minimize.
Importing Users
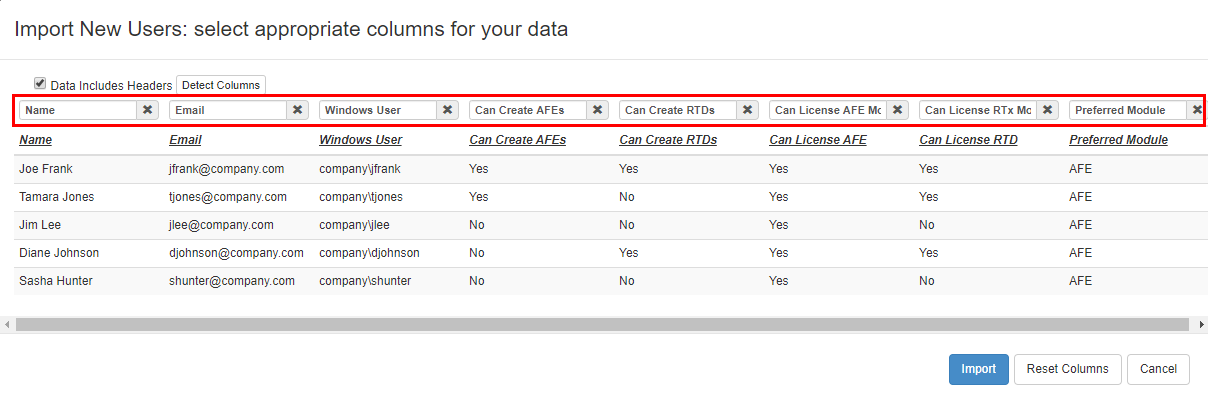
If you have multiple users to set up, you can import the list from Excel. First copy the list of users and their related data from the spreadsheet.

Then in Aucerna Execute, click the Import Multiple Users button. Click Ctrl + V to paste the user data into the import window. Label the column headers to indicate which data is stored in each column. Click the Import button to import the users.
Click image to expand or minimize.
Primary Attribute Lists
Some workflow rules are built around the primary attributes, which are the fields in the box at the top of the General tab. You must have values for the primary attributes before you can configure these workflow rules. To create or edit the primary attribute values, you need the Manage Attribute Lists privilege (Tools > Configuration > User Roles).
To add or edit primary attribute lists, browse to the name of the attribute under Tools > Configuration. For example, to add a new AFE Type value, select Tools > Configuration > AFE Types. Click the view items button beside the list name. You can enter new values one at a time or import from Excel.
Create a New Primary Attribute Value
To add new attribute values one at a time, click the Create New [attribute name] button. Depending on the attribute you are updating, there may be different fields to populate. For example, often an AFE type value will also require updating a value to be used in the AFE number or a value to export to a financial system.
Importing Primary Attribute Values
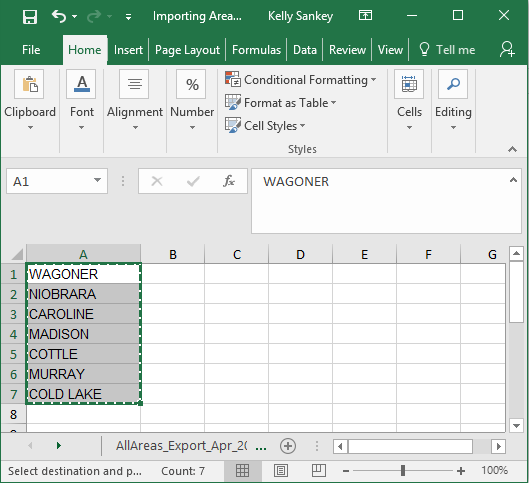
To import attribute values, first copy the list of values and their related data from a spreadsheet.
Click image to expand or minimize.
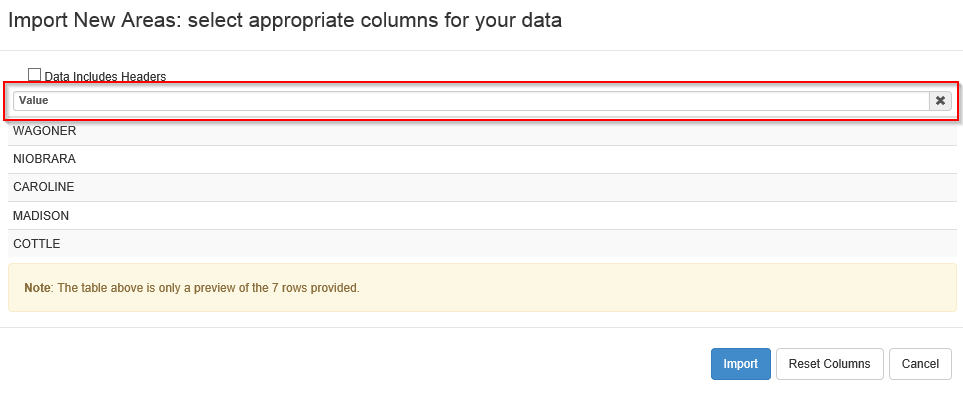
Then in Aucerna Execute, click the Import Multiple [attribute names] button. Click Ctrl + V to paste the attribute values into the import window. Label the column headers to indicate which data is stored in each column (note the column headers in the list of attribute values). Click the Import button to import the values.
Click image to expand or minimize.
Create Rights
Depending on your configuration, you may or may not be using create rights to grant the privilege to create AFEs. Creating rights not only grant the right to create or copy an AFE, they also control the primary attributes you can select. If you are the owner of an AFE and you no longer have create rights to it, you will not be able to route the AFE for review or release the AFE for approval.
To set up or browse create rights, you must have the Manage Create Rights user privilege (Tools > Configuration > User Roles).
Granting Create Rights
To add or update create rights, select Tools > Configuration > Create Rights Editor and click the configure button.
If you do not see the Create Rights Editor option available, you are not using the legacy create rights. The Create Rights Editor uses the Windows Desktop UI.
You must be in Internet Explorer in order for the Create Rights Editor to open. If you are not using create rights, check the Custom Creation Rule under the AFE Document Configuration (Tools > Configuration > AFEs and click the configure rules & fields button. You must have the Edit Document Config user privilege to view the AFE document configuration).
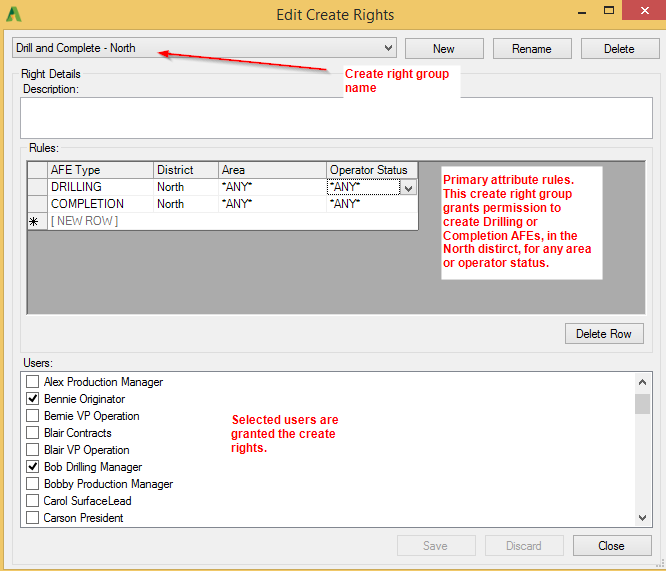
Create rights are organized into create rights groups where each group contains rules according to primary attribute values and the users who can create the AFEs with those primary attributes.
Click the New button to create a new create rights group and give the group a name. This name is only visible to the administrator and should reflect something about the rights within the group. Then select the rules for the primary attributes and the users to inherit the rights specified in this group.
Click image to expand or minimize.
Browsing Create Rights
The create rights browser allows you to check who has create rights to a set of primary attributes or show the rights per user. To open the browser, select Tools > Configuration > Create Rights Browser.
- Rights tab: Select a set of primary attributes. The list of people who have rights to create an AFE with those attributes appear in the window on the right. This is useful if a user is reporting that they are the owner of an AFE but they can’t route the AFE for review or release for approval. If the user’s name doesn’t appear when selecting the attributes from the AFE in question, then they don’t have create rights to the AFE.
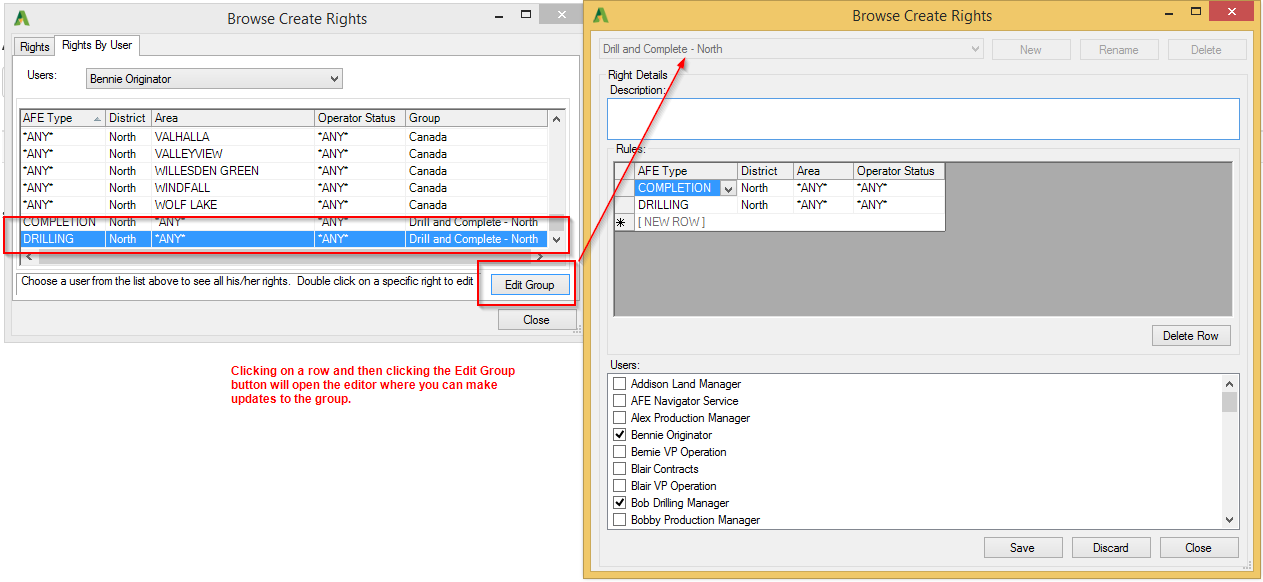
- Rights by User tab: Select a user name from the drop down list to view the create rights groups they belong to. This is useful if you are setting up create rights for a new hire and want them to have the same rights as another person in their department. From this view, you can click on a row and click Edit Group in order to make changes to that group (ex: add or remove people or update the attribute rules).
Click image to expand or minimize.
Importing Create Rights
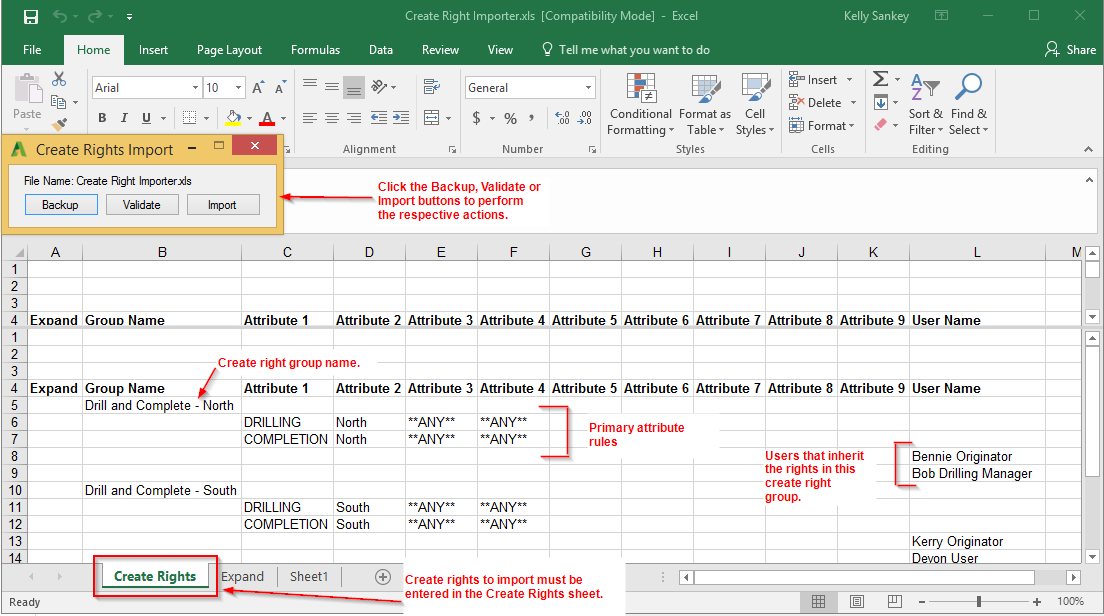
If you need to make mass changes to your create rights, it may be easiest to do this using the import sheet. You can also use the import sheet if you need to export the rules into Excel. To generate an import sheet, select Tools > Configuration > Desktop UI and click the configure button. When the Desktop UI opens, select File > Import > Create Rights > New. A spreadsheet opens along with a dialog containing buttons to Backup, Validate and Import.
To download a copy of your create rights, click the Backup button. This will create a new sheet in the import spreadsheet with the current create rights.
To import create rights, ALL create rights must be entered on the Create Rights sheet. When you import create rights, you will overwrite all the create rights in the system with only the rights on the Create Rights sheet. The attribute values and user names in the create rights importer must exactly match how they are set up in Aucerna Execute. Click Validate to check the sheet for errors and Import to import the create rights.
Click image to expand or minimize.
Review
After an AFE gets created, it is usually routed for review in order to have other people add or verify information on the AFE. Reviewers can edit the AFE while their review is pending. There are two types of review in Aucerna Execute: system review and ad hoc review.
- System Review:
- Rule-based review where reviewing positions are applied to the AFE based on some criteria of that AFE.
- Can be organized into tiers to allow for reviewers within a same tier to review in any order. Once all reviewers within a tier have completed their review, the review advances to the next tier of reviewers.
- Delegates can be assigned to system review positions.
- Ad Hoc Review:
- Ad hoc reviewers are selected by the owner of the AFE when they are routing the AFE for review. Any user can be selected as an ad hoc reviewer.
- There is no order enforced for ad hoc reviewers; they can review in any order of each other and at any time during the system review process.
Review Settings
An administrator can configure the types of review used and whether review is mandatory. Select Tools > Configuration > Settings and click the configure button, then search for the setting names shown below.
- AFE/Review - Review Type:
- User Review - Only ad hoc review
- System review - Only system review
- Both - Both ad hoc and system review.
- AFE/Mandatory Fields - Ad hoc Review:
- No - ad hoc review not mandatory
- Yes - ad hoc review mandatory.
- AFE/Mandatory Fields - System Review:
- No - system review not mandatory
- Yes - system review mandatory for all AFEs. This means the review rules must encompass all AFEs.
- Only if rules exist - system review will be mandatory only if there is a rule for the AFE.
Approval
After all information is entered on the AFE, the AFE must be released for approval.
Approvers:
- are applied to the AFE based on position rules; you cannot choose your approvers.
- do not edit the AFE, they can only approve, hold, recommend reject or reject the AFE.
- like system reviewers, approving positions can be organized into tiers to help speed up the approval process. Within a tier, the order of the approvals does not matter. Once all approvers within a tier have approved the AFE, the approvals advance to the next tier.
- delegates can be assigned to approving positions.
Configuring Position Rules — System Review and Approval
Position rules use Aucerna Execute’s graphical rule building tool (see Custom Business Rules). To create either system review or approval rules, you must have the Manage Position Rules user privilege (Tools > Configuration > User Roles). The configuration of the system review rules and approval rules is the same, the only difference is the menu option you select to set them up.
- Tools > Configuration > Position Rules - AFE System Review
- Tools > Configuration > Position Rules - AFE Approval
Each position rule requires the following information:
- Position Name: Name of the position. This is also the name of the position rule and this name must be unique.
- Order: When an AFE is routed for review or released for approval, the system evaluates all the position rules that apply to the AFE and adds the positions to the AFE in the order specified. Positions with the same order number show up in the same tier. For ease of maintenance, it is recommended that the order numbers have gaps (ex: 10, 20, 30, etc.). This makes it easier to insert new position rules into the workflow at a later time. If a position needs to approve AFEs in different orders (ex: first approver for some AFEs, last approver on others), then separate position rules need to be created.
- Rule: The AFE criteria that determines which AFEs this position needs to review or approve.
- Position Users: The person or people assigned to the approving position. The position users is where you would assign delegates for the position.
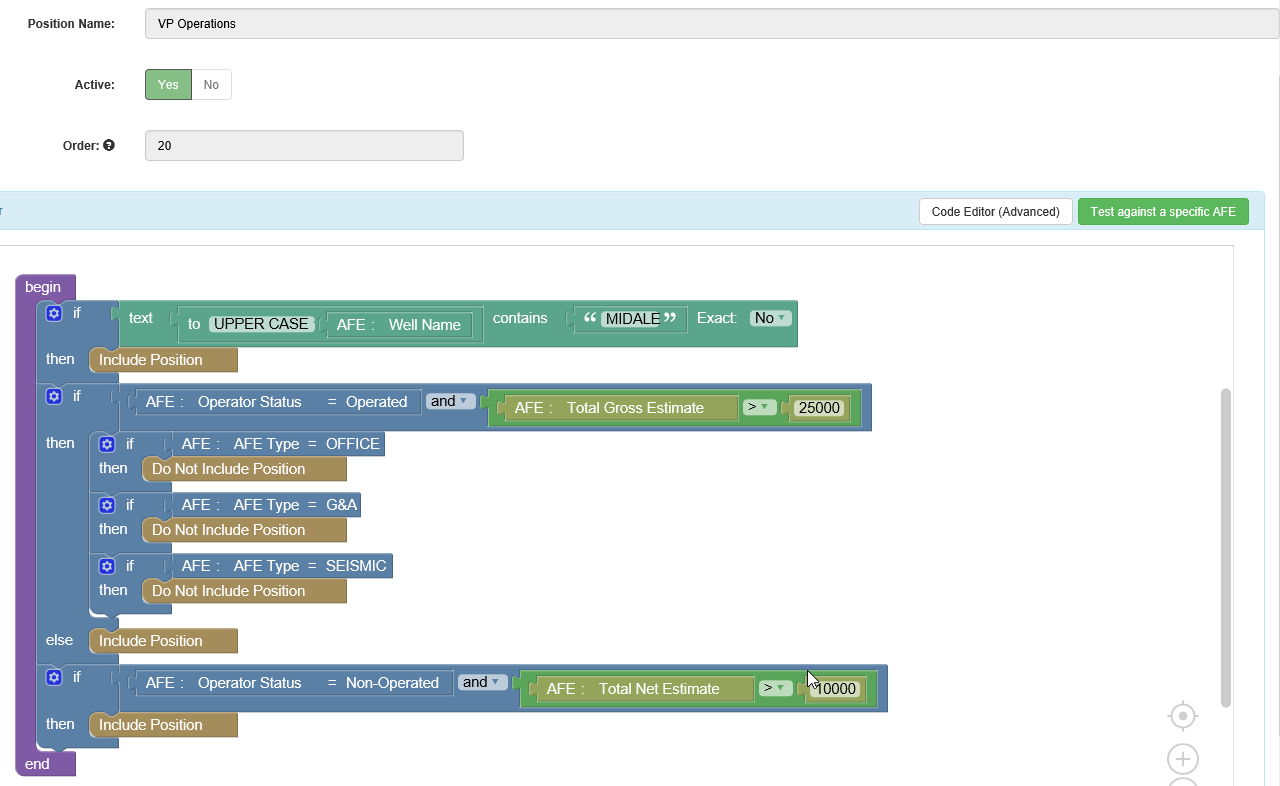
To show an example, consider a rule for a VP Operations that needs to approve in the second tier for AFEs with the following criteria:
- Operated AFEs where the total gross estimate is greater than $25,000, except where the AFE type is either Corporate, G&A, or Seismic.
- Non-Operated AFEs where the total net estimate is greater than $10,000.
- Approve any AFE where the well name contains the word Midale.
Click image to expand or minimize.
The Position Users tab is where you assign a person (or people) to the position. It is also where you assign a delegate to a position. In the example below, Jim Lee is the person assigned to the VP Operations position since January 1, 2017. Sasha Hunter was a delegate for the position between March 27-31, 2017. A person assigned to a position can approve an AFE where that position is named, between the start and end dates for that position. Therefore, either Jim or Sasha could approve on behalf of the VP Operations position between March 27-31, 2017.

Click image to expand or minimize.
Accounts on the AFE
The chart of accounts that apply to AFE costs get loaded into Aucerna Execute and account rules determine the accounts that appear on AFEs. The rules to tie accounts to AFEs are based on the primary attribute values. To create accounts, you must have the Manage Accounts user privilege and creating account rules requires the Manage Account Rules privilege (Tools > Configuration > User Roles).
Accounts can be added one at a time or imported via Excel. To see the list of accounts, select Tools > Configuration > Accounts and click view items.
Creating Accounts
To add accounts one at a time, click Create New Account. Each account requires the following information:
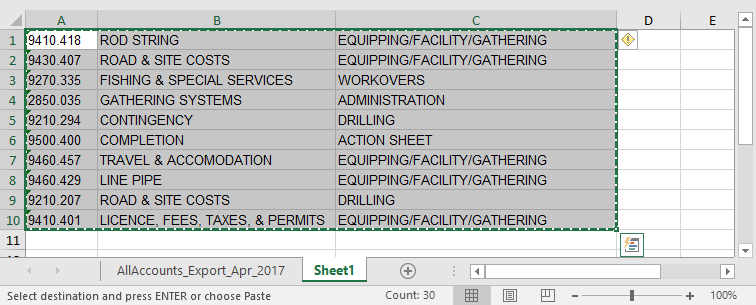
- Number: The account number should be consistent with the account numbers in your financial system. If your financial system separates account numbers by a major and minor/account and sub-feature, you would join these numbers together with a dash or decimal (ex: 9250.101)
- Description: Description of the costs the account is used to track (ex: Road and Site Costs, Licensing, Gathering Systems, etc.)
- Group: The category to which the account belongs (ex: Intangible Drilling, Well Costs, Land Acquisition, etc.). Accounts are grouped by their group name on the Estimate tab of the AFE and sub-totals are generated per account group.
There are five additional custom fields per account that can be used to flag or categorize accounts for the purpose of calculating sub-totals on forms and letters generated by Aucerna Execute. For example, you may use Custom1 to flag an account as either TANGIBLE or INTANGIBLE so that you can generate sub-totals for tangible and intangible costs.
Importing Accounts
To import accounts from a spreadsheet, copy the information from Excel.
Click image to expand or minimize.
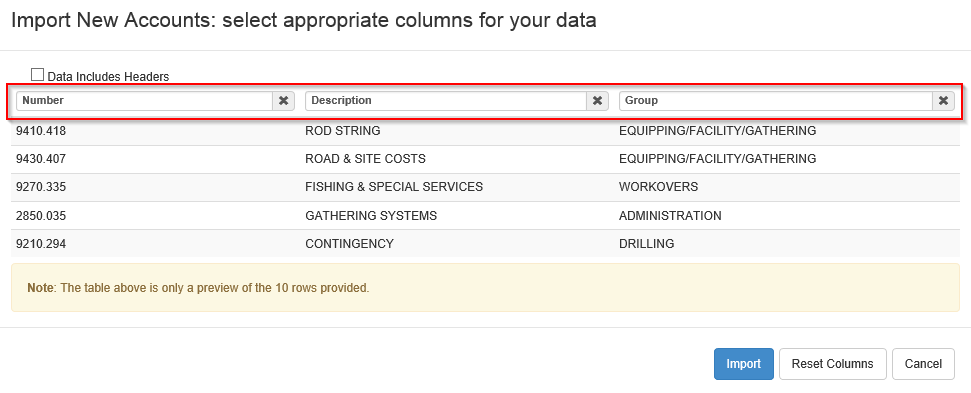
Then in Aucerna Execute, click the Import Multiple Accounts button. Click Ctrl + V to paste the account data into the import window. Label the column headers to indicate which data is stored in each column. Click the Import button to import the accounts.
Click image to expand or minimize.
Account Rules
To create the rules that determine which accounts show on the Estimate tab of an AFE, select Tools > Configuration > Account Rules and click the view items button. Account rules are organized into account rule groups where each group contains rules according the primary attribute values and the accounts that should be applied to the AFE. There are three ways you can specify the list of accounts for a rule:
- Account Rules by Group: Include or exclude accounts based on the account group they belong to.
- Account Rules by Account: Include or exclude ad hoc accounts.
- Account Rules by Pattern: Include or exclude accounts based the account number starting, ending or containing a set of numbers.
To create an account rule, click Create New Account Rule.
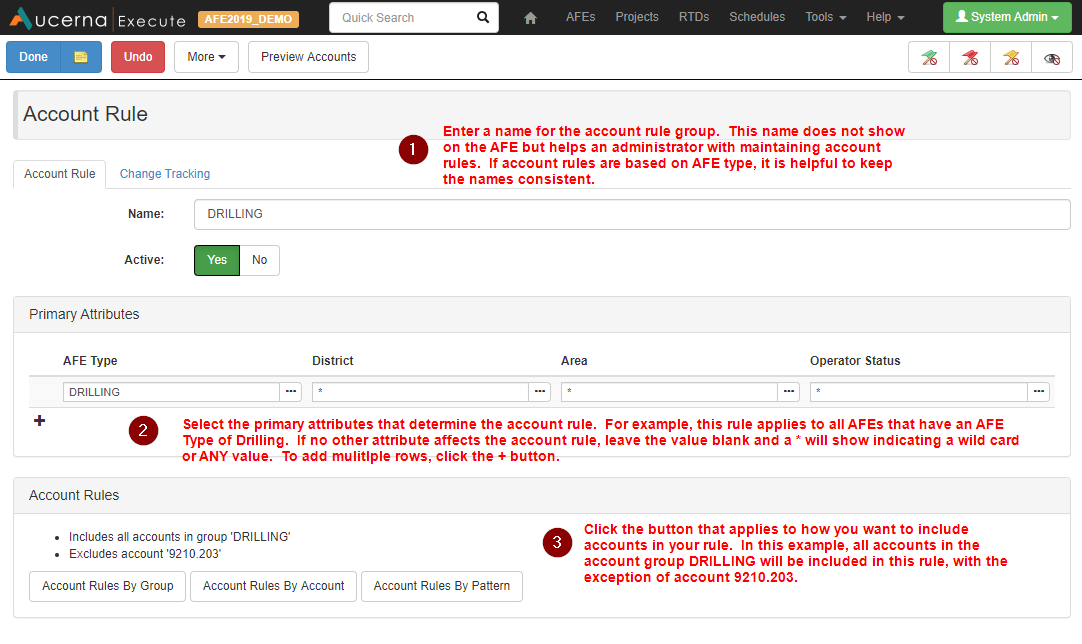
Click image to expand or minimize.
You can click the Preview Accounts button to see the accounts that are included in this rule.
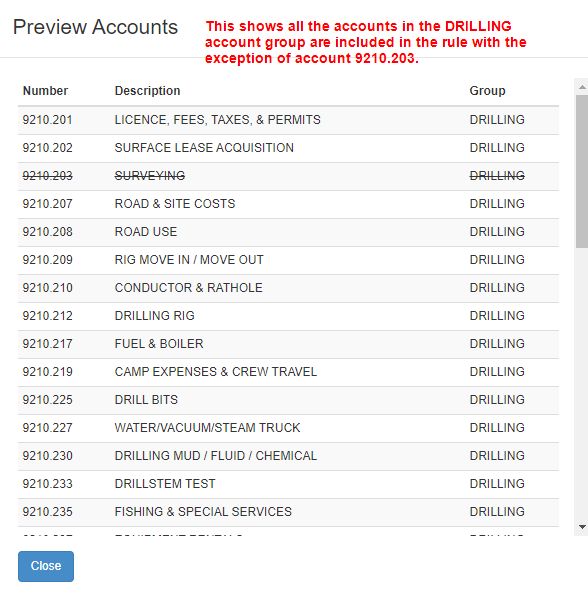
Click image to expand or minimize.
Adding Accounts for Cost Import
If you import field costs or actual costs from another system, there may be situations where an account contains costs in the source system but does not appear on an AFE’s Estimate tab. In these situations, a generic “Import Account” appears on the AFE to catch all the costs that have no matching account.
There is a setting that will automatically add accounts to an AFE for the purposes of cost imports only. The account must exist in the account list in Aucerna Execute.
To turn on this behavior, select Tools > Configuration > Settings and click Configure. Search for Allow Cost Import on Invalid Accounts and set to Yes.
Special Scenario - Users Adding Accounts
Depending on your accounting system, there may not be restrictive rules that determine which accounts are available to book estimates or costs to, based on the type of AFE. In that special case, you may want to allow owners and reviewers to add accounts to the Estimate tab. Accounts could only be added prior to the AFE being released for approval.
To turn on this behavior, select Tools > Configuration > Settings and click Configure. Search for Allow User (Owner/Reviewer) to add Account to AFE.
Overhead Calculations
In the Canadian oil and gas industry, a company can recover a portion of their indirect costs associated with operating a project by charging a defined percentage against direct costs charged to the project. The Petroleum Accounting Society of Canada (PASC) is the governing body that regulates the overhead rules.
To set up overhead calculations on AFEs, you must have the Manage Overhead Rules and Methods User privilege (Tools > Configuration > User Roles). The overhead methods (calculations) are set up first and then overhead rules determine the methods available for an AFE based on its primary attributes. If only one method exists for an AFE, or one method and the option of manual entry, the system will default to select the method. If multiple methods exist, the creator or reviewer needs to click the OH button beside the account to select the appropriate method.
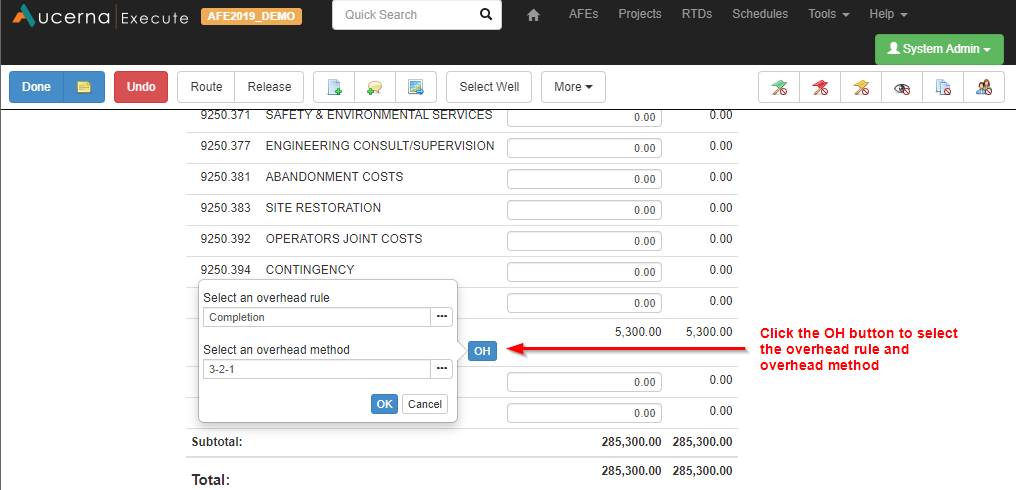
Click image to expand or minimize.
The overhead method functionality could also be used to calculate Engineering and Design Fees.
Overhead Methods
To set up the overhead method, select Tools > Configuration > Overhead Methods and click view item. Click Create New Overhead Method to create a new method. The name of the method is what users will see beside the overhead account in the Estimate tab and the code would be a code from your financial system (used if exporting AFEs with overhead information).
The calculations can be a percentage of the AFE estimate, a fixed dollar value on the estimate or a sliding scale percentage.
Sliding Scale Percentage
Two common overhead methods are the 3-2-1 and 5-3-1 methods. The example below shows how to set up the 3-2-1 method. The rule below translates to calculating 3% of the first $50,000, 2% of the next $100,000 and 1% of the remaining estimate on the AFE.
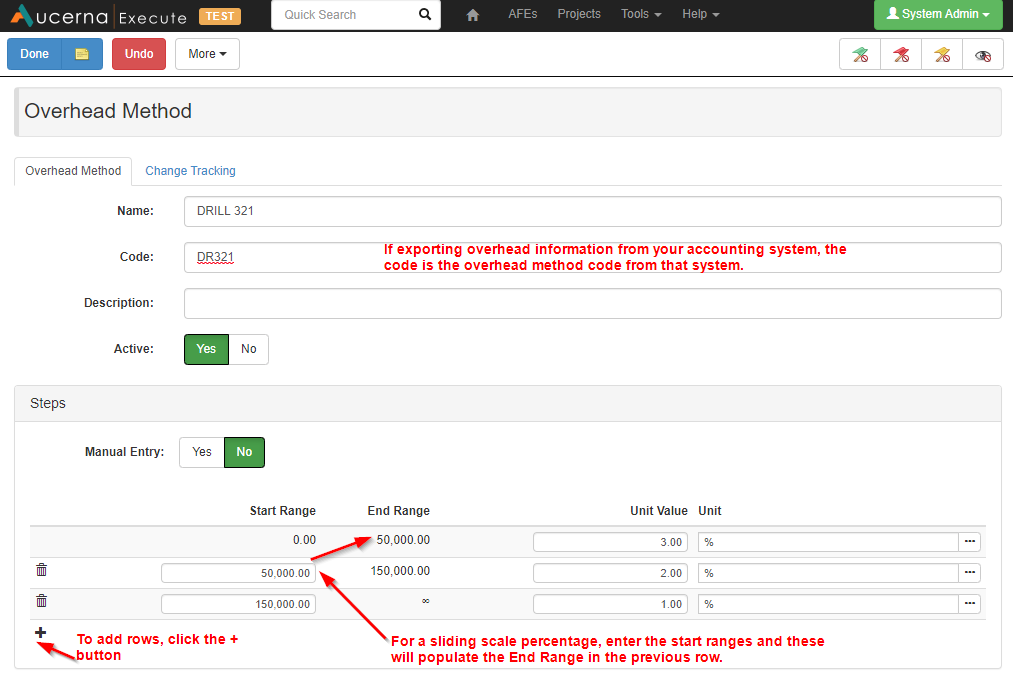
Click image to expand or minimize.
Fixed Percentage
The example below is an example of a fixed percentage rule, calculating 1% of the AFE estimate.
Click image to expand or minimize.
Fixed Amount
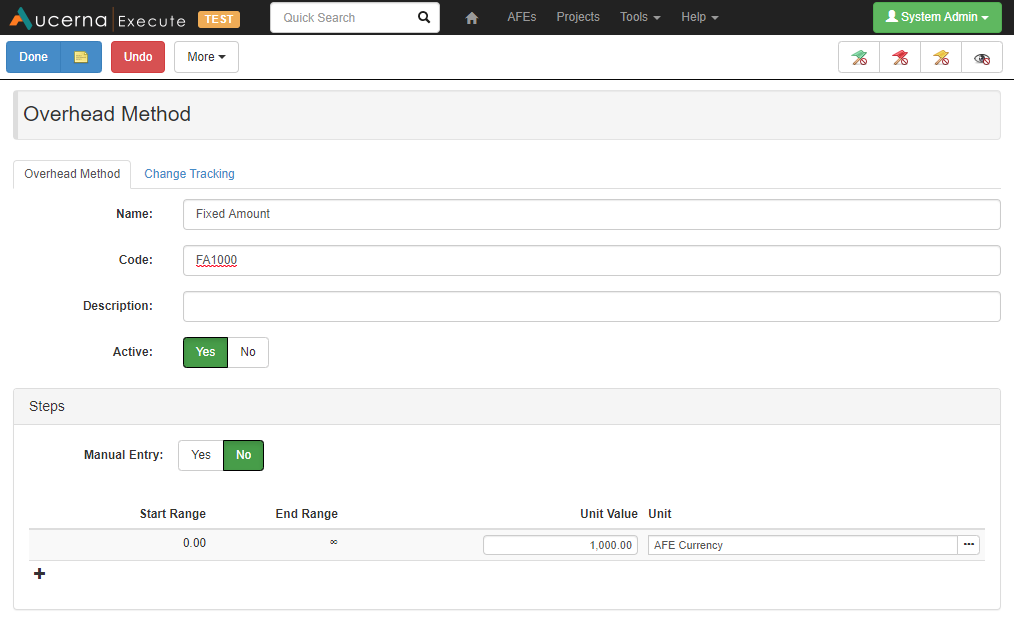
To apply a fixed amount on the AFE, the overhead method would look like the image below.
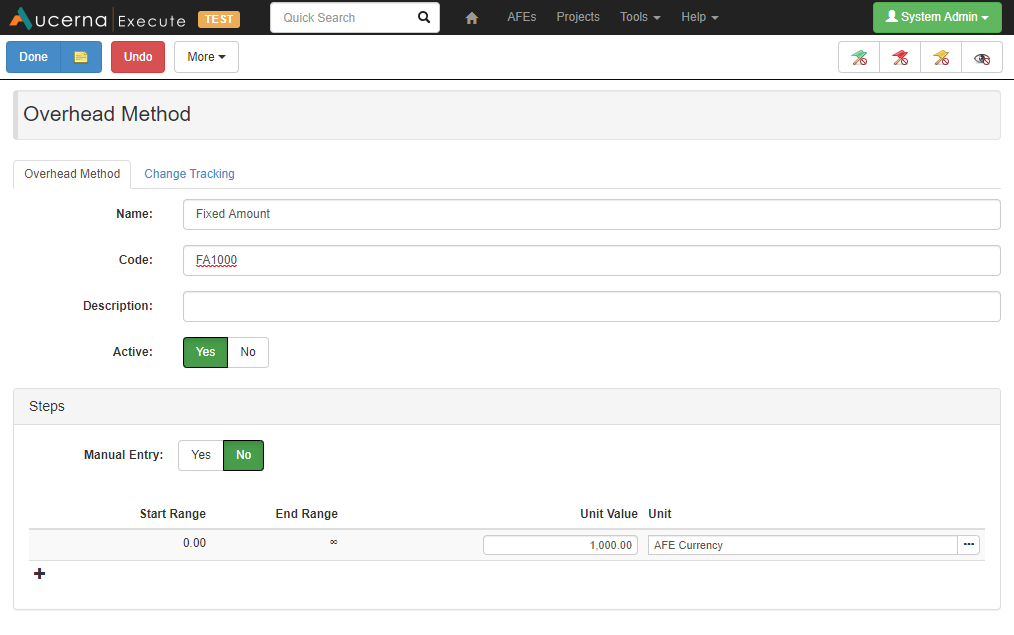
Click image to expand or minimize.
Overhead Rules
Once the overhead methods are set up, you can configure the rules to determine the methods that apply to AFEs according to their primary attribute values. The overhead rules also determine the account that overhead is booked to.
To create an overhead rule, select Tools > Configuration > Overhead Rules and click View Items. Then click Create New Overhead Rule.
- Name: Provide a name for the rule. The overhead rule name will be seen when you select the overhead method to apply to an AFE.
- Target Account: This is the account the overhead will be booked to.
- Primary Attributes: Select the primary attributes that determine the AFEs that the rule applies to. If Operator Status is a primary attribute, you would set its value to Operated as you would not want an overhead calculation on Non-Operated AFEs.
- Methods: Select the overhead methods that should be available for this rule
- Source Accounts: Click Modify Source Accounts if not all estimates on the AFE should be used to calculate overhead. The source accounts can be configured by specifying the accounts to either include or exclude. If on the AFE, most of the accounts should be included in the overhead calculation, then you should configure your rule based on accounts to exclude. Setting up the rule based on excluded accounts means that if new accounts get added to the AFE in the future, you only have to update the overhead rules if those new accounts should not be included in the overhead calculation.
The example below shows an overhead rule that would apply to all operated completion AFEs. There are two possible methods that could be selected from the Estimate tab of the AFE for the overhead account. The estimate booked to account 9250.999 would not be included in calculating the overhead amount.
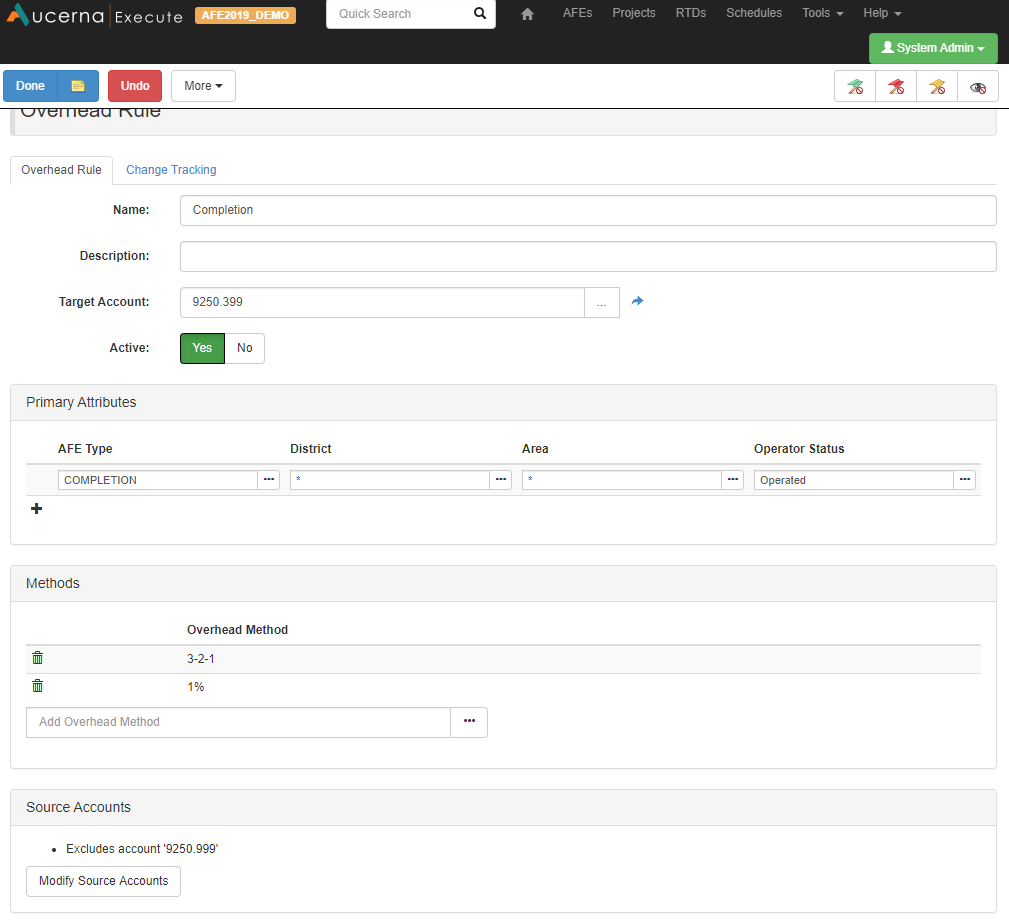
Click image to expand or minimize.
