Enersight allows the user to define both resources and work types. Resources include things such as drilling rig, completion rig, frac spread or pipeline crew (or specifically named instances of these). Any resource whose limited availability might affect the schedule can be modeled.
Examples of work types could be drilling and completion. Most likely a completion rig would not be capable of drilling but a drilling rig would be capable of both drilling and completion work. Each Scheduler task can specify one or more resources or work types required to complete the task.
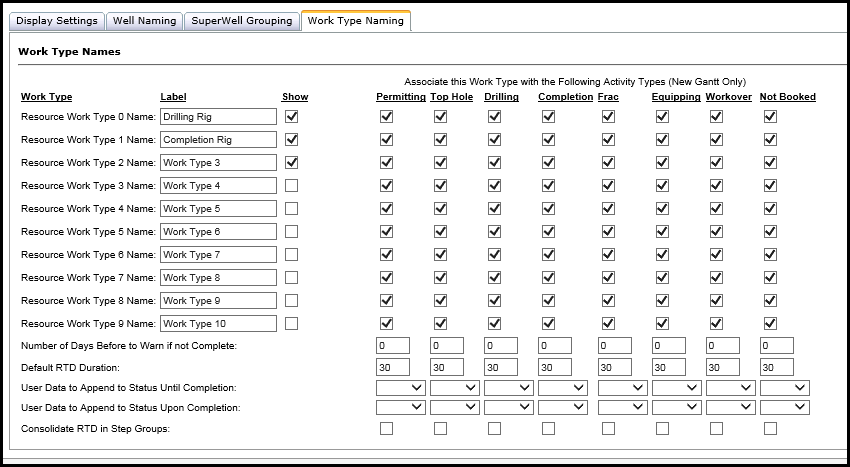
To define work types carried out by resources, click Settings > Work Type Naming from the Scheduler Tab.
Click image to expand or minimize.
Each resource work type can be labeled, and can be turned on or off (in Resources tab and Required Work Type dropdowns) by checking the "show" option.
Enersight allows you to specify up to 10 different resource work categories or "Types".
Adding Resources Definitions
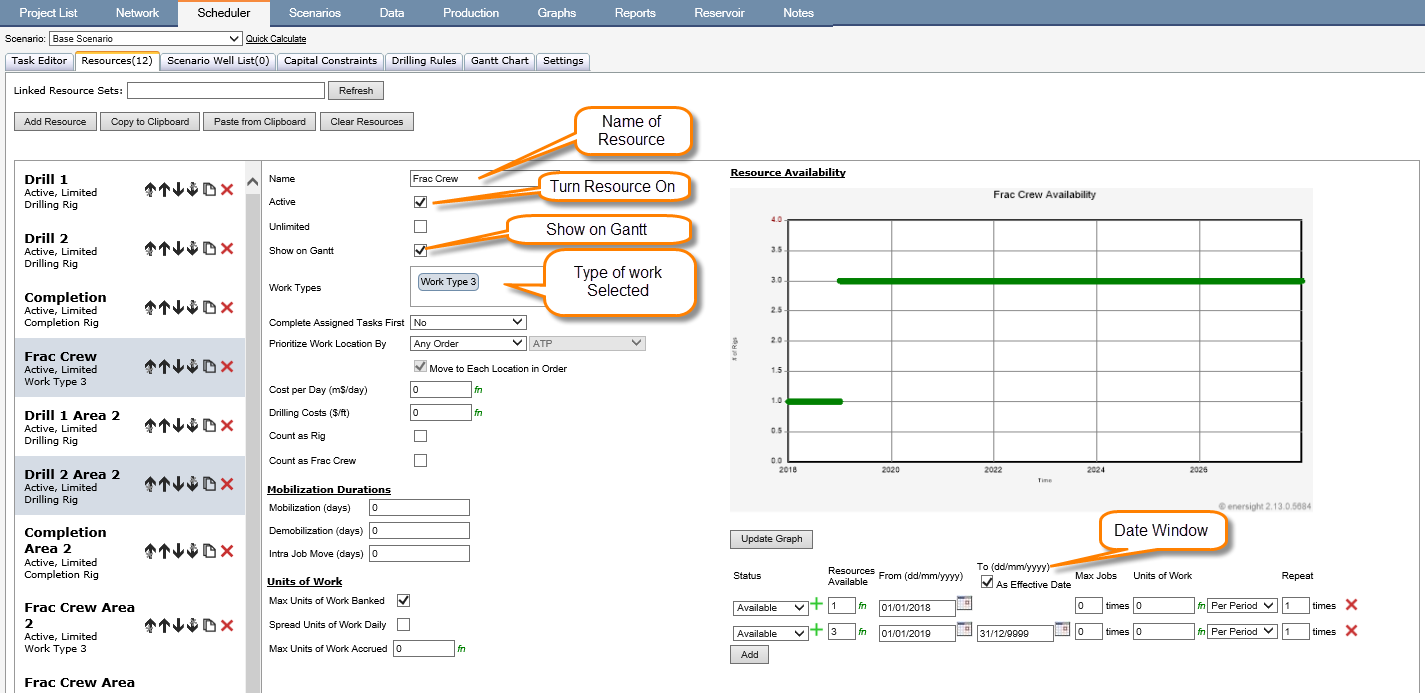
To add a new resource to your project, select the Resources tab from the Activity Scheduler and click “Add Resource”.
Click image to expand or minimize.
The resource editor lets you specify the type(s) of work the resource can do, costs, as well as seasonal variations in availability.
Resources may also be copied and pasted in bulk, allowing for significantly easier updating, including specifying sequencing. Where a resource name within a paste matches an existing resource within the scenario it updates that resource, else it appends this item as a new resource. An extra ‘Clear Resources’ option also has been added to assist in managing complete refreshes.
Within Paste functionality, only user data or drilling programs must be provided when prioritizing by work location, else all other selections beyond name are optional. Where unspecified, default values are selected aligning with a new resource add from the interface.
Resource Schedule
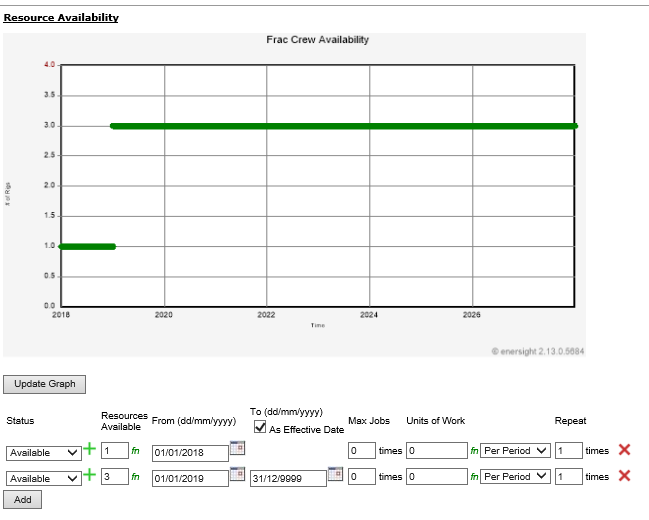
Although the “Add Resource” button is clicked to reach the resource editor, it more strictly adds a group of identical resources. By using the “Add” button it is possible to create a more detailed schedule for a group of resources than the simple repeated availability that can be represented by the single row at the foot of the preceding screen. A detailed schedule can be set for each separately defined resource. The model builder generates blocks of time for which the resource is available or unavailable, specifies how many times that block of time repeats, and sets the maximum number of jobs that can be executed during each block of time (a setting of 0 means no limit).
Some examples follow. If a third resource is to be available continuously from 2018, an extra row would be added with 3 resources available from 1-Jan-2019 to 31-Dec-9999.
Click image to expand or minimize.
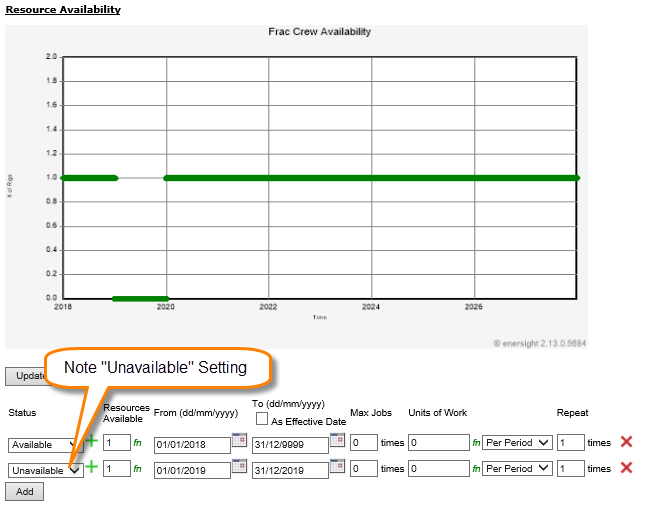
If the resource is unavailable throughout 2019, this can be modeled by adding an extra row with a resource unavailable from 1-Jan-2018 to 31-Dec-2018 (unavailable must be selected from the drop down; a reduced available number has no effect).
In general the last added row overrides what has gone before at times when it defines the number of resources but leaves the effect of preceding rows intact at other times.
Click image to expand or minimize.
To a degree it is up to the individual to model either a named single resources or multiple resources under a single resource name (which will appear in the Gantt chart as [Resource Name] (1), [Resource Name] (2) etc. However, if a learning function is to be applied dependent on the number of wells acted on by a set of resources, it is convenient to have that set of resources grouped under a single name to simplify the use of @DrillOrderResource in the learning function.
Other Examples
Template Wells
A template well is a typical forecast for a certain type of well in a specific area. Template wells are copied by the scheduler and all data they contain will apply to the new well by default. Alternatively, each well can have unique data as specified in the well list. A well generated from a template well will not be manually editable, as it is recreated every time the project is calculated and the scheduler is run. Generated wells will display with red labels in the Network tab following calculation.
Template wells are typically static assets (black font), that are excluded from calculations (X through them). There is no limit to how many template wells you can use in your drilling program.
Seasonality
If the date window is Jan-March and max job = 0, then the resource will be available every year of the project life during the period of January to March.
If the date window is Jan-March, Repeat is = 5 and max job = 10, then the resource will be available for 5 years (January to March), or 10 jobs - whichever is met first.
Lease Access (Hunting Restrictions)
To create an overall window where activity is restricted by something like Hunting Restrictions, the setup would be as follows:
- Create a work type called "Lease Access".
- Create a resource for each restriction e.g., "Hunting Restriction A".
- Make that resource an unlimited resource.
- Put in a seasonality window (as in the example above) for the restriction.
- In the step schedule, specify a second resource for each step in the plan that refers to the required resource (e.g., "Hunting Restriction A").
- When you calculate the project, the hunting window must be available for each step in the task for that step to complete.
Specifying Local Resources
Local (dedicated) resources can be specified at the program level for drilling programs. See Creating a Drilling Program for more information.
Resource Selection in Calculations
As the calculation proceeds on a day by day basis, each task in turn will ask for the resources that it requires to start.
A task will get assigned a specific resource for the duration of its work period according to the following rules:
- If a specific resource is requested, then only that resource may be assigned to that task.
- If a general work type has been requested, then any resource that meets that work type may be assigned. The program will hand out resources that are not referenced specifically by any well task first. This helps to ensure that if Well #1 can be drilled with any type of Drilling Rig, but Well #2 requires a specific rig Deep Sea Rig, resources definitely required for some tasks are not given out when another resource can do the job.
- A task will request a resource for each of its phases or steps separately. For example, a rig with a Drilling Step and a Completion Step will request a drilling rig, and AFTER the drilling is done, it will then request the next available completion rig.
Using Resources in a Task
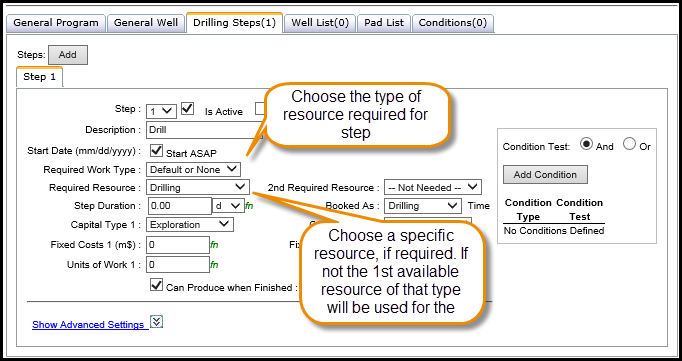
When you create a new task, you can specify work types and, if necessary, specific resources required for each step or phase of the task. The following example looks at a drilling schedule which specifies a drilling rig as a required resource. Multiple steps could be added to break the program into separate pieces such as drill, complete, frac and tie in.
Click image to expand or minimize.
Using a Dedicated Resource, Versus 1st Available
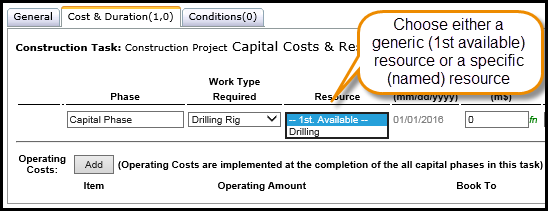
A generic work type for a step (such as "Drilling ") can be specified together with "--1st Available". This combination will choose the first resource available which is capable of this work type. Alternately, you may want a specific rig (perhaps one that has been drilling a certain well profile). You can specify to use only a specific rig by naming it as the required resource. E.g., you might select Precision 11 from the list above as a specific resource for this step. See above on "Resource Selection" where a task can choose between a specific and generic resource.
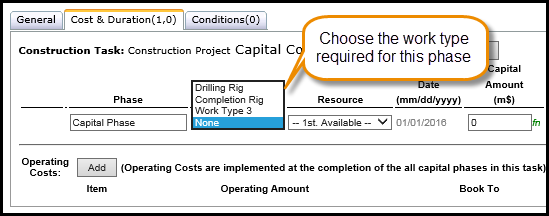
Resources can also be used for more generic tasks such as facility construction. The following facility construction task shows the selection of the resource as part of its capital phase. An example here might be a Pipeline crew required for a well tie in. You can choose the work type required in the first drop down, then you can select the first available work type, or select a specific named resource.
Click image to expand or minimize.
Click image to expand or minimize.
