Export to Cloud Storage
In Enersight 2.17 we have introduced the capability to export results data from a PDS directly to your existing Snowflake Stage as well as Azure Blob Storage and Amazon S3 Cloud Object Storage. This documentation page describes how to set up a connection and data profiles, the data structure, how to add additional metadata fields to your export, and how the export process works.
Overview
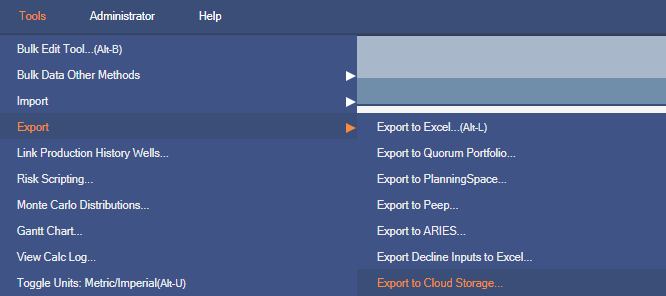
In the Tools > Export menu there is a new option to Export to Cloud Storage. This opens a configuration window where administrators can define Data Profiles that determine which tables will be exported as well as Metadata fields that will be written to a metadata file along with the export. An administrator must also set up a connection to your company's Cloud Storage instance. When performing an export, the user chooses the PDS and Version from which to export data, selects an existing data profile to use, fills out the metadata fields for this particular export job and then completes the export.
Exporting Data - The Export Job Tab
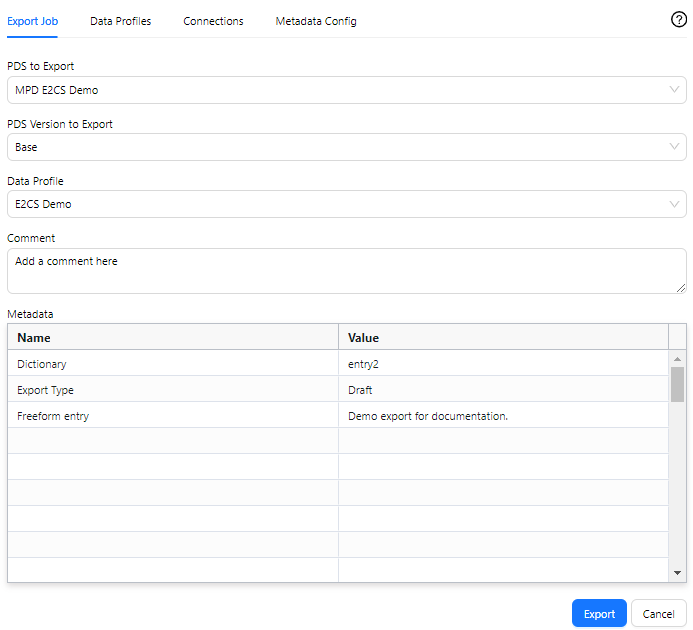
The Export Job tab is where a user can actually send data from a PDS Version to an existing Snowflake Stage, Azure Blob, or Amazon S3 bucket. On this tab, you choose an existing PDS, the corresponding Version from which you want to send data, and an existing Data Profile. Data Profiles must be set up by a user with CompanyAdmin Access Rights and determine which tables of data are exported (more on Data Profile configuration below) as well as the connection information, including the destination could storage stage/bucket/folder name. Additionally, you can enter a comment that will be sent along with the exported data - it will be written into the Metadata.json file as part of the export job.
Click image to expand or minimize.
You will also see a Metadata table on the Export Job tab. The 'Names' in this table are configured by an Administrator in the Metadata Configuration tab (more on this below) but the user exporting data can change the values that will accompany the exported data. All Names and Values will be written to the Metadata.json file as part of the export job. Some Metadata fields use Company Level User Defined Data fields that are Dictionaries - these appear as dropdown lists in the Metadata table. Others will be freeform fields where you can type any value.
Export
After selecting a PDS, Version, Data Profile, and filling out any relevant Metadata values, click Export. If everything is set up correctly, Enersight will connect to the specified cloud storage instance and begin exporting data. A log will start running at the bottom of the Export Job tab showing which tables are being processed and exported and a completion message will appear when the export is finished. You will also get an estimate of the amount of data that was sent as well as the export_id (at the beginning of the log).
In Snowflake/Azure/s3, a folder will be created in the specified stage/blob/bucket with the naming convention Date_Export_ID (e.g., @myjsonstage/2024-06-17T16-06-44_3c41badc-9aab-47c3-b70f-2e14a347106c) that contains a .json.gz file for each of the tables selected in the Data Profile as well as a Metadata.json.gz file and a Job_Summary.json.gz file. The Job_Summary file is written last, so if this is present in the cloud folder, it's an indicator that the export has succeeded.

Click image to expand or minimize.
If you see an error similar to the screenshot below when exporting, it is most likely due to an incorrect connection configuration. Double check with your administrator that the connection you are using has been set up correctly (more information on setting up a connection below).

Configuration
This section describes how to set up the necessary elements for a successful export to cloud storage. Note that only users with CompanyAdmin Access Rights can edit Data Profiles, Connections, and Metadata Configuration but all users can view them.
Data Profiles
A Data Profile is used to select:
- Which Connection is used to export data. See the Connection section below for more information on setting up a Connection.
-
The destination:
- Snowflake Stage
- You can append a folder name to the stage for data organization, e.g., @mySnowflakeStage/myfolder is a valid Stage definition.
- The Stage name should start with @, but Enersight will add one during the export process if it is missing.
- AWS S3 Bucket Name and Path
- Azure Blob Container and Path
- Snowflake Stage
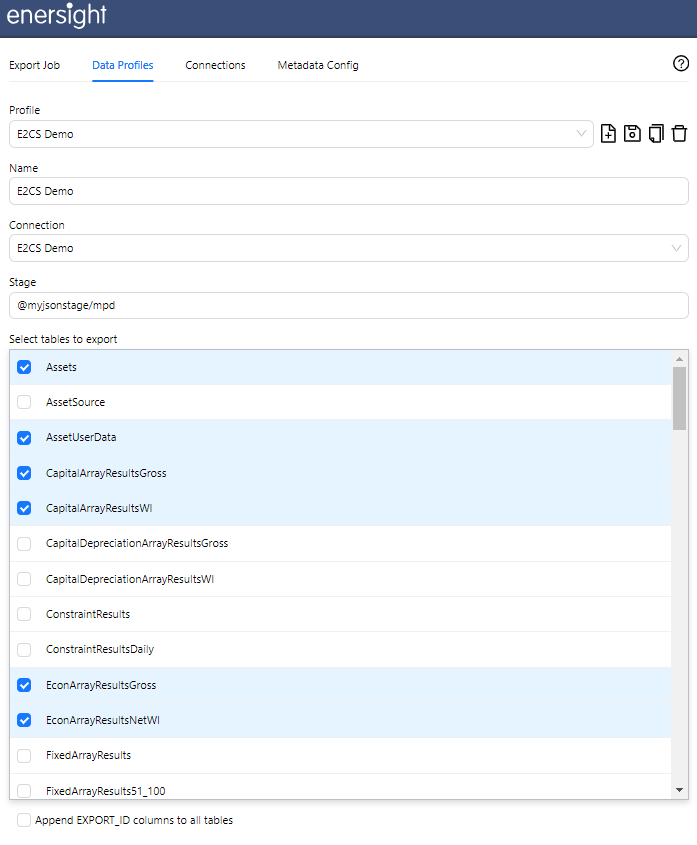
- The data tables that will be exported.
Click image to expand or minimize.
A company can have many different Data Profiles from which a user can choose, each having different sets of data tables selected or pointing to a different cloud storage instance.
To create a new Data Profile, click the New Profile button next to the Profile dropdown. You can then enter a name, choose a connection, enter a destination stage/bucket/blob container and select which data tables to export. Click the Save icon next to the Profile dropdown to save your changes. An existing profile can also be copied using the Copy icon. After copying, be sure to click Save to keep the copied data profile.
The option at the bottom of the Data Profiles tab 'Append EXPORT_ID' columns to all tables will add an additional column to each table that is exported. This column will contain the unique export_id associated with the export job, which in some cases can help to identify a particular export as well as facilitate joining tables for particular exports when data is pushed to BI tools. Enabling this option will slightly increase that amount of data transferred but by a very small amount.
Connections
The Connections tab is where an administrator will configure a connection to your company's cloud storage instance. Credentials are saved securely and users can then use an existing connection to export data to Snowflake, Azure Blob, or AWS S3 without knowing the credentials used to connect.
Similar to Data Profiles, you click the New Connection icon next to the Connections dropdown to create a new Connection. You can then give it a unique name. The three Connection Types currently available are Snowflake, AWS S3, and Azure Blob.
Be sure to click the Save icon to save changes to the Connection after renaming or modifying Authentication Fields.
Authentication Fields
Snowflake
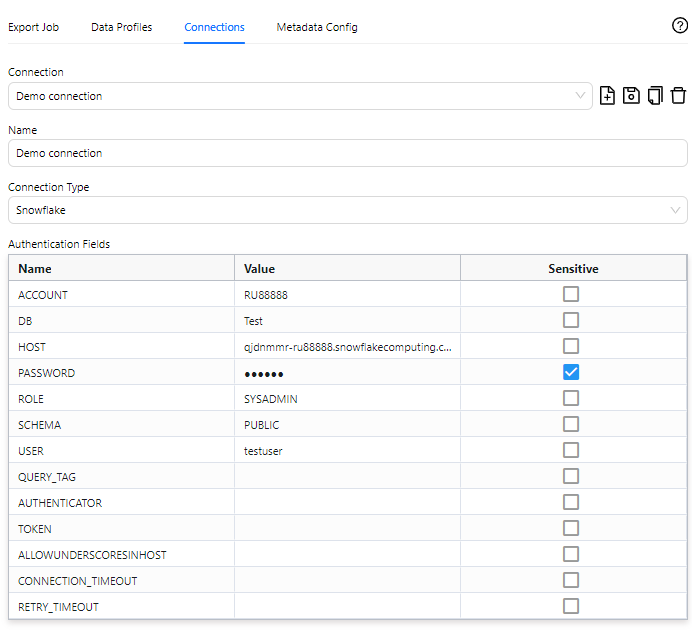
The authentication fields required depend on the configuration of your company's Snowflake instance, but below is an example of a typical connection configuration:
Click image to expand or minimize.
- ACCOUNT - can be found in the Account section when you click your user name in the bottom left of the Snowflake Web UI.
- DB - the name of the target database for the Enersight export (found in Databases in Snowflake).
- HOST - the host url, which can be provided by your Snowflake administrator. All of the available URls can be found using a SnowSQL query: select system$allowList. Or for a more readable result, use the following query: select value from table(flatten(parse_json(system$allowList())))The SNOWFLAKE_DEPLOYMENT entries are of interest for use with Enersight.
- PASSWORD - the password associated with the user in the USER field.
- ROLE - the role of the user in the USER field (found in the user profile, e.g., SYSADMIN).
- SCHEMA - this is the Schema of the database in the DB field that you wish to use.
- USER - an active Snowflake user with sufficient permissions to write data to the database in the DB field.
Azure Blob
Azure connections can be configured using a Client ID and Client Secret or with User and Password, depending on your Azure Configuration. You will also need your Tenant ID and the name of the storage account.
Here is a connection set up to use a Client ID and Secret:

AWS S3
Amazon S3 connections require the S3 Service URL, Client Key, and Client Secret Key.
Here is an example:

Metadata Configuration
Metadata fields are data fields that will be sent along with the exported data tables, found in the Metadata.json file in the destination folder. These fields will help identify the purpose of a particular data set that is exported to facilitate processing in BI tools after being processed in the cloud storage destination.
In the Metadata Configuration tab, an administrator determines the fields that a user can fill out during an Export Job as well as the default values that will appear when a user starts an Export Job.
There are two types of metadata fields available: Dictionary fields, which will provide a dropdown selection to users, and Freeform entry fields, in which a user can type any value. To add either, start typing in the Name column. If a Name matches an existing Company Level User Data definition that is a Dictionary, you will see the auto-complete options appear. These can be clicked to add them as Metadata fields.
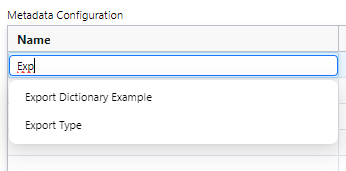
To select a default value for a dictionary field, double click the Default Value input and choose a value from the dropdown.
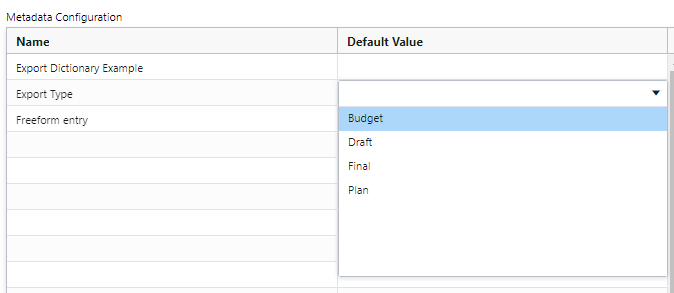
To add a Freeform entry field, type in the name of the field. To add a default value, type it in the Default Value column.
Be sure to Save your Metadata Configuration using the Save button at the bottom right after making any changes.
Export to Cloud APIs
As of Enersight 2.17.2, there is an API available that can trigger an export to Snowflake, an AWS Bucket, or Azure Blob Storage. The API uses an existing connection and data profile that have been defined via the Export to Cloud UI in Enersight.
The API can be reached at: https://odata4.enersight.net/api/dataexportjob/pushdata
The structure of the API call is as follows:
{
"pds": "PDS Name",
"pdsVersion": "PDS Version Name",Export
"profile": "Data Profile Name”,
"cutoffDate": "2025-05-02T13:05:17",
"metadata": {
"MetaDataName1": "MetaDataValue1",
"MetaDataName2": “MetaDataValue2"
}
}
The optional argument cutoffdate (in the format yyyy-mm-ddThh:mm:ss) instructs the API to compare a check on the time the requested PDS was last updated vs the date-time in the provided argument. If the PDS was updated after the provided cutoffdate, full PDS data will be returned. Otherwise, the requested tables will be returned but will be empty.
