
Variables
Most variables in PetroVR are not simply values attached to a name, but include a range of other, more complex features, which provide flexibility as well as enriching the information contained in that variable. Thus, only a few inputs are "bare" values: Wellbore Location coordinates in the Well Details Tab, or single cells in a decline table. Most inputs, however, are PetroVR-style variables, and include the following attributes and options:
- Type: A variable may be a numeric value, a date, a Boolean value or text (a string).
- Dimension: A variable may consist of a single value, an array of values spanning over the simulation periods, or as a double-entry table. See Single-Value, Array and Table Variables.
- Unit: See Units.
- Format: Number of decimals.
- Input mode: How the value is entered (directly, from MS Excel, or as a function). See Input Modes.
- Distributions: Uncertainty associated to a variable value. See Monte Carlo Simulation Operation.
- Excel output: Ability to export variable values to MS Excel during simulation. See further in Excel Output.
- Default value: Predefined value provided by the system.
- Description: Optional text where you can note down additional information such as peculiarities of a variable in a given model, source of the data, logic behind its calculation, etc.
Most variables you will encounter and use while modeling are PVR system variables, already defined in PetroVR and with default values which you can modify. This part of the Help refers mainly to this kind but there are other, special types: User-Defined Variables allow you to create and define inputs besides those provided by the system; Runtime Variables, on the other hand, are internal variables whose values change as the simulation progresses and to which you can refer from the Function Editor.
Variable Editing Area
PVR- and user-defined variables are always presented within a visual context which enables you to access the different options available. This variable editing area consists in a light grey rectangle surrounding the variable's value:
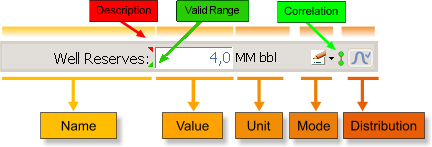
- Name: This is the name to be used for referring to this variable in FML (where the full name is used: see Variable Names below). In User-Defined Variables this name can be modified by using the Rename command; see Variables below.
- Description: When a variable description has been entered, this is marked by a
 small red triangle. The description will also appear when you hover the mouse pointer over the variable area.
 - Valid range: A
 small green triangle indicates that an upper and/or a lower limit to the value the variable can assume has been defined. See Valid Range window.
 - Value: Enter the value for this variable. Sometimes it will not be editable for a variety of reasons: the whole variable may be disabled; its value may be calculated elsewhere; it may be known only after the simulation; or it may be defined as a function or as an Excel input (see Input Modes).
Changes to the value of a variable are applied only after you finish editing it, either by hitting the Enter or Tab keys or by moving the cursor to another part of the interface. Every time a change is applied the following happens:
- The value is validated (e.g., the system checks if a negative value is acceptable there.)
- The change is saved to the change logs.
- Current results become out-of-date until the project is simulated again.
- Other variables calculated as a function of this one are updated.
- Unit: Right-click this area to modify the unit of an individual variable. The pop-up menu shows all available units, i.e. all units compatible with the current one. Use the option Infer unit to let PetroVR deduce the unit from the FML expression of a user variable defined as a function. See Units for more information.
- Mode: The icon shows the current input mode; available options are
 User Input,
  Excel Input and
  Function (see Input Modes). Additionally, if the variable is calculated elsewhere, the icon will appear
  grey, since it is not editable. Click the
  dropdown arrow to switch between modes; clicking on the icon will open the Properties window, the Excel Input window or the Function Editor, depending on the kind of input selected.
 - Correlation: If the probability distribution defined for this variable has been correlated with that of another, this is indicated by this
 icon. See Distribution Correlations.
 - Distribution: By default, the
 red icon indicates that no distribution has been defined for the variable. Click the icon to define a distribution; the deterministic value will still be displayed in the input box but the button will be
  instead. Note that there is no link between the "deterministic" input value and the distribution; see further in Distribution Selection.
Right-clicking on any part of the variable editing area except the unit area will display the variables menu.
In a new project, all variables start with a default value, marked with a teal background color:

You can always restore a variable's default value by selecting Reset to default value; see Variables.
Some combinations of inputs can cause variables to become calculated, i.e. their values will be the result of an internal calculation based on the current value of other variables, and so will no longer be editable. A typical example is the Expected Start Date of a job shown in the Scheduling Pane, which is calculated based on the scheduling inputs entered. Also, by selecting Trap Volumetrics as reservoir calculation method, the Oil in Place becomes calculated from Reservoir Area and Volumetrics data. In such cases, the whole area is no longer editable and marked with a grey icon:

In some few cases a label Known as a result of running the Simulation appears where you would expect to find an input variable. This means that the variable is not only calculated but calculated during the simulation, so that no meaningful value can be provided before.
A variable can appear as disabled when it is edited somewhere else and not in the current screen. This happens in the Well Drilling Info Tab, Well Completion Info Tab and the Well Performance Tab, when the well belongs to a group. In these cases you must go to the group in order to edit these variables (see Well Groups). The whole area of disabled variables appears grey:

Variables can also be edited in the Plan Variables Tree, where other options for changing parameters are provided, as well as more detailed viewing tools.
Variable Names
Variables in PetroVR are characterized by having an identifying name. Since all variables are always associated to an object, this name is always composed of the name of the object plus the specific name indicating the kind of variable. Thus, the full name of the Initial Rate variable of well Devonian P1 in reservoir Devonian A is:
Well Completion: Devonian A: Devonian P1: Initial RateHowever, in the context of well Devonian P1 (for example, in the Well Details Tab of that well), "Initial Rate" suffices to make it clear what variable is being referred to, and so it is the only name displayed in the Variables. In other contexts, where several variables are displayed at the same time and it becomes necessary to distinguish them from one another, use of the whole name is mandatory. Some of the places where full variable names are used are:
- The Function Editor.
- The various Change Browsers.
- The Distributions list in the Monte Carlo window.
- Trees such as the Plan Variables Tree or the
 PetroVR Plan Variables window in the Function Editor, where the hierarchical arrangement may assist you when defining functions.
Commands Available (Variables)
The following commands are available by right-clicking the variable editing area:
 References: Browse and inspect all variables defined as functions which make reference to this one.
- Unit: Change the current unit to any of the available alternative units.
- Format: Define the number of decimal places used to display the variable value.
 Edit Properties: Open a properties window where you can change at the same time description, unit type, unit and format. If the variable is defined as a function, the Function Editor will appear instead.
- Valid Range: Open the Valid Range window to set an upper and a lower limit to the value the variable can assume.
- Description: Enter or edit the variable description.
 Duplicate: Duplicate the variable (only in User-Defined Variables).
 Delete: Delete the variable (only in User-Defined Variables).
- Rename: Rename the variable (only in User-Defined Variables).
- Tags

- Tag as Result: Add this variable to the results included in the
- Results Window. See Tagging Variables as Results.
- Excel Output / Clear Excel Output: Enable/disable Excel Output for this variable.
 Tag as Key Input: Add this variable to the Key Inputs that can be edited in published projects. See Publishing PetroVR Projects.
 Copy: Copy the selected variable. Copied variables can be pasted elsewhere in a variety of ways: the
  Paste command (below) will paste only the bare value into another variable; with Paste Special (below) you can choose what other attributes will be pasted, and Paste variable in The User Tab allows you to create a new user-defined variable identical to the one copied.
- Paste: Paste the content of the clipboard into the variable value.
- Paste Special: Selectively paste the content of the clipboard, optionally including value, unit, format, function expression and distribution.
- Reset to default value: Change the value of the variable back to the system default.
- Changes: Browse the list of changes made to this variable. See Tracking Changes.
- You can also drag-and-drop a user-defined variable to another object of the model object tree to move it. If you do this while pressing the CTRL key you can create a copy. All FML expressions referencing the variable are automatically updated.
When editing array or table variables, other specific commands are also available; see Single-Value, Array and Table Variables and Working with Tables.
![]() How do I know if a variable is referenced elsewhere?
How do I know if a variable is referenced elsewhere?